Introduction
Let me tell you about Black Forest Cheesecake—it’s like a slice of heaven that brings together all the best elements of the classic German dessert! If you’re a fan of rich, creamy cheesecake and love the combination of chocolate and cherries, this is a must-try.
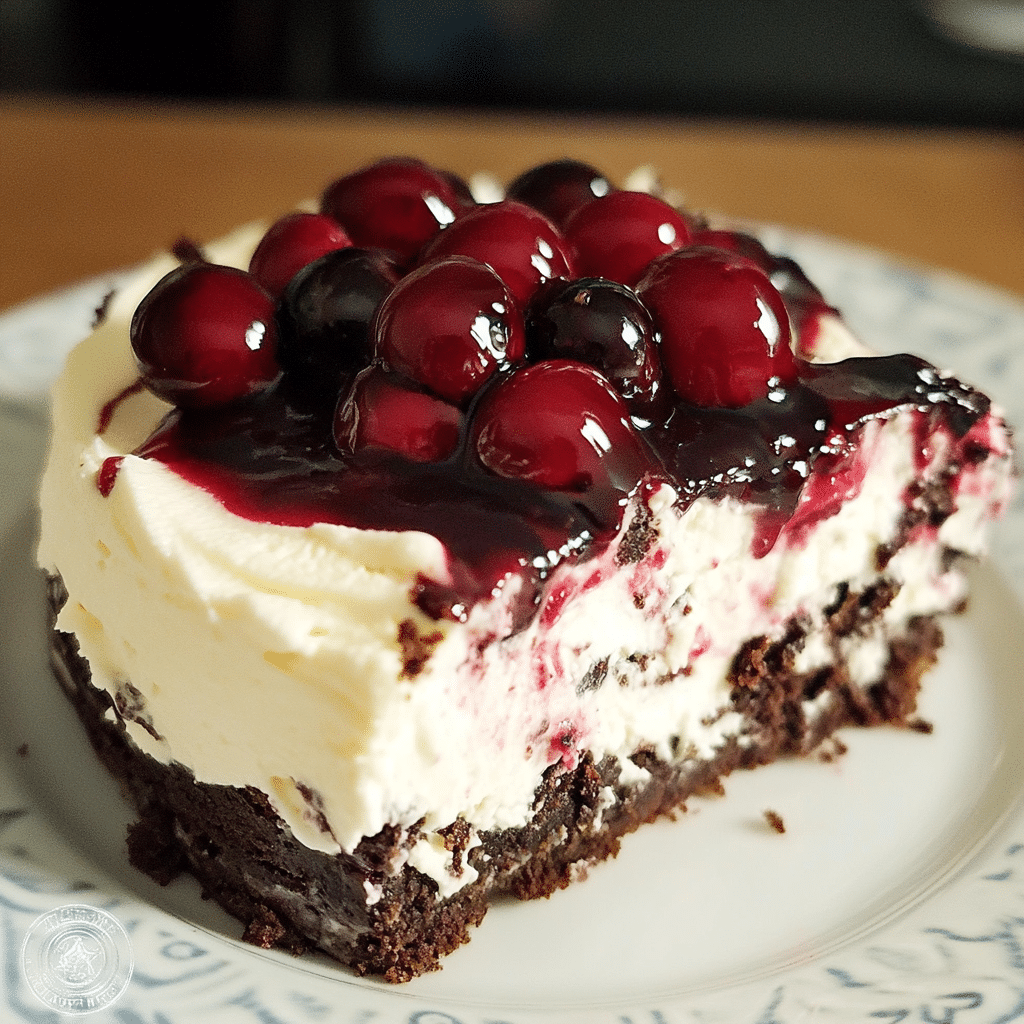
The first time I made this cheesecake, I was hosting a dinner party and wanted to impress my guests. I mean, who can resist a dessert that combines a smooth, velvety cheesecake with a crunchy chocolate crust? The crust adds such a nice texture, contrasting perfectly with the creamy filling. And let’s not forget the star of the show: that luscious cherry topping! It’s sweet, tangy, and just the right amount of fruity to balance the richness of the cheesecake.
I’ve found that this cheesecake is perfect for special occasions, whether it’s a birthday, an anniversary, or just a cozy family gathering. It looks so beautiful when you slice into it, with those vibrant cherries sitting on top of the creamy cheesecake—it’s definitely a showstopper.
What I love most is how easy it is to make, even though it looks so impressive! You can prep it ahead of time and let it chill in the fridge, which makes it a fantastic option for busy hosts. The moment you serve it, everyone will be in awe, and trust me, they’ll be coming back for seconds! So if you’re looking for a dessert that’s guaranteed to wow, give this Black Forest Cheesecake a shot. It’s a deliciously decadent treat that will definitely leave your guests craving more!
Why You’ll Love This Recipe
Here’s why Black Forest Cheesecake will quickly become a favorite:
- Decadent Flavor Combination: The rich creaminess of the cheesecake perfectly balances the tartness of the cherries and the deep chocolate flavor, creating an indulgent dessert.
- Stunning Presentation: With its beautiful layers of chocolate, cream, and cherries, this cheesecake makes an impressive centerpiece for any gathering.
- Unique Twist on a Classic: Combining the beloved Black Forest cake with creamy cheesecake offers a delightful new take on a classic dessert.
- Perfect for Celebrations: Whether for birthdays, anniversaries, or holidays, this cheesecake adds a touch of elegance and festivity to any occasion.
- Easy to Make: With straightforward steps and simple ingredients, you can create this showstopper dessert without any complicated techniques.
- Rich and Satisfying: A little goes a long way; each slice is so rich and satisfying that it’ll leave your sweet tooth content.
- Great for Chocolate Lovers: If you’re a chocolate enthusiast, this cheesecake will surely satisfy your cravings with its rich cocoa flavor.
- Can Be Made Ahead: Prepare it a day in advance for hassle-free entertaining; the flavors deepen and improve overnight.
- Customizable Toppings: Feel free to experiment with toppings like whipped cream, chocolate shavings, or even nuts to suit your taste.
- Fun to Slice and Serve: Watching the layers reveal themselves when you slice into the cheesecake is always a delight for your guests.
Preparation Time and Servings
- Total Time: 6 hours (including chilling time)
- Servings: 10 servings
- Calories per serving: Approximately 450 calories
- Key Nutrients: Protein: 7g, Carbohydrates: 45g, Fat: 30g
Ingredients
Here’s what you’ll need for Black Forest Cheesecake:
For the Chocolate Crust:
- 1 1/2 cups chocolate cookie crumbs (such as Oreo)
- 1/2 cup unsalted butter, melted
- 1/4 cup granulated sugar
Cheesecake Filling:
- 3 (8 oz) packages cream cheese, softened
- 1 cup granulated sugar
- 1 teaspoon vanilla extract
- 3 large eggs
- 1 cup sour cream
- 1/4 cup unsweetened cocoa powder
Cherry Topping:
- 2 cups fresh or frozen cherries, pitted
- 1/2 cup granulated sugar
- 1 tablespoon cornstarch
- 1 tablespoon lemon juice
- 1/4 cup water
Ingredient Highlights
- Cream Cheese: The base for the cheesecake, providing richness and creaminess.
- Chocolate Cookie Crumbs: Create a deliciously rich crust with chocolate flavor.
- Cherries: Fresh or frozen cherries add a burst of flavor and natural sweetness.
- Unsweetened Cocoa Powder: Intensifies the chocolate flavor in the cheesecake.
- Sour Cream: Adds tanginess and helps achieve a creamy texture.
Step-by-Step Instructions
Follow these steps to create a delicious Black Forest Cheesecake:
Prepare the Chocolate Crust
- Preheat your oven to 350°F (175°C). In a mixing bowl, combine chocolate cookie crumbs, melted butter, and sugar until well mixed. Press the mixture firmly into the bottom of a 9-inch springform pan to form an even crust.
Bake the Crust
- Bake the crust for 10 minutes, then remove from the oven and allow it to cool while you prepare the filling.
Make the Cheesecake Filling
- In a large mixing bowl, beat the softened cream cheese and sugar until smooth and creamy. Add the vanilla extract, then incorporate the eggs one at a time, mixing well after each addition.
Add Sour Cream and Cocoa Powder
- Gently fold in the sour cream and cocoa powder until fully combined, ensuring there are no lumps.
Pour Filling into Crust
- Pour the cheesecake filling into the cooled chocolate crust, smoothing the top with a spatula. Tap the pan lightly on the counter to remove any air bubbles.
Bake the Cheesecake
- Bake in the preheated oven for 55-60 minutes or until the center is set but slightly jiggly. Turn off the oven and let the cheesecake cool in the oven with the door ajar for 1 hour.
Cool and Chill
- Remove the cheesecake from the oven and let it cool completely at room temperature. Once cooled, cover it with plastic wrap and refrigerate for at least 4 hours or overnight for best results.
Prepare the Cherry Topping
- In a saucepan over medium heat, combine cherries, sugar, cornstarch, lemon juice, and water. Cook for 5-7 minutes, stirring gently until the cherries are soft and the mixture thickens. Remove from heat and let it cool.
Top the Cheesecake
- Once the cheesecake is thoroughly chilled, remove it from the springform pan. Spoon the cooled cherry topping over the cheesecake, spreading it evenly.
Serve the Cheesecake
- Slice the cheesecake with a sharp knife, wiping the blade between slices for clean cuts. Serve chilled, garnished with whipped cream if desired.
How to Serve
Here are some great ways to enjoy Black Forest Cheesecake:
- Classic Presentation: Serve slices on individual dessert plates, garnished with a dollop of whipped cream for a traditional touch.
- Cherry Topping: Top each slice with a spoonful of cherry pie filling or fresh cherries to enhance the Black Forest flavor.
- Chocolate Shavings: Sprinkle chocolate shavings or curls over the cheesecake for an elegant and indulgent garnish.
- With Ice Cream: Offer a scoop of vanilla or chocolate ice cream on the side for a delightful contrast in temperature and texture.
- Pair with Coffee: Serve alongside a cup of freshly brewed coffee or espresso to complement the rich flavors of the cheesecake.
- Add Fresh Berries: Garnish with fresh raspberries or strawberries for a burst of color and additional fruitiness.
- Serve with Whipped Cream: Offer extra whipped cream in a bowl on the side for guests to add as much as they like.
- Create a Dessert Board: Arrange slices of cheesecake alongside other desserts, such as brownies or cookies, for a festive dessert board.
- Individual Portions: Cut the cheesecake into smaller squares or mini tartlets for a fun, bite-sized serving option at parties.
- Decorative Plate: Drizzle chocolate or cherry sauce on the plate before placing the slice of cheesecake for an attractive presentation.
Additional Tips
To make the most of your Black Forest Cheesecake, consider these tips:
- Use High-Quality Ingredients: Opt for high-quality dark chocolate and fresh cherries to enhance the flavors of your cheesecake.
- Chill Thoroughly: Allow the cheesecake to cool completely before refrigerating it. Chilling overnight improves the texture and flavor.
- Room Temperature Ingredients: Make sure your cream cheese, eggs, and sour cream are at room temperature for a smoother batter and easier mixing.
- Avoid Overmixing: When incorporating the eggs into the batter, mix just until combined to prevent the cheesecake from cracking during baking.
- Water Bath Method: Consider baking your cheesecake in a water bath to help regulate the temperature and create a creamy texture without cracks.
- Garnish Generously: Top the cheesecake with whipped cream and chocolate shavings right before serving for an eye-catching presentation.
- Cherries on Top: Use both fresh and jarred cherries for decoration—fresh for garnish and jarred for a sweet, syrupy layer inside.
- Make Ahead: This cheesecake can be made a day or two in advance, making it a perfect choice for entertaining or special occasions.
- Serving Temperature: Let the cheesecake sit at room temperature for about 15-20 minutes before serving for the best flavor and texture.
- Customize Your Crust: Experiment with different crusts, like crushed Oreo cookies or a nut-based crust, to add a unique twist to your Black Forest Cheesecake.
Recipe Variations
Here are some fun variations for Black Forest Cheesecake:
- Chocolate Cookie Crust: Substitute the traditional graham cracker crust with crushed chocolate cookies for an extra chocolatey base.
- Cherry Variations: Use different fruits like raspberries or strawberries instead of cherries for a unique twist on the classic flavor.
- White Chocolate Drizzle: Drizzle melted white chocolate over the top of the cheesecake for a sweet contrast to the dark chocolate.
- Nutty Flavor: Incorporate finely chopped nuts, like walnuts or pecans, into the crust for added texture and flavor.
- Maraschino Cherries: Instead of fresh cherries, use maraschino cherries for a sweeter, more syrupy topping.
- Mocha Infusion: Add espresso powder or coffee liqueur to the cheesecake filling for a rich mocha flavor.
- Vegan Option: Create a vegan version using dairy-free cream cheese, coconut milk, and a nut-based crust for a delicious alternative.
- Layered Version: Create a layered cheesecake by adding a layer of cherry filling in the middle of the cheesecake.
- Cheesecake Bars: Transform the cheesecake into bars for easier serving; just adjust the baking time for a thinner, more portable dessert.
- Mini Cheesecakes: Make individual-sized mini cheesecakes using a muffin tin for a fun, portion-controlled treat.
Freezing and Storage
Here’s how to store and freeze your Black Forest Cheesecake:
- Storage: Keep the cheesecake covered in the refrigerator for up to 5 days.
- Freezing: Freeze slices in airtight containers for up to 2 months. Thaw in the refrigerator before serving.
Special Equipment
Consider these kitchen tools to make Black Forest Cheesecake with ease:
- Springform Pan: Essential for baking and easily removing the cheesecake without damaging its shape.
- Mixing Bowls: Various sizes for mixing the cheesecake batter and preparing the cherry topping.
- Electric Mixer: Ideal for blending the cream cheese and sugar until smooth and creamy.
- Rubber Spatula: Useful for scraping down the sides of the bowl and folding in whipped cream.
- Measuring Cups and Spoons: For accurate measurement of ingredients like flour, sugar, and cocoa powder.
- Baking Sheet: To catch any potential drips from the springform pan while baking.
- Food Processor or Blender: Great for finely crushing graham crackers or chocolate cookies for the crust.
- Piping Bag and Tips: Optional, but perfect for decorating the cheesecake with whipped cream.
- Small Saucepan: For heating the cherries and making the cherry topping.
- Cooling Rack: To allow the cheesecake to cool evenly after baking, preventing sogginess.
These tools will help ensure your Black Forest Cheesecake turns out perfectly!
FAQ Section
Here are answers to some common questions about Black Forest Cheesecake:
- Can I use canned cherries?
Yes, canned cherries work well; just drain and rinse before using. - How do I prevent cracks in my cheesecake?
Bake at a lower temperature and avoid overmixing to minimize cracks. - What if I don’t have sour cream?
Greek yogurt can be used as a substitute for sour cream. - Can I make this cheesecake gluten-free?
Yes, use gluten-free chocolate cookies for the crust. - How should I store leftovers?
Cover and refrigerate leftovers for up to 5 days.
Black Forest Cheesecake Recipe
- Total Time: 6 hours
Ingredients
For the Chocolate Crust:
- 1 1/2 cups chocolate cookie crumbs (such as Oreo)
- 1/2 cup unsalted butter, melted
- 1/4 cup granulated sugar
For the Cheesecake Filling:
- 3 (8 oz) packages cream cheese, softened
- 1 cup granulated sugar
- 1 teaspoon vanilla extract
- 3 large eggs
- 1 cup sour cream
- 1/4 cup unsweetened cocoa powder
For the Cherry Topping:
- 2 cups fresh or frozen cherries, pitted
- 1/2 cup granulated sugar
- 1 tablespoon cornstarch
- 1 tablespoon lemon juice
- 1/4 cup water
Instructions
Prepare the Chocolate Crust
- Preheat your oven to 350°F (175°C). In a mixing bowl, combine chocolate cookie crumbs, melted butter, and sugar until well mixed. Press the mixture firmly into the bottom of a 9-inch springform pan to form an even crust.
Bake the Crust
- Bake the crust for 10 minutes, then remove from the oven and allow it to cool while you prepare the filling.
Make the Cheesecake Filling
- In a large mixing bowl, beat the softened cream cheese and sugar until smooth and creamy. Add the vanilla extract, then incorporate the eggs one at a time, mixing well after each addition.
Add Sour Cream and Cocoa Powder
- Gently fold in the sour cream and cocoa powder until fully combined, ensuring there are no lumps.
Pour Filling into Crust
- Pour the cheesecake filling into the cooled chocolate crust, smoothing the top with a spatula. Tap the pan lightly on the counter to remove any air bubbles.
Bake the Cheesecake
- Bake in the preheated oven for 55-60 minutes or until the center is set but slightly jiggly. Turn off the oven and let the cheesecake cool in the oven with the door ajar for 1 hour.
Cool and Chill
- Remove the cheesecake from the oven and let it cool completely at room temperature. Once cooled, cover it with plastic wrap and refrigerate for at least 4 hours or overnight for best results.
Prepare the Cherry Topping
- In a saucepan over medium heat, combine cherries, sugar, cornstarch, lemon juice, and water. Cook for 5-7 minutes, stirring gently until the cherries are soft and the mixture thickens. Remove from heat and let it cool.
Top the Cheesecake
- Once the cheesecake is thoroughly chilled, remove it from the springform pan. Spoon the cooled cherry topping over the cheesecake, spreading it evenly.
Serve the Cheesecake
- Slice the cheesecake with a sharp knife, wiping the blade between slices for clean cuts. Serve chilled, garnished with whipped cream if desired.
Nutrition
- Serving Size: 10 servings
- Calories: 450 kcal
- Fat: 30g
- Carbohydrates: 45g
- Protein: 7g
Conclusion
Black Forest Cheesecake is an indulgent dessert that beautifully combines the rich flavors of chocolate, tart cherries, and creamy cream cheese into a heavenly treat. With its stunning layers and luscious topping, this cheesecake not only looks impressive but also delivers a delightful taste experience that will leave everyone wanting more.
Perfect for any occasion, whether it’s a holiday gathering, a special celebration, or simply a sweet indulgence at home, this dessert is sure to be a showstopper. The creamy texture, paired with the chocolatey crust and vibrant cherry topping, creates a symphony of flavors that is irresistible.
Give this recipe a try and savor the rich flavors of this decadent cheesecake. I can’t wait to see how your Black Forest Cheesecake turns out! Don’t forget to snap a photo and tag me on social media—I love seeing your delicious creations! Happy baking!

