
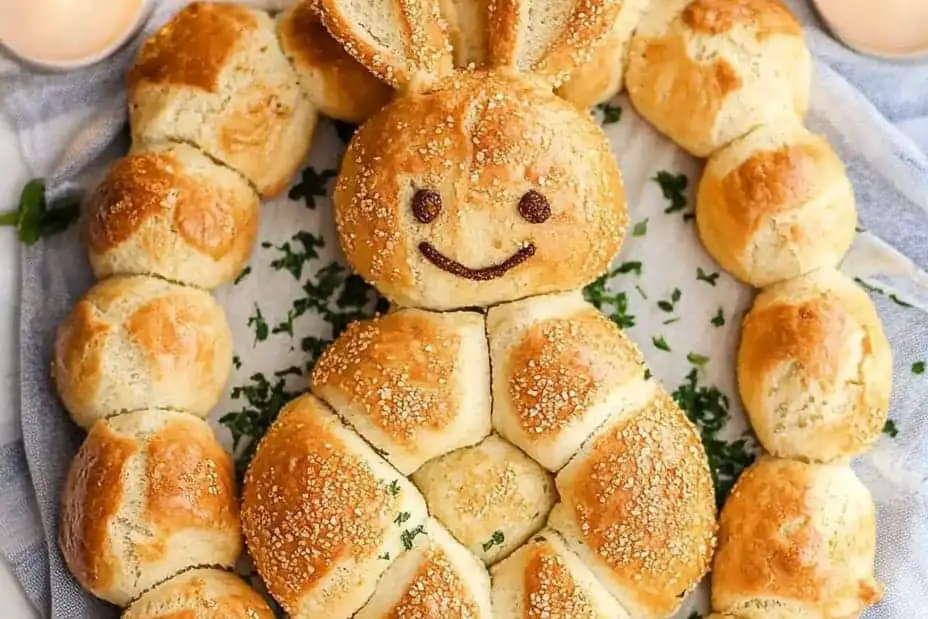

Easter Bunny Pull Apart Bread is a wonderful springtime treat that brings joy to any festive gathering. This delightful twist on traditional sweet bread captures the essence of Easter with its charming bunny shape. The fluffy, pillowy bread is perfect for sharing among family and friends, making it a great centerpiece for celebrations. With its tempting aroma and scrumptious flavor, this whimsical creation is sure to impress your guests, kids, and even those who might not usually indulge in sweet breads!
Imagine this: a table adorned with vibrant colors and spring motifs, and at the center is a beautifully baked Easter Bunny Pull Apart Bread. Each piece is inviting, tempting everyone to pull apart a fluffy piece and enjoy its delectable flavor. This treat not only tastes amazing but also creates wonderful memories as you gather around with your loved ones.
In this article, we will explore the magic of making Easter Bunny Pull Apart Bread. From the reasons why you’ll love this recipe to the step-by-step instructions, we have everything laid out for you. It doesn’t matter if you’re a novice baker or someone with more experience; this bread is a fun addition to your Easter festivities. Let’s jump right into it!
Why You’ll Love This Recipe
Easter Bunny Pull Apart Bread has several qualities that make it an appealing choice for your holiday baking. Here are some reasons why you’ll adore this recipe:
1. Fun for Everyone: Shaping the bread into a bunny is exciting, especially for kids. It becomes a fun family activity that encourages participation from everyone.
2. Customization Options: You can make this bread your own by altering the fillings. Try using chocolate, cinnamon, or fruit preserves to suit your families’ taste.
3. Perfect for Sharing: This pull apart bread is meant to be shared. Its design encourages interaction, allowing everyone to break off a piece while seated together.
4. Fluffy and Delicious: The texture is incredibly soft and airy, providing a delightful contrast to its sweet flavor. It’ll have everyone diving back for seconds.
5. Festive Presentation: The playful bunny shape makes it ideal for Easter brunch or as a treat for kids. Its unique design adds a festive touch to your table.
6. Simple Ingredients: Most ingredients are common pantry staples, meaning you won’t need to search high and low for special items.
7. Memorable Experience: Sharing and enjoying the bunny bread creates lasting memories that everyone will cherish long after Easter is over.
These factors alone make Easter Bunny Pull Apart Bread an unforgettable addition to your seasonal celebrations, ensuring it becomes a delightful tradition for years to come!
Preparation and Cooking Time
The preparation of Easter Bunny Pull Apart Bread requires a little time, but the joy that comes from making it is worth every minute! Here’s a handy timeline to help you plan:
– Preparation Time: 30 minutes
– Rising Time: 1 hour
– Baking Time: 25-30 minutes
– Cooling Time: 10 minutes
– Total Time: Approx. 2 hours and 10 minutes
This timeline ensures you have ample time to enjoy the process of creating this lovely bread while also accounting for the necessary rising and baking time.
Ingredients
– 4 cups all-purpose flour
– 1 packet instant yeast (2 ¼ teaspoons)
– ½ cup granulated sugar
– 1 teaspoon salt
– 1 cup milk, warmed
– ½ cup unsalted butter, melted
– 2 large eggs
– 1 teaspoon vanilla extract
– ½ cup chocolate chips or fruit preserves (optional for filling)
– 1 egg (for egg wash)
– Sprinkles or powdered sugar (for decoration, optional)
Step-by-Step Instructions

Creating your own Easter Bunny Pull Apart Bread is easier than you might think! Follow these simple steps to bring your whimsical creation to life:
1. Combine Dry Ingredients: In a large mixing bowl, mix together the flour, sugar, instant yeast, and salt until well combined.
2. Mix Wet Ingredients: In another bowl, combine the warmed milk, melted butter, eggs, and vanilla extract. Whisk together until fully integrated.
3. Combine Mixtures: Gradually pour the wet mixture into the dry ingredients, stirring until a rough dough forms.
4. Knead the Dough: Transfer the dough onto a floured surface and knead for about 8-10 minutes until the dough becomes smooth and elastic.
5. First Rise: Place the dough in a greased bowl and cover it with a damp cloth or plastic wrap. Allow it to rise in a warm place for about 1 hour, or until it doubles in size.
6. Shape the Dough: After rising, punch down the dough and roll it out into a rectangle. Cut it into smaller squares or circles to create bunny shapes. If using fillings, place a bit of chocolate chips or fruit preserves in the center of each piece before folding.
7. Final Rise: Arrange the shaped dough pieces in a greased baking dish, cover, and let them rise again for about 30 minutes.
8. Bake: Preheat your oven to 350°F (175°C). Brush the risen dough with an egg wash for a golden finish, then bake for 25-30 minutes or until golden brown.
9. Cool & Decorate: Allow the bread to cool for 10 minutes in the pan before transferring to a wire rack. Decorate with sprinkles or a dusting of powdered sugar as desired.
By following these steps, you’ll easily create a delightful Easter Bunny Pull Apart Bread that is both visually appealing and delicious!
How to Serve
Serving your Easter Bunny Pull Apart Bread can enhance the experience and make it even more special. Here are some tips for a memorable presentation:
1. Display: Place the bread on a decorative platter or a cake stand to showcase its charming design, making it a centerpiece on your table.
2. Accompaniments: Pair with flavored butter or cream cheese spread for added richness. A side of fresh fruit complements the sweetness.
3. Slice and Share: Encourage everyone to pull apart pieces instead of slicing. This adds to the fun and community spirit of the dish.
4. Beverage Pairing: Serve with a refreshing beverage, such as a fruity lemonade or a warm cup of herbal tea, to balance the sweetness.
5. Themed Decor: Consider integrating festive elements, such as pastel-colored napkins, bunny-themed plates, or flower centerpieces, to enhance your overall Easter theme.
By taking these steps, you can create an inviting atmosphere that encourages sharing and enjoyment of this delightful springtime treat.
Conclusion
Easter Bunny Pull Apart Bread is an incredible way to celebrate the spring season and the joys of Easter. Its whimsical design and delightful flavor make it a treat that’s perfect for people of all ages. With simple ingredients, easy-to-follow instructions, and a fun spirit, this recipe is sure to become a cherished tradition.
Whether you’re gathering with family, hosting an Easter brunch, or delighting kids with a themed treat, this bread brings happiness to the table. So roll up your sleeves and start baking this amazing Easter Bunny Pull Apart Bread today! You’ll be glad you did.
Additional Tips
– Experiment with Flavors: You can adjust the sweetness and flavor by adding vanilla extract or citrus zest to the dough for a unique twist.
– Use a Stand Mixer: A stand mixer with a dough hook can make kneading the dough easier and save your arms from a workout!
– Serve Warm: For a more delightful experience, serve the bunny bread warm from the oven. It enhances the softness and flavor.
– Pair with Dips: Offer a selection of dips like chocolate sauce or a fruit compote to add an interactive element to your serving experience.
– Make Ahead: You can prepare the dough a day in advance. Just follow the recipe until the first rise, then refrigerate it overnight. Let it come to room temperature before forming and baking.
Recipe Variation
Feel free to switch things up! Here are a few variations to try:
1. Savory Version: Instead of sweet fillings, use a blend of cheeses, herbs, and cooked meats for a savory twist.
2. Different Shapes: Shape the dough into different animals or flowers for a fun change from the classic bunny design.
3. Gluten-Free Option: Use a gluten-free all-purpose flour blend to create a delicious gluten-free version without compromising flavor.
4. Seasonal Flavors: Experiment with seasonal additions like pumpkin puree for fall or nutmeg for winter holidays to keep it fresh throughout the year.
Freezing and Storage
– Storage: Keep the Easter Bunny Pull Apart Bread in an airtight container at room temperature for up to 3 days. After that, it may start to dry out.
– Freezing: You can freeze the bread for up to 3 months. Wrap it tightly in plastic wrap and then foil to minimize freezer burn. Thaw at room temperature before serving.
Special Equipment
You will need a few essential tools to prepare the Easter Bunny Pull Apart Bread successfully:
– Large mixing bowls
– Rolling pin for shaping the dough
– Baking dish or tray for rising and baking
– Plastic wrap or a damp cloth for covering the dough
– Pastry brush for the egg wash
Frequently Asked Questions
Can I make this bread gluten-free?
Yes, substitute the all-purpose flour with a gluten-free flour blend to make it gluten-free.
How do I know when the bread is fully baked?
You can check for doneness by inserting a toothpick into the center. If it comes out clean or with a few crumbs, it’s ready.
Can I prepare the dough ahead of time?
Absolutely! Prepare the dough the day before and let it rise in the fridge. Shape it and bake the next day.
What can I serve alongside the bunny bread?
It pairs well with jams, flavored butters, or even a sweet cream cheese spread for added indulgence.
Why did my bread not rise?
Ensure that your yeast is fresh and that the liquids used in the recipe are warm but not hot. Too hot can kill the yeast, while too cold may not activate it.
Conclusion
Easter Bunny Pull Apart Bread is a whimsical springtime treat that elevates any gathering with its delightful appearance and comforting flavor. With simple ingredients and fun shaping opportunities, this bread isn’t just a recipe but an experience to cherish with family and friends. Whether enjoyed during an Easter brunch or at family gatherings, its charm and versatility promise laughter and joy, making it a treasured tradition for years to come. So gather your loved ones, and let the fun of creating this delightful bread begin!
Easter Bunny Pull Apart Bread: An Incredible 7-Step Recipe

- Prep Time: 30 minutes
- Cook Time: 25-30 minutes
- Total Time: 0 hours
Ingredients
– 4 cups all-purpose flour
– 1 packet instant yeast (2 ¼ teaspoons)
– ½ cup granulated sugar
– 1 teaspoon salt
– 1 cup milk, warmed
– ½ cup unsalted butter, melted
– 2 large eggs
– 1 teaspoon vanilla extract
– ½ cup chocolate chips or fruit preserves (optional for filling)
– 1 egg (for egg wash)
– Sprinkles or powdered sugar (for decoration, optional)
Instructions
Creating your own Easter Bunny Pull Apart Bread is easier than you might think! Follow these simple steps to bring your whimsical creation to life:
1. Combine Dry Ingredients: In a large mixing bowl, mix together the flour, sugar, instant yeast, and salt until well combined.
2. Mix Wet Ingredients: In another bowl, combine the warmed milk, melted butter, eggs, and vanilla extract. Whisk together until fully integrated.
3. Combine Mixtures: Gradually pour the wet mixture into the dry ingredients, stirring until a rough dough forms.
4. Knead the Dough: Transfer the dough onto a floured surface and knead for about 8-10 minutes until the dough becomes smooth and elastic.
5. First Rise: Place the dough in a greased bowl and cover it with a damp cloth or plastic wrap. Allow it to rise in a warm place for about 1 hour, or until it doubles in size.
6. Shape the Dough: After rising, punch down the dough and roll it out into a rectangle. Cut it into smaller squares or circles to create bunny shapes. If using fillings, place a bit of chocolate chips or fruit preserves in the center of each piece before folding.
7. Final Rise: Arrange the shaped dough pieces in a greased baking dish, cover, and let them rise again for about 30 minutes.
8. Bake: Preheat your oven to 350°F (175°C). Brush the risen dough with an egg wash for a golden finish, then bake for 25-30 minutes or until golden brown.
9. Cool & Decorate: Allow the bread to cool for 10 minutes in the pan before transferring to a wire rack. Decorate with sprinkles or a dusting of powdered sugar as desired.
By following these steps, you’ll easily create a delightful Easter Bunny Pull Apart Bread that is both visually appealing and delicious!
Nutrition
- Serving Size: 12 servings
- Calories: 200 kcal per serving
- Fat: 6g
- Protein: 4g


