


Introduction
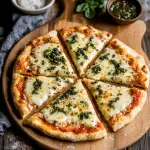
This Gluten-Free Pizza Crust, Brazilian Cheese Bread Style, is a game changer for anyone who loves pizza but needs to avoid gluten. It takes the delightful, chewy texture of Brazilian cheese bread—known as Pão de Queijo—and transforms it into a pizza crust that’s both flavorful and satisfying. Imagine sinking your teeth into a crust that’s crispy on the outside and chewy on the inside, all while being perfectly sturdy enough to hold your favorite toppings.
What I absolutely adore about this recipe is how simple it is to prepare. You just mix tapioca flour with cheese, eggs, and a few seasonings, and then bake it to create a crust that’s ready for whatever toppings you can dream up! The beauty of using tapioca flour is that it gives the crust that delightful stretch and chewiness that many gluten-free options lack. Plus, the cheese adds a wonderful depth of flavor that pairs perfectly with all the classic pizza toppings—whether you prefer a classic margherita or want to get creative with gourmet ingredients.
I remember the first time I made this gluten-free crust for a gathering. I had friends over, and I wanted everyone to enjoy pizza together, regardless of dietary restrictions. The response was incredible! Everyone was surprised by how delicious and satisfying the crust was. It sparked a fun evening of topping experimentation, with everyone creating their own personalized pizzas.
This Gluten-Free Pizza Crust is not only perfect for those avoiding gluten but also a fantastic option for anyone looking to try something new and delicious. So, gather your favorite ingredients, roll up your sleeves, and get ready to enjoy a pizza night that everyone can partake in!
Why You’ll Love This Recipe
Here’s why this Gluten-Free Pizza Crust will become a go-to:
- Deliciously Cheesy: This pizza crust is made with cheese, giving it a wonderfully cheesy flavor that pairs perfectly with your favorite toppings, making each bite a delightful experience.
- Gluten-Free Goodness: Perfect for those with gluten sensitivities or celiac disease, this recipe ensures that everyone can enjoy a tasty pizza night without worries.
- Crispy on the Outside, Chewy on the Inside: The unique texture of this crust offers a satisfying crunch with a chewy interior, reminiscent of traditional pizza while being entirely gluten-free.
- Quick and Easy to Make: With simple ingredients and straightforward steps, this pizza crust can be whipped up in no time, making it ideal for busy weeknights or spontaneous pizza cravings.
- Versatile Base: This crust serves as a blank canvas for a variety of toppings, whether you prefer classic margherita, loaded veggie, or even dessert pizzas, catering to every taste preference.
- Protein-Packed: The use of cheese and eggs in the crust not only enhances flavor but also adds a protein boost, making your pizza a more satisfying meal.
- Naturally Gluten-Free Ingredients: Made with tapioca flour and cheese, this recipe uses ingredients that are naturally gluten-free, making it a healthier option without sacrificing flavor.
- Fun to Customize: You can easily adapt this recipe by adding herbs, spices, or other flavorings to the dough, allowing you to create your unique twist on the classic pizza crust.
- Great for Meal Prep: You can make the crust ahead of time and freeze it, so you’ll always have a gluten-free pizza option on hand when cravings strike.
- Kid-Friendly and Family Approved: Kids love the cheesy flavor and fun texture of this crust, making it a hit at family gatherings or dinner parties where everyone can create their own personalized pizzas.
Preparation Time and Cook Time
- Total Time: 30 minutes
- Preparation Time: 10 minutes
- Cook Time: 20 minutes
- Servings: 2 medium-sized pizza crusts
- Calories per serving: Approximately 250 calories per crust
- Key Nutrients: Fat: 14g, Carbohydrates: 22g, Protein: 7g
Ingredients
Here’s what you’ll need for the Gluten-Free Pizza Crust, Brazilian Cheese Bread Style:
For the Pizza Crust:
- 2 cups tapioca flour
- 1 cup shredded mozzarella cheese
- 1/2 cup grated Parmesan cheese
- 2 large eggs
- 1/4 cup milk (dairy or non-dairy)
- 1 teaspoon garlic powder
- 1 teaspoon salt
- 1/2 teaspoon baking powder
- Olive oil, for greasing
Ingredient Highlights
- Tapioca Flour: Provides the chewy texture essential to this crust.
- Mozzarella Cheese: Adds creaminess and flavor.
- Parmesan Cheese: Enhances the savory taste of the crust.
- Eggs: Help bind the ingredients together.
- Garlic Powder: Adds aromatic flavor to the crust.
Step-by-Step Instructions


Follow these steps to create your Gluten-Free Pizza Crust:
Preheat the Oven
- Preheat your oven to 400°F (200°C) and line a baking sheet with parchment paper.
Mix the Dry Ingredients
- In a large bowl, combine the tapioca flour, garlic powder, salt, and baking powder.
Add the Cheeses
- Stir in the shredded mozzarella and grated Parmesan cheese until well mixed.
Combine the Wet Ingredients
- In a separate bowl, whisk together the eggs and milk until smooth.
Combine Mixtures
- Pour the wet mixture into the dry ingredients, mixing until a dough forms.
Knead the Dough
- Knead the dough for a minute or two until it becomes smooth and elastic.
Shape the Crusts
- Divide the dough into two equal portions and shape each portion into a round crust on the prepared baking sheet, about 1/4 inch thick.
Bake the Crusts
- Bake in the preheated oven for 15-20 minutes or until the edges are golden and the crust is set.
Add Toppings
- Remove the crusts from the oven, add your desired toppings, and return to the oven for an additional 5-10 minutes, until the cheese is melted and bubbly.
Serve
- Allow to cool slightly before slicing and serving.
How to Serve
Here are some delightful ways to enjoy your Gluten-Free Pizza Crust:
- Personalize with Toppings: Create a topping bar with various options such as fresh vegetables, meats, cheeses, and sauces, allowing guests to customize their pizzas.
- Pair with Dipping Sauces: Serve with a selection of dipping sauces like marinara, garlic butter, or pesto for added flavor with each bite.
- Add Fresh Herbs: Sprinkle fresh herbs like basil, oregano, or arugula on top after baking for a burst of freshness and color.
- Serve with a Salad: Pair the pizza with a light side salad, such as a mixed greens salad with a vinaigrette dressing, to balance the meal.
- Use Unique Toppings: Experiment with unconventional toppings such as roasted vegetables, fig and prosciutto, or BBQ chicken for a gourmet twist.
- Create Mini Pizzas: Use smaller rounds of the crust to make individual mini pizzas, perfect for appetizers or party platters.
- Offer Gluten-Free Options: Ensure that all accompanying dishes, such as salads and sauces, are gluten-free to cater to dietary restrictions.
- Present with a Cheese Board: Serve the pizza alongside a cheese board featuring various cheeses, crackers, and fruit for a delightful grazing experience.
- Slice and Serve Warm: Cut the pizza into wedges and serve warm on a rustic wooden board or pizza stone for a cozy presentation.
- Garnish with Chili Flakes or Olive Oil: Add a sprinkle of chili flakes or a drizzle of flavored olive oil before serving to enhance the flavors and appeal visually.
Additional Tips
To make the most of your Gluten-Free Pizza Crust, consider these tips:
- Use Fresh Cheese: For the best flavor and texture, opt for fresh cheese like mozzarella or a mix of mozzarella and parmesan to enhance the cheesy goodness.
- Add Herbs and Spices: Incorporate dried herbs like oregano, basil, or garlic powder into the dough for extra flavor. This enhances the taste of the crust without extra calories.
- Experiment with Flours: While tapioca flour is key for Brazilian cheese bread, you can mix it with other gluten-free flours like almond flour or brown rice flour for a different texture and taste.
- Check the Dough Consistency: The dough should be sticky but manageable. If it’s too dry, add a little more water or cheese; if too wet, add a bit more flour until you achieve the right consistency.
- Let the Dough Rest: Allowing the dough to rest for about 10-15 minutes can help improve the texture and make it easier to spread.
- Pre-Bake the Crust: For a crispier crust, pre-bake the crust for about 5-7 minutes before adding your toppings. This prevents it from becoming soggy.
- Use Parchment Paper: Roll or press the dough between two sheets of parchment paper to prevent sticking, making it easier to transfer to the baking sheet.
- Top with Quality Ingredients: Choose high-quality toppings such as fresh vegetables, meats, and gourmet cheeses to elevate the overall taste of your pizza.
- Experiment with Seasonings: Sprinkle the crust with sea salt or garlic powder before baking to enhance the flavor profile and create a delicious crust.
- Serve with Dipping Sauce: Pair your pizza with a side of marinara, garlic butter, or herb-infused olive oil for an extra burst of flavor when enjoying your pizza.
Recipe Variations
Try these variations for a new twist on Gluten-Free Pizza Crust:
- Herbed Garlic Variation: Add minced garlic and a mix of Italian herbs (like oregano, basil, and thyme) to the dough for an aromatic flavor boost.
- Spicy Pepper Variation: Incorporate finely chopped jalapeños or red pepper flakes into the dough for a spicy kick that complements your favorite toppings.
- Savory Spinach and Feta: Mix in finely chopped cooked spinach and crumbled feta cheese to the dough for a Mediterranean twist.
- Smoky BBQ Chicken: Top the crust with BBQ sauce, shredded cooked chicken, red onions, and mozzarella for a smoky, flavorful pizza.
- Mediterranean Delight: Use toppings like hummus, cherry tomatoes, olives, artichoke hearts, and feta cheese for a fresh, vibrant pizza.
- Caprese Style: After baking the crust, layer fresh mozzarella, tomatoes, and basil leaves, drizzling with balsamic glaze for a refreshing Caprese-inspired pizza.
- Pesto Veggie Pizza: Spread pesto sauce on the crust and top with a mix of roasted vegetables like bell peppers, zucchini, and eggplant for a colorful, flavorful option.
- Sweet Potato Crust: Swap out some of the cheese for mashed sweet potatoes to create a slightly sweet and earthy-flavored crust.
- Cheesy Jalapeño Variation: Add shredded pepper jack cheese and finely chopped jalapeños to the dough for a cheesy, spicy crust that stands out.
- Breakfast Pizza: Top the crust with scrambled eggs, breakfast sausage, and cheese for a hearty breakfast option that’s perfect for brunch.
Freezing and Storage
Here’s how to store your Gluten-Free Pizza Crust:
- Storage: Keep cooked crusts in an airtight container in the fridge for up to 3 days.
- Freezing: Freeze unbaked or baked crusts for up to 3 months.
- Reheating: Reheat in the oven or toaster oven for the best texture.
Special Equipment
To make this recipe, you may need the following kitchen tools:
- Mixing Bowls: A set of various-sized mixing bowls for combining ingredients efficiently.
- Silicone Spatula: Ideal for mixing and scraping down the sides of bowls without damaging them.
- Stand Mixer or Hand Mixer: Helpful for thoroughly mixing the dough to achieve a smooth consistency.
- Pizza Stone or Baking Steel: Enhances the crust’s crispiness by providing even heat distribution during baking.
- Parchment Paper: Useful for preventing sticking and making cleanup easier when baking the crust.
- Rolling Pin: Assists in rolling out the dough to your desired thickness for an even pizza crust.
- Measuring Cups and Spoons: Accurate measurements are essential for achieving the right texture and flavor in gluten-free dough.
- Oven Thermometer: Ensures your oven is at the correct temperature for optimal baking results.
- Food Processor: Can be used to quickly combine ingredients or make the dough smoother if preferred.
- Cooling Rack: Allows the pizza crust to cool properly after baking, helping to maintain its texture.
FAQ Section
Here are answers to some common questions about Gluten-Free Pizza Crust:
- Can I use regular flour?
No, this recipe is specifically designed for tapioca flour to achieve the right texture. - Is this pizza crust vegan?
No, it contains eggs and cheese, but substitutions can be made. - Can I make this ahead of time?
Yes, you can prepare and freeze the crusts for later use. - What can I use instead of mozzarella?
You can use any cheese that melts well, like provolone or gouda. - How long will the crust last in the fridge?
It will stay fresh for about 3 days in the refrigerator. - Can I bake it on a pizza stone?
Yes, using a preheated pizza stone will enhance the crust’s texture. - Is this recipe low-carb?
While it’s gluten-free, it is not particularly low-carb due to the tapioca flour. - Can I double the recipe?
Yes, simply double all ingredients for more crusts. - How can I make it spicier?
Add more spices or hot sauce to the dough for heat. - Can I use almond milk instead of regular milk?
Yes, any non-dairy milk can be used in this recipe.
Gluten-Free Pizza Crust, Brazilian Cheese Bread Style
- Prep Time: 10 minutes
- Cook Time: 20 minutes
- Total Time: 30 minutes
Ingredients
For the Pizza Crust:
- 2 cups tapioca flour
- 1 cup shredded mozzarella cheese
- 1/2 cup grated Parmesan cheese
- 2 large eggs
- 1/4 cup milk (dairy or non-dairy)
- 1 teaspoon garlic powder
- 1 teaspoon salt
- 1/2 teaspoon baking powder
- Olive oil, for greasing
Instructions
Preheat the Oven
- Preheat your oven to 400°F (200°C) and line a baking sheet with parchment paper.
Mix the Dry Ingredients
- In a large bowl, combine the tapioca flour, garlic powder, salt, and baking powder.
Add the Cheeses
- Stir in the shredded mozzarella and grated Parmesan cheese until well mixed.
Combine the Wet Ingredients
- In a separate bowl, whisk together the eggs and milk until smooth.
Combine Mixtures
- Pour the wet mixture into the dry ingredients, mixing until a dough forms.
Knead the Dough
- Knead the dough for a minute or two until it becomes smooth and elastic.
Shape the Crusts
- Divide the dough into two equal portions and shape each portion into a round crust on the prepared baking sheet, about 1/4 inch thick.
Bake the Crusts
- Bake in the preheated oven for 15-20 minutes or until the edges are golden and the crust is set.
Add Toppings
- Remove the crusts from the oven, add your desired toppings, and return to the oven for an additional 5-10 minutes, until the cheese is melted and bubbly.
Serve
- Allow to cool slightly before slicing and serving.
Nutrition
- Serving Size: 2 medium-sized pizza crusts
- Calories: 250 kcal
- Fat: 14g
- Carbohydrates: 22g
- Protein: 7g
Conclusion
Gluten-Free Pizza Crust, Brazilian Cheese Bread Style is a versatile and delicious alternative to traditional pizza crusts. This unique crust features a chewy texture and a delightful cheesy flavor, making it an excellent base for your favorite toppings.
Whether you’re looking to enjoy pizza night with family or impress friends at a gathering, this gluten-free crust allows you to indulge without compromising on taste. Customize it with fresh vegetables, savory meats, or your go-to sauces, and savor a guilt-free treat that everyone will love!
I can’t wait to see how your Brazilian Cheese Bread-style pizza turns out! Don’t forget to snap a photo and tag me on Instagram—I truly enjoy seeing your culinary creations! Happy cooking!


