Introduction
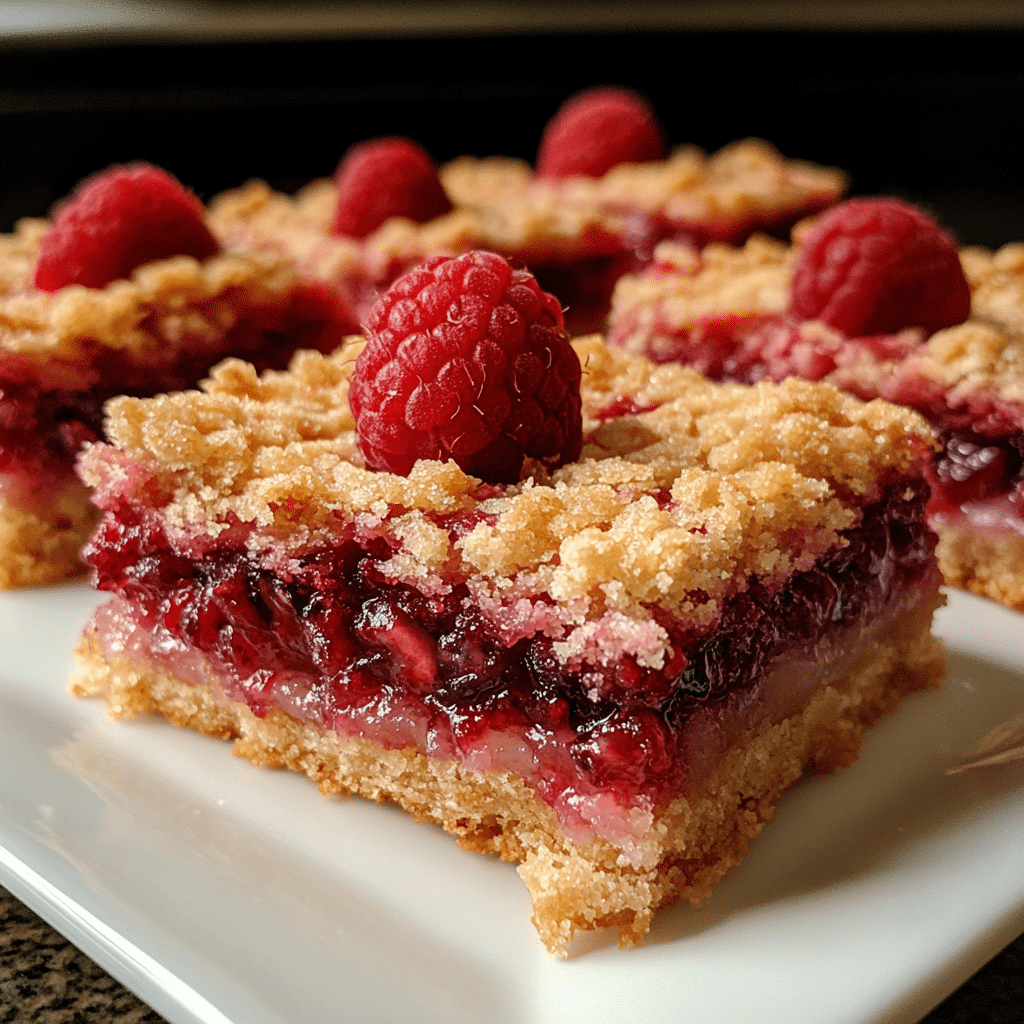
Gluten-Free Raspberry Bars are a delightful treat that brings together the tartness of fresh raspberries and a buttery, crumbly crust, making them perfect for any occasion! Whether you’re enjoying them at a picnic, serving them at a party, or simply indulging with a cup of tea, these bars are a crowd-pleaser. The vibrant red filling contrasts beautifully with the golden crust, making them as appealing to the eyes as they are to the palate.
This recipe holds a special place in my heart, as it reminds me of summer days spent picking fresh raspberries from local farms with my family. We would always come home with baskets overflowing with berries, and these bars quickly became a favorite way to enjoy our bounty. The sweet aroma of baking wafting through the house would signal that something special was on its way.
Every time I make them, I’m transported back to those sunny afternoons filled with laughter and sweet treats. Each bite is a nostalgic reminder of the joy we shared, and I love sharing these bars with friends and family, who always rave about their delicious flavor. Whether for a celebration or just because, these Gluten-Free Raspberry Bars are a simple yet delightful way to celebrate the sweetness of summer, no matter the season!
Why You’ll Love This Recipe
Here are a few reasons why Gluten-Free Raspberry Bars are a must-try:
- Deliciously Sweet and Tart: The balance of sweet and tangy flavors from fresh raspberries makes each bite irresistible.
- Easy to Make: With simple ingredients and straightforward steps, these bars are quick to whip up, perfect for both beginner and experienced bakers.
- Healthy Alternative: Made with gluten-free ingredients, these bars are a great option for those with gluten sensitivities, allowing everyone to enjoy dessert.
- Versatile Serving Options: Enjoy them as a snack, dessert, or breakfast treat; they’re perfect for any time of day!
- Beautiful Presentation: The vibrant raspberry color and crumbly topping create an appealing look, making them a stunning addition to any dessert table.
- Perfect for Meal Prep: These bars can be made in advance, making them a convenient choice for busy weeks or last-minute gatherings.
- Nutritious Ingredients: Packed with antioxidants from raspberries and wholesome ingredients, they offer a guilt-free indulgence.
- Easily Customizable: You can mix in your favorite add-ins like nuts or chocolate chips to personalize the recipe to your taste.
- Freezer Friendly: These bars freeze well, allowing you to enjoy a delicious treat anytime you crave something sweet.
- Family-Friendly Recipe: Kids and adults alike will love these delightful bars, making them a hit at family gatherings and parties.
Preparation Time and Servings
- Total Time: 45 minutes
- Servings: 12
- Calories per serving: Approximately 180 calories
- Key Nutrients: Protein: 4g, Carbohydrates: 23g, Fat: 9g
Ingredients
To make Gluten-Free Raspberry Bars, you’ll need the following ingredients:
For the Crust:
- 1 ½ cups almond flour
- 1 cup gluten-free rolled oats
- 1/3 cup coconut sugar (or brown sugar)
- 1/2 cup coconut oil, melted (or unsalted butter)
- 1/4 teaspoon salt
- 1 teaspoon vanilla extract
For the Raspberry Filling:
- 2 cups fresh or frozen raspberries
- 1/4 cup honey (or maple syrup)
- 1 tablespoon cornstarch (or arrowroot powder)
- 1 teaspoon lemon juice
- Optional: 1/2 teaspoon vanilla extract
Ingredient Highlights
- Almond Flour: Gives a nutty flavor and a great texture for gluten-free baking.
- Raspberries: Fresh or frozen, they provide the perfect tartness and natural sweetness.
- Coconut Sugar: A lower-glycemic sweetener that adds a rich flavor to the crust.
Step-by-Step Instructions
Making Gluten-Free Raspberry Bars is a simple process! Here’s how to do it:
1st Step: Preheat the Oven
- Preheat your oven to 350°F (175°C) and line an 8×8-inch baking pan with parchment paper, leaving some overhang for easy removal.
2nd Step: Make the Crust
- In a mixing bowl, combine the almond flour, rolled oats, coconut sugar, melted coconut oil, salt, and vanilla extract. Mix until crumbly and well combined.
- Press about two-thirds of the mixture firmly into the bottom of the prepared pan to form an even layer. Reserve the remaining mixture for the topping.
3rd Step: Prepare the Raspberry Filling
- In a medium saucepan over medium heat, combine the raspberries, honey, cornstarch, lemon juice, and optional vanilla extract. Cook, stirring gently until the mixture is bubbly and thickened, about 5-7 minutes. Remove from heat.
4th Step: Assemble the Bars
- Pour the raspberry filling over the pressed crust in the pan, spreading it evenly. Sprinkle the reserved crumb mixture over the top of the filling.
5th Step: Bake
- Bake in the preheated oven for 25-30 minutes, or until the topping is golden brown. Remove from the oven and let cool in the pan for about 10 minutes.
6th Step: Cool and Slice
- Use the parchment paper to lift the bars out of the pan. Allow them to cool completely on a wire rack before slicing into squares.
How to Serve
Gluten-Free Raspberry Bars are versatile and can be served in various ways:
- Slice and Plate: Cut the bars into neat squares or rectangles and place them on individual dessert plates for a polished presentation.
- Dust with Powdered Sugar: Lightly sprinkle powdered sugar over the top of the bars before serving for an elegant touch.
- Serve with Whipped Cream: Add a dollop of freshly whipped cream on top or alongside each bar for a creamy complement to the tart raspberry flavor.
- Pair with Fresh Berries: Garnish each plate with fresh raspberries or blueberries for a pop of color and added freshness.
- Accompany with Tea or Coffee: Serve the bars with a cup of tea or coffee to enhance the flavors and create a delightful afternoon treat.
- Top with Vanilla Ice Cream: For an indulgent dessert, serve warm raspberry bars with a scoop of vanilla ice cream melting on top.
- Create a Dessert Platter: Arrange sliced raspberry bars on a platter alongside other gluten-free treats like cookies or mini tarts for a lovely dessert spread.
- Serve with a Fruit Compote: Drizzle a homemade fruit compote, like mixed berry or raspberry, over the bars for extra flavor and moisture.
- Include a Side of Yogurt: Offer a small bowl of Greek yogurt as a side for dipping or spreading on top of the bars for added creaminess.
- Wrap for Gifts: Cut the bars into squares, wrap them in parchment paper, and tie with a ribbon for a thoughtful homemade gift.
Additional Tips
Here are some helpful tips to ensure your Gluten-Free Raspberry Bars turn out perfectly:
- Choose Quality Ingredients: Use high-quality gluten-free flour blends to ensure the best texture and flavor in your bars.
- Fresh or Frozen Raspberries: Both fresh and frozen raspberries work well, but if using frozen, don’t thaw them beforehand to prevent excess moisture.
- Adjust Sweetness: Taste the raspberry filling before baking and adjust the sugar based on the tartness of your raspberries.
- Chill the Dough: Refrigerate the crust dough for 30 minutes before baking to help it firm up and prevent spreading.
- Use Parchment Paper: Line your baking dish with parchment paper for easy removal and cutting of the bars once cooled.
- Let Them Cool Completely: Allow the raspberry bars to cool completely in the pan before cutting to ensure clean edges.
- Store Properly: Keep the bars in an airtight container in the refrigerator to maintain freshness and prevent them from becoming soggy.
- Try Different Fruits: Experiment with other fruits, such as blueberries, strawberries, or peaches, to create your own variations of the bars.
- Add a Zing: For extra flavor, consider adding a teaspoon of lemon juice or zest to the raspberry filling for a bright, citrusy contrast.
- Top with Whipped Cream: Serve the bars with a dollop of whipped cream or a scoop of vanilla ice cream for a delightful dessert experience.
Recipe Variations
Try these variations to customize your Gluten-Free Raspberry Bars:
- Mixed Berry Variation: Substitute raspberries with a blend of blueberries, blackberries, and strawberries for a colorful, mixed berry treat.
- Lemon Zest Addition: Add lemon zest to the crust and filling for a refreshing citrus flavor that complements the tartness of the raspberries.
- Chocolate Chip Twist: Fold in mini chocolate chips to the raspberry filling for a delicious chocolate and berry combination.
- Almond Flour Base: Use almond flour instead of gluten-free all-purpose flour for a nuttier flavor and a slightly denser texture.
- Coconut Flake Topping: Top the bars with unsweetened coconut flakes before baking for a tropical twist.
- Peanut Butter Drizzle: Drizzle melted peanut butter over the cooled bars for added richness and a nutty flavor.
- Spiced Version: Incorporate spices like cinnamon or nutmeg into the crust for a warm, spiced flavor that pairs well with the fruit.
- Oat Crust Option: Use gluten-free oats in the crust for a chewy texture and heartier bite.
- Vegan Variation: Substitute eggs with flax eggs and use maple syrup or agave instead of sugar to create a vegan-friendly version.
- Crumble Topping: Add a crumble topping made from gluten-free oats, brown sugar, and butter for added texture and a rustic look.
Freezing and Storage
Here’s how to store any leftovers:
- Storage: Keep leftovers in an airtight container in the fridge for up to 5 days.
- Freezing: Freeze bars in a single layer, then transfer to a freezer-safe container for up to 3 months. Thaw before serving.
Special Equipment
While this recipe is quite straightforward, having these items can be helpful:
- Mixing Bowls: Various sizes for combining dry and wet ingredients easily.
- Electric Mixer: Helpful for creaming butter and sugar together smoothly.
- 9×9-inch Baking Pan: Ideal for baking the raspberry bars; using a non-stick or lined pan ensures easy removal.
- Rubber Spatula: Perfect for mixing ingredients thoroughly and scraping down the sides of bowls.
- Measuring Cups and Spoons: Essential for accurately measuring all ingredients for consistent results.
- Food Processor: Useful for blending oats, nuts, or any crumbly toppings if desired.
- Parchment Paper: For lining the baking pan, making it easier to lift out the bars once baked.
- Sifter: Optional, but great for sifting gluten-free flour to ensure no lumps and even mixing.
- Cooling Rack: Allows the raspberry bars to cool completely before slicing, preventing sogginess.
- Sharp Knife: For cutting the baked bars into neat squares or rectangles for serving.
These tools will help you create delicious Gluten-Free Raspberry Bars with ease!
FAQ Section
Here are some frequently asked questions about this recipe:
- Can I substitute almond flour?
Yes! You can use other gluten-free flours like oat flour or a gluten-free all-purpose blend, but the texture may vary. - Is this recipe nut-free?
No, it contains almond flour, but you can use sunflower seed flour for a nut-free alternative. - How can I make these bars vegan?
Substitute honey with maple syrup and use vegan butter instead of coconut oil. - Can I make these bars ahead of time?
Yes! You can prepare them a day in advance and store them in the fridge until you’re ready to serve.
Gluten-Free Raspberry Bars
- Total Time: 45 minutes
Ingredients
For the Crust:
- 1 ½ cups almond flour
- 1 cup gluten-free rolled oats
- 1/3 cup coconut sugar (or brown sugar)
- 1/2 cup coconut oil, melted (or unsalted butter)
- 1/4 teaspoon salt
- 1 teaspoon vanilla extract
For the Raspberry Filling:
- 2 cups fresh or frozen raspberries
- 1/4 cup honey (or maple syrup)
- 1 tablespoon cornstarch (or arrowroot powder)
- 1 teaspoon lemon juice
- Optional: 1/2 teaspoon vanilla extract
Instructions
Step 1: Preheat the Oven
- Preheat your oven to 350°F (175°C) and line an 8×8-inch baking pan with parchment paper, leaving some overhang for easy removal.
Step 2: Make the Crust
- In a mixing bowl, combine the almond flour, rolled oats, coconut sugar, melted coconut oil, salt, and vanilla extract. Mix until crumbly and well combined.
- Press about two-thirds of the mixture firmly into the bottom of the prepared pan to form an even layer. Reserve the remaining mixture for the topping.
Step 3: Prepare the Raspberry Filling
- In a medium saucepan over medium heat, combine the raspberries, honey, cornstarch, lemon juice, and optional vanilla extract. Cook, stirring gently until the mixture is bubbly and thickened, about 5-7 minutes. Remove from heat.
Step 4: Assemble the Bars
- Pour the raspberry filling over the pressed crust in the pan, spreading it evenly. Sprinkle the reserved crumb mixture over the top of the filling.
Step 5: Bake
- Bake in the preheated oven for 25-30 minutes, or until the topping is golden brown. Remove from the oven and let cool in the pan for about 10 minutes.
Step 6: Cool and Slice
- Use the parchment paper to lift the bars out of the pan. Allow them to cool completely on a wire rack before slicing into squares.
Nutrition
- Serving Size: 12 servings
- Calories: 180 kcal
- Fat: 9g
- Carbohydrates: 23g
- Protein: 4g
Conclusion
Gluten-Free Raspberry Bars are a delightful and easy dessert that everyone can enjoy, regardless of dietary restrictions! With their vibrant colors, delicious flavors, and simple preparation, they’re perfect for any gathering or just a cozy night at home. Each bite is a taste of summer, and I’m sure they’ll become a favorite in your household, just like they are in mine.
I hope you enjoy making these bars as much as I do! Don’t forget to share your creations and let me know how they turned out. Happy baking! As you savor these delicious bars, take a moment to appreciate the memories they evoke—whether it’s summer berry picking with loved ones or simply enjoying a sweet treat on a quiet afternoon. They remind us that food is not just about flavor but also about the moments we share around the table. May these Gluten-Free Raspberry Bars inspire you to create your own joyful moments and sweet memories in the kitchen!

