Introduction
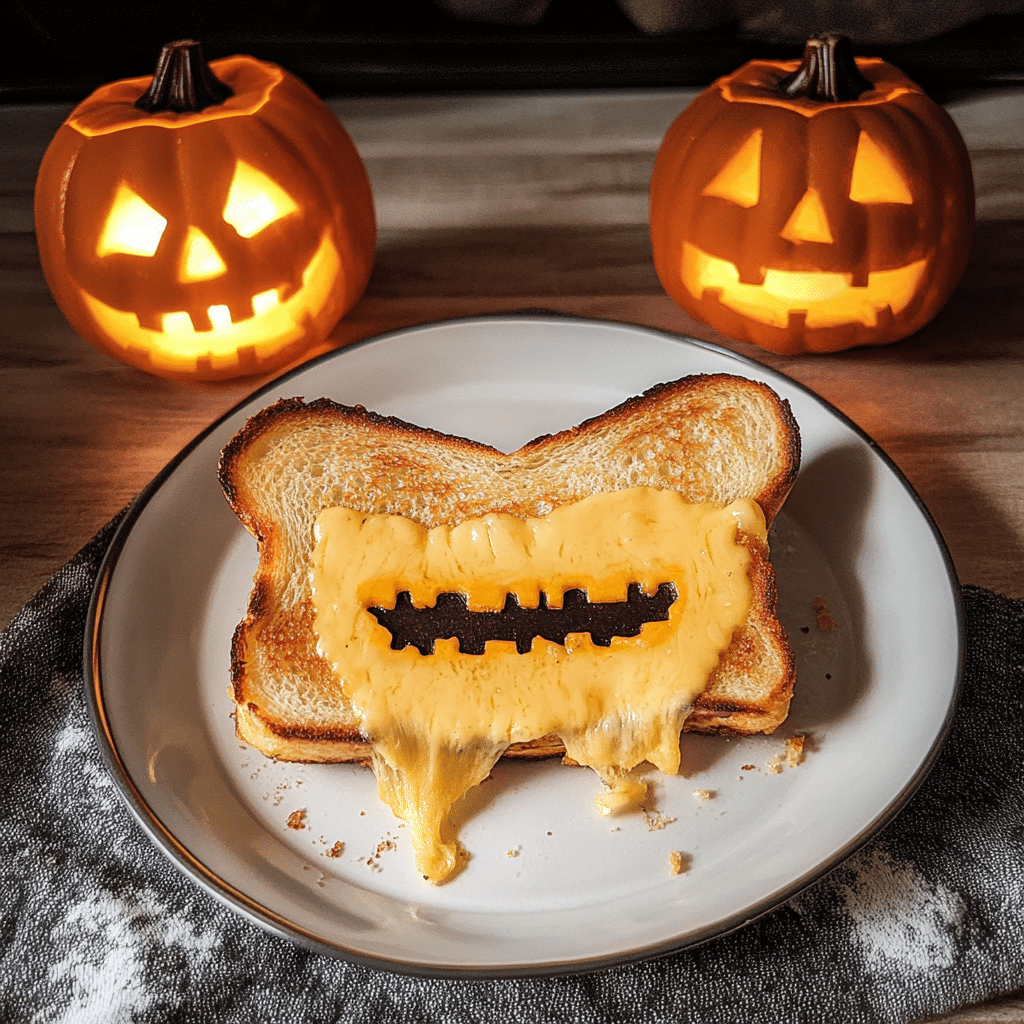
As the spooky season rolls around, it’s time to infuse a little fun into your meals! There’s something wonderfully nostalgic about grilled cheese—it’s a classic comfort food that warms your soul. But this Halloween, let’s take it up a notch and transform that beloved sandwich into something truly special: Halloween Grilled Cheese Recipe! Imagine ooey-gooey cheese sandwiched between perfectly toasted bread, with a festive twist that’s sure to delight kids and adults alike.
I remember the first time I made these whimsical sandwiches. It was a chilly October evening, and I wanted to create a fun dinner that would get everyone into the Halloween spirit. A quick trip to the kitchen turned into a culinary adventure, complete with cookie cutters and colorful cheeses. The result? A plateful of delicious, spooky grilled cheese that brought smiles and laughter around the table. This recipe is not just about the food; it’s about creating memories with family and friends while enjoying the flavors of fall.
Perfect for Halloween parties, cozy dinners, or just a fun lunch at home, these Halloween Grilled Cheese Sandwiches are easy to make and utterly delightful. So grab your favorite cheeses and get ready to scare up some deliciousness!
Why You’ll Love This Recipe
There are plenty of reasons to love this Halloween Grilled Cheese Recipe:
- Fun and Festive: The playful shapes and colors make this grilled cheese a hit for Halloween-themed gatherings.
- Easy to Make: With just a few simple ingredients, you can whip up these spooky sandwiches in no time.
- Customizable: Use your favorite cheeses, breads, and add-ins to make it your own.
- Family-Friendly: Kids will love the fun shapes and flavors, making it a perfect meal for the whole family.
- Delicious: Beyond the spooky aesthetics, these grilled cheese sandwiches are utterly delicious, with melty cheese and crispy bread.
Preparation Time and Servings
- Total Time: 20 minutes
- Servings: 4 sandwiches
- Calories per serving: Approximately 350 calories per sandwich
- Key nutrients: Protein: 16g, Carbohydrates: 32g, Fat: 20g
Ingredients
To create these festive Halloween Grilled Cheese Sandwiches, gather the following ingredients:
For the Sandwiches:
- 8 slices of bread (white, whole wheat, or your favorite type)
- 8 ounces of cheese (cheddar, mozzarella, or a combination)
- 4 tablespoons of butter
- Optional: Food coloring (orange and green) for fun effects
- Optional: Black olives or other toppings for decoration
Ingredient Highlights
- Cheese: Choose cheeses that melt well. Cheddar is classic, but mozzarella adds a fun stretchiness, and pepper jack can give a spicy kick.
- Bread: The type of bread can change the flavor and texture; sourdough adds a tangy note, while classic white bread is super soft and nostalgic.
- Butter: Using butter on the outside gives the sandwiches a golden, crispy finish.
Step-by-Step Instructions
Let’s dive into the simple steps to create your Halloween Grilled Cheese Sandwiches:
1st Step: Prepare Your Ingredients
- Start by gathering all your ingredients. If you’re using food coloring to color your cheese, divide the cheese into portions and mix in a few drops of coloring until you reach the desired hue.
2nd Step: Shape the Sandwiches
- Use cookie cutters in spooky shapes like pumpkins, ghosts, or bats to cut your bread. You can also simply cut the bread into triangles or squares if you prefer a classic look.
3rd Step: Assemble the Sandwiches
- Lay four slices of the shaped bread on a clean surface. Place a generous amount of cheese on each slice. If you’re using colored cheese, you can mix the colors or layer them for a fun effect. Top with another slice of bread to create a sandwich.
4th Step: Butter the Bread
- Spread butter on the outside of each sandwich. This will help achieve that perfect golden-brown crust while grilling.
5th Step: Heat the Pan
- Heat a non-stick skillet over medium heat. Once hot, place the sandwiches in the pan, making sure not to overcrowd it.
6th Step: Grill the Sandwiches
- Cook each sandwich for about 3-4 minutes on one side, or until golden brown. Carefully flip the sandwiches over and cook for another 3-4 minutes, pressing down gently with a spatula to ensure even grilling.
7th Step: Add Fun Decorations
- If you’d like, you can slice black olives to create eyes or other features on your sandwiches once they’re grilled. Simply place them on top of the cheese before serving.
8th Step: Serve and Enjoy
- Once the cheese is melty and the bread is golden, remove the sandwiches from the skillet and let them cool slightly before cutting them into smaller pieces or leaving them as is. Serve with your favorite dipping sauce, like marinara or a spooky green sauce made from avocado!
How to Serve
These Halloween Grilled Cheese Recipe can be served in various fun ways:
- With Tomato Soup: Pair with a spooky bowl of tomato soup for dipping. You can even add ghost-shaped croutons for extra flair!
- On a Platter: Arrange the sandwiches on a festive platter with Halloween-themed decorations for a party setting.
- With Fun Dips: Serve with a selection of dips—try adding green food coloring to your favorite dipping sauce for a spooky twist!
Additional Tips
Here are some helpful tips to ensure your Halloween Grilled Cheese Recipe turns out perfectly:
- Use Good Cheese: For the best flavor, opt for quality cheese. A blend of cheeses can elevate the flavor and meltiness.
- Don’t Rush: Cooking over medium heat ensures the cheese melts perfectly while the bread gets crispy. Don’t rush the grilling!
- Add Extras: Feel free to add extras like sliced tomatoes, spinach, or even a smear of pesto inside the sandwich for added flavor.
- Experiment with Bread: Try different types of bread for varying textures and flavors—sourdough, rye, or even brioche for a sweet touch.
- Watch Closely: Grilled cheese can go from perfectly golden to burnt quickly, so keep an eye on them while they cook.
- Presentation is Key: Serve on a decorated plate with Halloween-themed garnishes like fake spider webs (made from cotton) or edible eyeball candies to create a festive atmosphere.
- Make It Spooky: Use a food-safe marker to draw faces on slices of cheese before melting for an added element of surprise.
- Choose the Right Bread: Use artisan or specialty bread, such as pumpkin spice or sourdough, for a unique flavor and texture.
- Try Unique Spreads: Spread the outside of the bread with flavored butter (like garlic or herb butter) or mayonnaise for a deliciously crispy crust.
- Toast on Low Heat: Cook on low to ensure the cheese melts perfectly without burning the bread for a golden-brown finish.
Recipe Variations
Feel free to customize this recipe to suit your taste! Here are some fun variations you can try:
- Sweet Grilled Cheese: Add slices of apple or pear along with cheese for a sweet and savory twist.
- Spicy Grilled Cheese: Use pepper jack cheese and add jalapeño slices for a spicy kick.
- Spooky Spider Grilled Cheese: Add black olives or cooked turkey bacon pieces to create spider shapes on top of the grilled cheese. Use a slice of cheese to create a web design on the outside before grilling.
- Mummy Grilled Cheese: Use strips of mozzarella or provolone to create a “mummy” look on the outside of the sandwich. Grill until the cheese is melty and golden, and add two olive pieces for eyes.
- Green Goblin Grilled Cheese: Incorporate spinach or pesto into the cheese mixture for a vibrant green color. Use green food coloring for the bread or dye it naturally with matcha powder.
- Witch’s Brew Grilled Cheese: Use a mix of cheeses like cheddar, mozzarella, and a hint of blue cheese for a “witchy” flavor. Serve with a side of green soup, like broccoli or split pea, to resemble a cauldron.
- Herbed Grilled Cheese: Mix in fresh herbs like basil or thyme into the cheese for added flavor.
- Monster Grilled Cheese: Create monster faces using various toppings such as sliced peppers for teeth, cherry tomatoes for eyes, and olives for pupils. Use colorful bread, like beet or spinach-infused, for a more vibrant look.
- Ghostly Cheese: Cut ghost shapes out of the bread with a cookie cutter before grilling. Fill with your favorite cheese and use black sesame seeds or small pieces of olive for the ghost’s eyes.
- Vegan Version: Substitute dairy cheese with your favorite vegan cheese and use plant-based butter.
Freezing and Storage
Here’s how to store or freeze your grilled cheese for later enjoyment:
- Storage: If you have leftovers, store them in an airtight container in the fridge for up to 2 days. Reheat in a skillet over low heat to maintain crispiness.
- Freezing: Grilled cheese can be frozen by wrapping each sandwich tightly in plastic wrap, then placing them in a freezer-safe bag. They’ll keep for about 1 month. To reheat, thaw in the fridge overnight and warm in a skillet.
Special Equipment
You’ll need a few essential tools to make these sandwiches:
- Non-Stick Skillet: Perfect for evenly grilling the sandwiches without sticking.
- Cookie Cutters: Fun shapes to make your sandwiches festive.
- Spatula: For flipping the sandwiches with ease.
- Cutting Board: A dedicated surface for assembling and cutting the sandwiches.
- Sharp Knife: For slicing any additional ingredients, like vegetables or cheese.
- Cheese Grater: If using block cheese, a grater will help you shred the cheese for even melting.
- Baking Sheet (optional): For holding the cut sandwiches if you’re making a large batch and want to keep them warm in the oven.
FAQ Section
Here are some frequently asked questions to help you with this recipe:
- Can I use different cheeses?
Absolutely! Feel free to mix and match your favorite cheeses for different flavors. - What can I use if I don’t have cookie cutters?
You can use a knife to cut the sandwiches into squares, triangles, or any fun shape you like! - Can I prepare these ahead of time?
While grilled cheese is best fresh, you can assemble the sandwiches ahead of time and grill them just before serving. - How can I make these healthier?
Use whole-grain bread, low-fat cheese, and add more veggies to increase nutritional value.
Halloween Grilled Cheese Recipe
- Total Time: 20 minutes
Ingredients
For the Sandwiches:
- 8 slices of bread (white, whole wheat, or your favorite type)
- 8 ounces of cheese (cheddar, mozzarella, or a combination)
- 4 tablespoons of butter
- Optional: Food coloring (orange and green) for fun effects
- Optional: Black olives or other toppings for decoration
Instructions
Step 1: Prepare Your Ingredients
- Start by gathering all your ingredients. If you’re using food coloring to color your cheese, divide the cheese into portions and mix in a few drops of coloring until you reach the desired hue.
Step 2: Shape the Sandwiches
- Use cookie cutters in spooky shapes like pumpkins, ghosts, or bats to cut your bread. You can also simply cut the bread into triangles or squares if you prefer a classic look.
Step 3: Assemble the Sandwiches
- Lay four slices of the shaped bread on a clean surface. Place a generous amount of cheese on each slice. If you’re using colored cheese, you can mix the colors or layer them for a fun effect. Top with another slice of bread to create a sandwich.
Step 4: Butter the Bread
- Spread butter on the outside of each sandwich. This will help achieve that perfect golden-brown crust while grilling.
Step 5: Heat the Pan
- Heat a non-stick skillet over medium heat. Once hot, place the sandwiches in the pan, making sure not to overcrowd it.
Step 6: Grill the Sandwiches
- Cook each sandwich for about 3-4 minutes on one side, or until golden brown. Carefully flip the sandwiches over and cook for another 3-4 minutes, pressing down gently with a spatula to ensure even grilling.
Step 7: Add Fun Decorations
- If you’d like, you can slice black olives to create eyes or other features on your sandwiches once they’re grilled. Simply place them on top of the cheese before serving.
Step 8: Serve and Enjoy
- Once the cheese is melty and the bread is golden, remove the sandwiches from the skillet and let them cool slightly before cutting them into smaller pieces or leaving them as is. Serve with your favorite dipping sauce, like marinara or a spooky green sauce made from avocado!
Nutrition
- Serving Size: 4 sandwiches
- Calories: 350 kcal
- Fat: 20g
- Carbohydrates: 32g
- Protein: 16g
Conclusion
Get ready to elevate your Halloween celebrations with these Halloween Grilled Cheese Sandwiches! They’re not only delicious but also a fun way to get everyone in the spirit of the season. The combination of melty cheese and crispy bread, paired with playful shapes, will have everyone smiling.
If you try this, I’d love to see how your Halloween Grilled Cheese Recipe turns out! Snap a photo and tag me on social media or leave a comment to share your experience. Happy haunting and even happier eating!

