Introduction
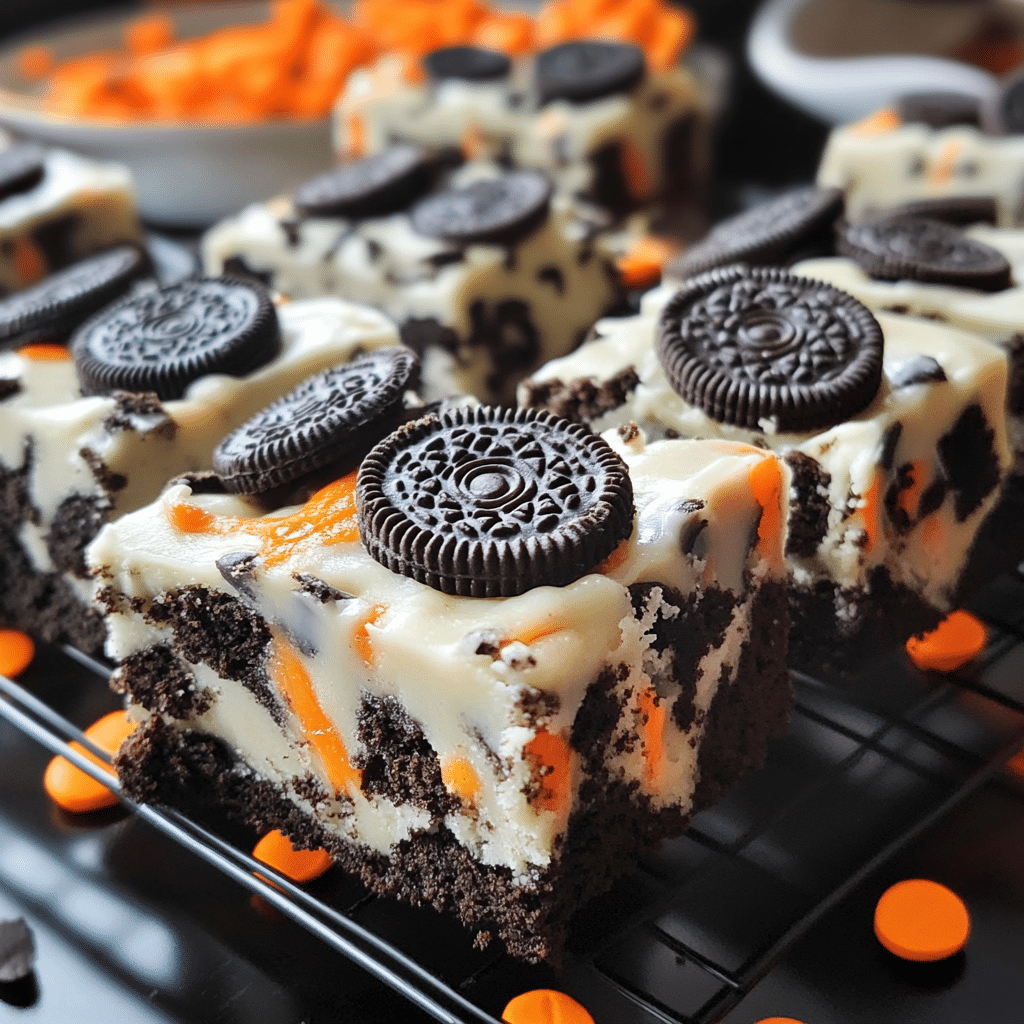
Halloween Oreo Cake Bars are a deliciously spooky treat that combines the rich flavors of chocolate and cream with the fun of festive Halloween decorations. These bars are made with layers of moist chocolate cake, creamy Oreo filling, and a delectable chocolate ganache, all topped with colorful sprinkles or Halloween-themed decorations. They’re perfect for parties, school treats, or simply to enjoy during the Halloween season.
I remember the first time I made these for a Halloween gathering. They were a hit with both kids and adults, and the vibrant colors and flavors made them a standout dessert. Each bite is a delightful combination of textures—from the soft cake to the creamy filling and the rich ganache, creating an indulgent experience that everyone loves.
These cake bars are not only easy to make but also bring a touch of Halloween magic to any celebration. The best part is the creativity involved; you can customize the decorations to fit your theme, whether it’s spooky spiders, cute ghosts, or bright pumpkin sprinkles. It’s a wonderful way to engage with family and friends in the kitchen, making the preparation just as enjoyable as the final product.
So gather your ingredients, turn on some festive music, and have fun creating these delightful treats together. I can’t wait for you to experience the joy they bring to your Halloween celebrations! Enjoy baking and sharing these spooky delights with your loved ones!
Why You’ll Love This Recipe
Here’s why Halloween Oreo Cake Bars will become a favorite in your household:
- Decadent Flavor: The combination of rich chocolate cake and creamy Oreo filling creates an irresistible dessert that satisfies your sweet tooth.
- Festive Presentation: The spooky decorations and colors make these cake bars a fun and eye-catching treat for Halloween gatherings.
- Easy to Make: With straightforward instructions and minimal ingredients, these bars are quick to whip up, making them perfect for last-minute baking.
- Versatile Serving: They can be served as a dessert or a festive snack, making them suitable for parties, school events, or cozy family gatherings.
- Kid-Friendly: The fun flavors and vibrant colors appeal to kids, making it a great recipe to involve them in the baking process.
- Customizable Toppings: You can easily switch up the toppings, using different candies or sprinkles to suit your Halloween theme.
- Make Ahead: These cake bars can be made in advance, allowing you to save time and reduce stress on the day of your Halloween celebration.
- Perfect for Sharing: Cut them into fun shapes or sizes and share them with friends, family, or coworkers for a delightful Halloween treat.
- Great for Leftovers: If you have any bars left, they stay delicious for days, making them a perfect snack throughout the week.
- Photo-Worthy: Their festive appearance is Instagram-worthy, making them a fun addition to your Halloween food photography!
Preparation Time and Servings
- Total Time: 1 hour 15 minutes
- Servings: 12 bars
- Calories per serving: Approximately 300 calories
- Key Nutrients: Protein: 4g, Carbohydrates: 40g, Fat: 15g
Ingredients
To make Halloween Oreo Cake Bars, you’ll need the following ingredients:
For the Chocolate Cake:
- 1 cup all-purpose flour
- 1/2 cup unsweetened cocoa powder
- 1 cup granulated sugar
- 1 teaspoon baking powder
- 1/2 teaspoon baking soda
- 1/4 teaspoon salt
- 1/2 cup milk
- 1/4 cup vegetable oil
- 1 large egg
- 1 teaspoon vanilla extract
- 1/2 cup boiling water
Oreo Filling:
- 1 package (8 oz) cream cheese, softened
- 1/2 cup powdered sugar
- 1 cup crushed Oreo cookies (about 10-12 cookies)
- 1 cup whipped topping (like Cool Whip)
Chocolate Ganache:
- 1 cup semi-sweet chocolate chips
- 1/2 cup heavy cream
Topping:
- Halloween-themed sprinkles or decorations
- Additional crushed Oreos (optional)
Ingredient Highlights
- Oreo Cookies: The iconic cookie adds a delicious flavor and texture, making the filling irresistible.
- Chocolate Ganache: This rich topping brings an extra layer of indulgence to the bars.
- Whipped Topping: Adds a light and fluffy texture to the Oreo filling.
Step-by-Step Instructions
Follow these steps to create your Halloween Oreo Cake Bars:
1st Step: Preheat the Oven
- Preheat your oven to 350°F (175°C). Grease and line an 8×8-inch baking pan with parchment paper.
2nd Step: Make the Chocolate Cake
- In a large bowl, mix together the flour, cocoa powder, sugar, baking powder, baking soda, and salt.
- Add the milk, vegetable oil, egg, and vanilla extract, and mix until well combined.
- Carefully stir in the boiling water until the batter is smooth (it will be thin).
- Pour the batter into the prepared baking pan and spread evenly.
3rd Step: Bake the Cake
- Bake in the preheated oven for 25-30 minutes, or until a toothpick inserted into the center comes out clean.
- Remove from the oven and let cool completely in the pan.
4th Step: Prepare the Oreo Filling
- In a medium bowl, beat the softened cream cheese until smooth.
- Gradually add the powdered sugar, mixing until well combined.
- Fold in the crushed Oreo cookies and whipped topping until everything is evenly distributed.
5th Step: Assemble the Cake Bars
- Once the chocolate cake has cooled, spread the Oreo filling evenly over the top of the cake.
- Place the cake in the refrigerator to chill while you prepare the ganache.
6th Step: Make the Chocolate Ganache
- In a small saucepan over low heat, combine the chocolate chips and heavy cream. Stir until the chocolate is melted and the mixture is smooth.
- Remove from heat and let cool slightly.
7th Step: Top the Bars
- Pour the chocolate ganache over the Oreo filling, spreading it evenly.
- Before the ganache sets, sprinkle with Halloween-themed decorations and additional crushed Oreos, if desired.
8th Step: Chill and Cut
- Refrigerate the cake bars for at least 2 hours to allow everything to set.
- Once set, lift the bars out of the pan using the parchment paper and cut into squares.
How to Serve
Here are some fun ideas for serving your Halloween Oreo Cake Bars:
- Chill Before Serving: Refrigerate the cake bars for a couple of hours to firm them up, making them easier to cut and serve.
- Cut into Fun Shapes: Use a sharp knife to cut the bars into festive shapes, such as squares or Halloween-themed cookie cutters, for an eye-catching presentation.
- Plate with Color: Serve the cake bars on vibrant, themed plates to enhance the Halloween spirit and make them visually appealing.
- Drizzle with Chocolate: Add a drizzle of melted chocolate over the top for an elegant touch and extra flavor.
- Garnish with Sprinkles: Top the bars with Halloween-themed sprinkles or edible glitter to make them festive and fun.
- Serve with Ice Cream: Pair each bar with a scoop of vanilla or pumpkin ice cream for a delightful dessert combo.
- Accompany with Whipped Cream: Offer a dollop of whipped cream on the side for added creaminess and flavor contrast.
- Use Decorative Toothpicks: Insert Halloween-themed toothpicks for a playful touch, making them easy for guests to grab.
- Present with a Tag: Label each serving with fun names or descriptions related to Halloween to add a personal touch.
- Create a Dessert Table: Arrange the bars on a themed dessert table along with other Halloween treats for a festive display that encourages guests to indulge.
Additional Tips
Make your Halloween Oreo Cake Bars perfect with these helpful tips:
- Use Fresh Oreos: For the best flavor and texture, use fresh Oreos that haven’t been sitting around for too long.
- Crush Evenly: When crushing the Oreos for the crust, aim for a fine crumb texture. This helps create a solid base that holds together well.
- Experiment with Flavors: Try using different flavors of Oreos, like pumpkin spice or mint, to add a unique twist to your cake bars.
- Add Extra Toppings: Consider drizzling melted chocolate or white chocolate over the top for added sweetness and a decorative touch.
- Chill Before Cutting: After baking, allow the cake bars to cool completely, then chill them in the refrigerator for a bit before cutting. This helps achieve cleaner slices.
- Decorate Festively: Use Halloween-themed sprinkles, candy eyes, or edible glitter on top to make the bars extra festive.
- Customize with Fillings: Consider adding a layer of cream cheese frosting or whipped cream between the cake and the topping for an extra creamy texture.
- Use Parchment Paper: Line your baking dish with parchment paper for easier removal and cleanup after the bars have cooled.
- Store Properly: Keep leftover cake bars in an airtight container in the refrigerator for up to a week to maintain freshness.
- Involve the Kids: Get the kids involved in the decorating process. It’s a fun way to make memories and let everyone personalize their treats!
These tips will help you create delicious and festive Halloween Oreo Cake Bars that everyone will love!
Recipe Variations
Experiment with these variations for your Halloween Oreo Cake Bars:
- Pumpkin Spice Variation: Add pumpkin puree and pumpkin spice to the batter for a fall-inspired twist on the classic recipe.
- Peanut Butter Swirl: Incorporate creamy peanut butter into the batter and swirl it in before baking for a deliciously nutty flavor.
- Chocolate Chip Addition: Mix in mini chocolate chips to the batter for extra chocolatey goodness and a delightful texture.
- Minty Surprise: Use mint-flavored Oreos and add a few drops of mint extract to the batter for a refreshing twist.
- S’mores Style: Layer crushed graham crackers and mini marshmallows on top of the Oreo base before baking to create a s’mores-inspired treat.
- Nutty Delight: Fold in chopped nuts, such as pecans or walnuts, for added crunch and a delightful flavor contrast.
- Caramel Drizzle: Drizzle caramel sauce over the top of the baked bars for a sweet, gooey addition that complements the chocolate.
- Berry Blast: Mix in fresh or freeze-dried berries, like raspberries or strawberries, for a fruity burst in each bite.
- Coconut Topping: Add shredded coconut on top before baking for a tropical flavor that pairs well with the chocolate.
- Halloween Sprinkles: Top the bars with festive Halloween-themed sprinkles for a fun and colorful finish that kids will love.
These variations will allow you to customize your Halloween Oreo Cake Bars to suit different tastes and occasions!
Freezing and Storage
Here’s how to store and freeze your Halloween Oreo Cake Bars:
- Storage: Keep leftover bars in an airtight container in the refrigerator for up to 5 days.
- Freezing: You can freeze the uncut bars for up to 2 months. Thaw in the refrigerator before serving.
Special Equipment
Here are some helpful tools for making Halloween Oreo Cake Bars:
- Oven: Essential for baking the cake bars to perfection.
- Mixing Bowls: Various sizes for combining dry and wet ingredients.
- Electric Mixer: Useful for mixing the batter until smooth and fluffy.
- 9×13-inch Baking Pan: A standard size for baking the cake bars; non-stick or lined with parchment paper is ideal.
- Rubber Spatula: Perfect for spreading the batter evenly in the pan and folding in ingredients.
- Cooling Rack: Allows the cake bars to cool completely before cutting and decorating.
- Measuring Cups and Spoons: Essential for accurately measuring ingredients for the cake and toppings.
- Sifter: Optional for sifting powdered sugar or cocoa powder for dusting on top.
- Piping Bags: Great for decorating with frosting or melted chocolate.
- Sharp Knife or Pizza Cutter: Handy for slicing the cake bars into neat squares or rectangles for serving.
Having these tools will make your Halloween Oreo Cake Bars preparation smooth and enjoyable!
FAQ Section
Here are some frequently asked questions about this recipe:
- Can I use a different size pan?
Yes, but baking time may vary; adjust accordingly. - What can I use instead of whipped topping?
You can use freshly whipped cream or another non-dairy whipped topping. - Can I prepare these in advance?
Absolutely! They can be made a day ahead and stored in the fridge. - What toppings can I use?
Feel free to use any sprinkles, candies, or nuts you like.
Halloween Oreo Cake Bars
- Total Time: 1 hour 15 minutes
Ingredients
For the Chocolate Cake:
- 1 cup all-purpose flour
- 1/2 cup unsweetened cocoa powder
- 1 cup granulated sugar
- 1 teaspoon baking powder
- 1/2 teaspoon baking soda
- 1/4 teaspoon salt
- 1/2 cup milk
- 1/4 cup vegetable oil
- 1 large egg
- 1 teaspoon vanilla extract
- 1/2 cup boiling water
For the Oreo Filling:
- 1 package (8 oz) cream cheese, softened
- 1/2 cup powdered sugar
- 1 cup crushed Oreo cookies (about 10–12 cookies)
- 1 cup whipped topping (like Cool Whip)
For the Chocolate Ganache:
- 1 cup semi-sweet chocolate chips
- 1/2 cup heavy cream
For Topping:
- Halloween-themed sprinkles or decorations
- Additional crushed Oreos (optional)
Instructions
Step 1: Preheat the Oven
- Preheat your oven to 350°F (175°C). Grease and line an 8×8-inch baking pan with parchment paper.
Step 2: Make the Chocolate Cake
- In a large bowl, mix together the flour, cocoa powder, sugar, baking powder, baking soda, and salt.
- Add the milk, vegetable oil, egg, and vanilla extract, and mix until well combined.
- Carefully stir in the boiling water until the batter is smooth (it will be thin).
- Pour the batter into the prepared baking pan and spread evenly.
Step 3: Bake the Cake
- Bake in the preheated oven for 25-30 minutes, or until a toothpick inserted into the center comes out clean.
- Remove from the oven and let cool completely in the pan.
Step 4: Prepare the Oreo Filling
- In a medium bowl, beat the softened cream cheese until smooth.
- Gradually add the powdered sugar, mixing until well combined.
- Fold in the crushed Oreo cookies and whipped topping until everything is evenly distributed.
Step 5: Assemble the Cake Bars
- Once the chocolate cake has cooled, spread the Oreo filling evenly over the top of the cake.
- Place the cake in the refrigerator to chill while you prepare the ganache.
Step 6: Make the Chocolate Ganache
- In a small saucepan over low heat, combine the chocolate chips and heavy cream. Stir until the chocolate is melted and the mixture is smooth.
- Remove from heat and let cool slightly.
Step 7: Top the Bars
- Pour the chocolate ganache over the Oreo filling, spreading it evenly.
- Before the ganache sets, sprinkle with Halloween-themed decorations and additional crushed Oreos, if desired.
Step 8: Chill and Cut
- Refrigerate the cake bars for at least 2 hours to allow everything to set.
- Once set, lift the bars out of the pan using the parchment paper and cut into squares.
Nutrition
- Serving Size: 12 bars
- Calories: 300 kcal
- Fat: 15g
- Carbohydrates: 40g
- Protein: 4g
Conclusion
Halloween Oreo Cake Bars are a delightful way to celebrate the Halloween season with their delicious layers and fun presentation. These bars feature a rich, chocolatey base infused with crushed Oreos, creating a decadent treat that is both festive and satisfying. The combination of chocolate and Oreo flavors makes this treat irresistible, especially when topped with creamy frosting and spooky decorations like candy eyes or sprinkles.
I can’t wait for you to try this recipe and see how much everyone enjoys these spooky, sweet bars! They’re perfect for parties, school events, or even a cozy night in while watching Halloween movies. The easy-to-follow instructions mean that you can whip up these treats quickly, allowing you to spend more time celebrating with your loved ones.

