Introduction
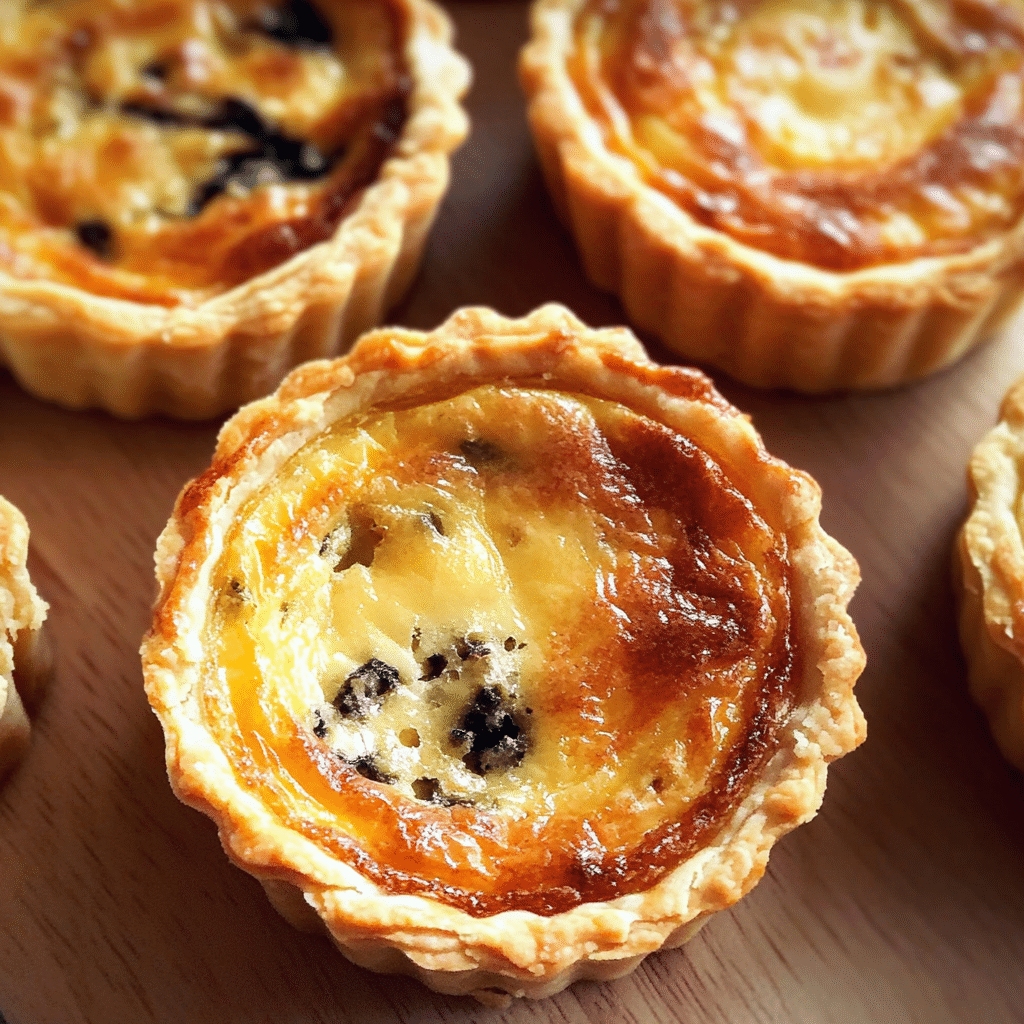
Mini Quiche are delightful bite-sized pastries that bring a touch of elegance and flavor to any gathering. Perfect for brunch, festive celebrations, or casual snacking, these individual quiches are not only visually appealing but also incredibly versatile. Their petite size makes them a fantastic option for guests to enjoy without the fuss of traditional dining.
What makes Mini Quiches truly special is their adaptability. You can mix and match fillings to create a variety of flavors that cater to different tastes. Whether you prefer a classic combination of spinach and feta, a savory blend of bacon and cheddar, or a more adventurous mix with roasted red peppers and goat cheese, the possibilities are endless. Each quiche can be customized to highlight seasonal ingredients, ensuring freshness and variety.
The flaky crust serves as the perfect foundation, complementing the creamy filling that’s loaded with a medley of vegetables, cheeses, and meats. As they bake, the quiches puff up slightly, creating a light and airy texture that contrasts beautifully with the satisfying crunch of the crust. The rich, savory aroma wafting from the oven will have everyone eagerly anticipating the first bite.
One of the best aspects of Mini Quiches is their convenience. They can be prepared ahead of time and either baked fresh or served at room temperature, making them an ideal addition to any menu. Simply pop them in the oven before guests arrive, or make a batch the day before to enjoy stress-free hosting.
With their combination of taste, texture, and presentation, Mini Quiches are sure to impress your family and friends, making them a beloved staple for any occasion.
Why You’ll Love This Recipe
Here’s why you’ll adore making Mini Quiche:
- Versatile Filling Options: Customize your mini quiches with a variety of fillings, such as vegetables, meats, and cheeses, to suit everyone’s tastes.
- Perfect for Any Meal: Ideal for breakfast, brunch, lunch, or even dinner, making them a versatile addition to your meal rotation.
- Easy to Make Ahead: Prepare a batch in advance and store them in the fridge or freezer for quick and convenient meals on busy days.
- Portable Snack: Their bite-sized nature makes mini quiches perfect for picnics, parties, or snacks on the go.
- Crowd-Pleaser: They’re always a hit at gatherings and potlucks, appealing to both kids and adults with their delicious flavors.
- Healthier Option: By using whole ingredients, you can control the amount of cheese, cream, and fillings, making them a healthier choice than store-bought versions.
- Gluten-Free Alternative: Easily make a gluten-free crust using almond flour or a crustless version, accommodating different dietary needs.
- Fun to Customize: Let everyone create their own mini quiches with a toppings bar, adding a fun interactive element to your meal prep.
- Rich in Protein: Packed with eggs and other nutritious fillings, they provide a satisfying source of protein to keep you energized.
- Elegant Presentation: Their small size and colorful fillings make for an elegant and visually appealing dish for any occasion.
Preparation Time and Servings
- Total Time: 40 minutes
- Servings: 12 mini quiches
- Calories per serving: Approximately 150 calories per quiche
- Key Nutrients: Protein: 8g, Carbohydrates: 12g, Fat: 9g
Ingredients
Here’s what you’ll need to make Mini Quiche:
For the Crust:
- 1 package (about 14 oz) refrigerated pie crusts (or homemade)
For the Filling:
- 6 large eggs
- 1 cup heavy cream
- 1 cup shredded cheese (such as cheddar, Swiss, or mozzarella)
- 1 cup diced vegetables (such as bell peppers, spinach, or mushrooms)
- 1 cup cooked meat (such as bacon, ham, or sausage) – optional
- Salt and pepper, to taste
- Fresh herbs (such as parsley or chives), for garnish (optional)
Ingredient Highlights
- Cheese Variety: Cheese adds creaminess and flavor, making each bite delicious.
- Fresh Vegetables: Use seasonal vegetables for the best flavor and nutrition.
Step-by-Step Instructions
Follow these simple instructions to create your own Mini Quiche:
Preheat the Oven
- Preheat your oven to 375°F (190°C) and grease a 12-cup muffin tin with non-stick spray.
Prepare the Crust
- Roll out the refrigerated pie crust on a lightly floured surface. Using a round cutter or a glass, cut circles slightly larger than the muffin cups. Press the circles into the greased muffin tin, creating a small crust in each cup.
Mix the Filling
- In a large mixing bowl, whisk together the eggs and heavy cream until well combined. Stir in the shredded cheese, diced vegetables, and cooked meat (if using). Season with salt and pepper to taste.
Fill the Cups
- Carefully pour the egg mixture into each prepared crust, filling each cup about 3/4 full.
Bake
- Place the muffin tin in the preheated oven and bake for 20-25 minutes, or until the egg is set and the tops are lightly golden.
Cool and Serve
- Remove the muffin tin from the oven and let the mini quiches cool for a few minutes. Carefully remove each quiche from the tin and serve warm or at room temperature.
How to Serve
Here are some delicious ways to serve Mini Quiche:
- Brunch Buffet: Place them on a large platter as part of a brunch spread, accompanied by fresh fruit and pastries.
- With Dipping Sauces: Serve alongside a variety of sauces, such as salsa, pesto, or a tangy yogurt dip, for added flavor.
- On Individual Plates: Serve each mini quiche on its own plate with a small side salad for a more elegant presentation.
- Garnished with Fresh Herbs: Top each quiche with a sprinkle of fresh herbs, like chives or parsley, for a burst of color and flavor.
- In a Breakfast Box: Pack mini quiches in a to-go breakfast box with fruit and granola for a convenient meal on the run.
- As Party Appetizers: Arrange on a serving tray with toothpicks for easy eating as finger food during parties.
- With a Side Salad: Serve alongside a light mixed greens salad drizzled with vinaigrette to balance the richness of the quiche.
- Topped with Cheese: Add a sprinkle of grated cheese on top before baking for an extra cheesy treat.
- Accompanied by Slices of Avocado: Serve with slices of ripe avocado for a creamy complement to the savory quiches.
- With Warm Bread: Pair with slices of warm baguette or crusty bread for a hearty meal option.
Additional Tips
To ensure your Mini Quiche turns out perfectly, keep these tips in mind:
- Use a Variety of Fillings: Experiment with different vegetables, meats, and cheeses to create unique flavor combinations. Spinach, mushrooms, bacon, and cheddar are great options.
- Pre-cook Ingredients: For ingredients like mushrooms and spinach, sauté them first to release excess moisture and enhance their flavor before adding them to the quiche.
- Don’t Overfill: Avoid filling the quiche cups to the brim; leave a little space to prevent spillage while baking.
- Add Fresh Herbs: Incorporate fresh herbs like chives, parsley, or thyme to elevate the flavor profile of your mini quiches.
- Use Store-bought Pastry: If you’re short on time, using pre-made pastry shells or phyllo dough can save you preparation time while still delivering delicious results.
- Experiment with Cheese: Try different cheeses such as feta, goat cheese, or pepper jack for added flavor and creaminess.
- Chill the Filling: Allow your filling mixture to cool before adding the eggs to prevent cooking the eggs prematurely and ensure a fluffy texture.
- Bake at the Right Temperature: Bake at 375°F (190°C) for even cooking and to achieve a golden-brown crust without burning.
- Let Them Cool: Allow the mini quiches to cool for a few minutes before removing them from the pan to set properly and avoid breaking.
- Store Properly: Store any leftover mini quiches in an airtight container in the refrigerator for up to three days or freeze for longer storage. Reheat them in the oven or microwave before serving.
These tips will help you achieve the perfect mini quiches every time!
Recipe Variations
Here are some fun variations to try with Mini Quiche:
- Spinach and Feta: Incorporate fresh spinach and crumbled feta cheese for a Mediterranean twist that adds flavor and nutrition.
- Mushroom and Swiss: Sauté sliced mushrooms and mix in Swiss cheese for an earthy, creamy filling that’s irresistible.
- Ham and Cheese: Add diced chicken ham and shredded cheddar for a classic combination that’s hearty and satisfying.
- Tomato and Basil: Use sun-dried tomatoes and fresh basil for a fresh, flavorful filling that captures the essence of summer.
- Smoked Salmon and Dill: Combine smoked salmon with cream cheese and fresh dill for a sophisticated brunch option that’s packed with flavor.
- Zucchini and Goat Cheese: Grate zucchini and mix with crumbled goat cheese for a light, flavorful quiche that’s perfect for summer.
- Bell Pepper and Onion: Sauté diced bell peppers and onions for a colorful, sweet filling that adds crunch and flavor.
- Sweet Potato and Black Bean: For a hearty vegetarian option, mix roasted sweet potato and black beans with spices for a filling mini quiche.
- Broccoli and Cheddar: Steam broccoli florets and mix them with sharp cheddar cheese for a classic and nutritious variation.
- Spicy Chorizo and Pepper Jack: Add crumbled chorizo and pepper jack cheese for a spicy kick that elevates your mini quiche to the next level.
These variations allow you to customize your mini quiches to suit your taste or occasion!
Freezing and Storage
Here’s how to store and freeze your Mini Quiche:
- Storage: Store leftovers in an airtight container in the refrigerator for up to 3 days. Reheat in the microwave or oven.
- Freezing: Freeze baked quiches individually for up to 3 months. Thaw in the refrigerator overnight before reheating.
Special Equipment
Here are some helpful kitchen tools you may want to use when making Mini Quiche:
- Mini Muffin Tin: Essential for baking the mini quiches, creating the perfect portion sizes.
- Mixing Bowls: Various sizes for mixing the egg filling and combining ingredients.
- Whisk: Useful for beating the eggs and ensuring a smooth filling mixture.
- Measuring Cups and Spoons: For accurately measuring out ingredients like milk, cheese, and spices.
- Rolling Pin: Needed if you are making your own pastry crust for the quiches.
- Pastry Cutter or Dough Scraper: Handy for cutting out dough circles for the crusts.
- Silicone Baking Cups: An alternative to the muffin tin, these allow for easy removal and clean-up.
- Sharp Knife: For chopping vegetables and other fillings, ensuring clean cuts.
- Baking Sheet: To catch any spills and provide extra support for the mini muffin tin in the oven.
- Cooling Rack: Useful for cooling the mini quiches after baking, preventing sogginess.
These tools will help make your mini quiche-making experience seamless and enjoyable!
FAQ Section
Here are some frequently asked questions about Mini Quiche:
- Can I make these ahead of time?
Yes, you can prepare the filling and crust in advance, then bake them just before serving. - Can I use a different type of crust?
Absolutely! Feel free to use a gluten-free crust or even no crust for a crustless version. - How long do they last in the fridge?
They can be stored in the refrigerator for up to 3 days in an airtight container. - Can I use egg substitutes?
Yes, egg substitutes or silken tofu can work for a dairy-free or vegan option. - What’s the best way to reheat mini quiches?
Reheat them in the oven at 350°F (175°C) for about 10 minutes for best results.
Mini Quiche Recipe
- Total Time: 40 minutes
Ingredients
For the Crust:
- 1 package (about 14 oz) refrigerated pie crusts (or homemade)
For the Filling:
- 6 large eggs
- 1 cup heavy cream
- 1 cup shredded cheese (such as cheddar, Swiss, or mozzarella)
- 1 cup diced vegetables (such as bell peppers, spinach, or mushrooms)
- 1 cup cooked meat (such as bacon, ham, or sausage) – optional
- Salt and pepper, to taste
- Fresh herbs (such as parsley or chives), for garnish (optional)
Instructions
Preheat the Oven
- Preheat your oven to 375°F (190°C) and grease a 12-cup muffin tin with non-stick spray.
Prepare the Crust
- Roll out the refrigerated pie crust on a lightly floured surface. Using a round cutter or a glass, cut circles slightly larger than the muffin cups. Press the circles into the greased muffin tin, creating a small crust in each cup.
Mix the Filling
- In a large mixing bowl, whisk together the eggs and heavy cream until well combined. Stir in the shredded cheese, diced vegetables, and cooked meat (if using). Season with salt and pepper to taste.
Fill the Cups
- Carefully pour the egg mixture into each prepared crust, filling each cup about 3/4 full.
Bake
- Place the muffin tin in the preheated oven and bake for 20-25 minutes, or until the egg is set and the tops are lightly golden.
Cool and Serve
- Remove the muffin tin from the oven and let the mini quiches cool for a few minutes. Carefully remove each quiche from the tin and serve warm or at room temperature.
Nutrition
- Serving Size: 12 mini quiches
- Calories: 150 kcal
- Fat: 9g
- Carbohydrates: 12g
- Protein: 8g
Conclusion
Mini Quiche are a delightful and versatile dish that adds elegance and flavor to any meal. Their customizable nature means you can create endless combinations to suit your taste, from classic combinations like spinach and feta to more adventurous options like smoked salmon and dill. Whether enjoyed as part of a brunch spread, an elegant appetizer, or a comforting snack, these little bites are sure to impress your family and friends.
With their flaky crust and creamy filling, Mini Quiche are not only delicious but also easy to prepare, making them a perfect addition to any gathering. Plus, they can be made ahead of time and served warm or at room temperature, adding to their appeal. Give this recipe a try, and savor the deliciousness in every bite! I can’t wait to see how your Mini Quiche turn out! Don’t forget to snap a photo and tag me on social media—I love seeing your delicious creations! Happy cooking!

