Introduction
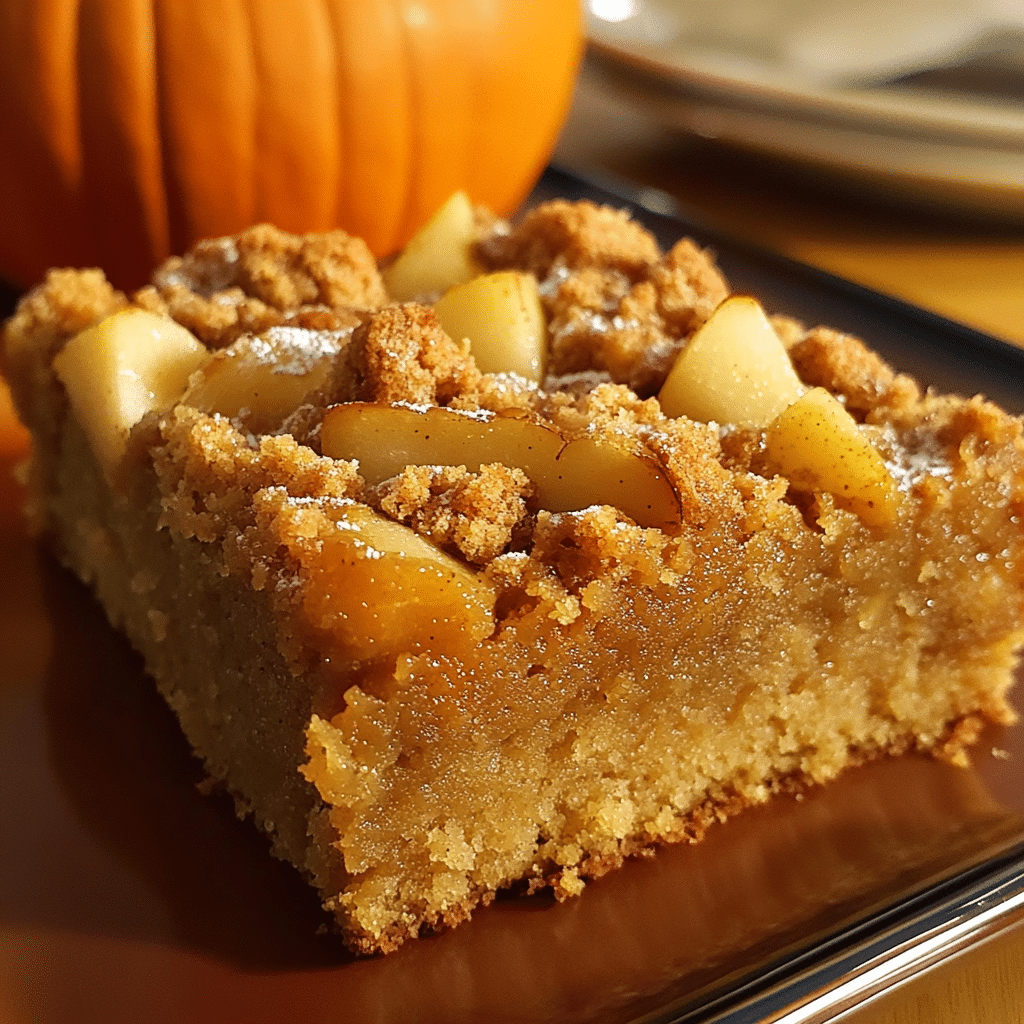
As the autumn leaves begin to carpet the ground and the air turns crisp, there’s nothing quite like the aroma of freshly baked cake wafting through the kitchen. This Pear and Pumpkin Snack Cake is the perfect way to embrace the flavors of fall! Imagine a soft, moist cake infused with warm spices, layered with sweet, tender pears, and featuring the subtle richness of pumpkin. Each slice is a cozy hug in cake form, perfect for snacking or dessert.
I stumbled upon this recipe during a Sunday afternoon baking session when I found a few ripe pears on my counter and a can of pumpkin just waiting to be used. Combining these two ingredients resulted in a delightful cake that quickly became a family favorite. The best part? It’s incredibly easy to whip up, making it a fantastic choice for both seasoned bakers and beginners alike.
Whether you’re looking for a comforting snack with your afternoon tea or a sweet treat to share with friends at a gathering, this Pear and Pumpkin Snack Cake will surely delight everyone who takes a bite.
Why You’ll Love This Recipe
There are so many reasons to adore this Pear and Pumpkin Snack Cake:
- Moist and Flavorful: The combination of pear and pumpkin creates a moist cake that’s bursting with flavor.
- Easy to Make: With simple ingredients and straightforward steps, this recipe is perfect for any baking skill level.
- Versatile: Enjoy it as a snack, dessert, or even breakfast—this cake is delicious any time of day!
- Warm Spices: The warm spices evoke the cozy feelings of fall, making every bite feel like a warm embrace.
- Great for Sharing: This cake is perfect for potlucks, gatherings, or just to have on hand for unexpected guests.
Preparation Time and Servings
- Total Time: 1 hour (includes baking time)
- Servings: 12 slices
- Calories per serving: Approximately 180 calories per slice
- Key nutrients: Protein: 2g, Carbohydrates: 25g, Fat: 7g, Fiber: 1g
Ingredients
To create this delightful Pear and Pumpkin Snack Cake, gather the following ingredients:
For the Cake:
- 1 cup unsalted butter, softened
- 1 cup granulated sugar
- 1 cup brown sugar, packed
- 1 cup canned pumpkin puree
- 3 large eggs
- 2 teaspoons vanilla extract
- 2 cups all-purpose flour
- 1 teaspoon baking powder
- 1 teaspoon baking soda
- 1 teaspoon cinnamon
- ½ teaspoon nutmeg
- ½ teaspoon ground ginger
- ½ teaspoon salt
- 2 ripe pears, peeled, cored, and diced
Topping (optional):
- ½ cup chopped pecans or walnuts
- ½ teaspoon cinnamon
- 1 tablespoon brown sugar
Ingredient Highlights
- Pumpkin puree: Adds moisture and a subtle sweetness to the cake, making it incredibly tender.
- Pears: The fresh pears bring natural sweetness and a lovely texture, perfectly complementing the pumpkin.
- Warm spices: Cinnamon, nutmeg, and ginger create a cozy flavor profile that screams fall.
Step-by-Step Instructions
Let’s dive into the simple steps to make your Pear and Pumpkin Snack Cake:
1st Step: Preheat and Prepare the Pan
- Preheat your oven to 350°F (175°C). Grease and flour a 9×13-inch baking pan or line it with parchment paper for easy removal.
2nd Step: Cream the Butter and Sugars
- In a large mixing bowl, beat the softened butter, granulated sugar, and brown sugar together until light and fluffy. This should take about 3-4 minutes.
3rd Step: Add Pumpkin and Eggs
- Mix in the canned pumpkin puree until well combined. Add the eggs, one at a time, mixing well after each addition. Finally, stir in the vanilla extract.
4th Step: Combine Dry Ingredients
- In a separate bowl, whisk together the flour, baking powder, baking soda, cinnamon, nutmeg, ginger, and salt.
5th Step: Mix Wet and Dry Ingredients
- Gradually add the dry ingredients to the wet ingredients, mixing until just combined. Be careful not to overmix, as this can make the cake tough.
6th Step: Fold in the Pears
- Gently fold the diced pears into the batter, ensuring they’re evenly distributed throughout the mixture.
7th Step: Prepare the Topping (Optional)
- If you’re adding a topping, combine the chopped nuts, cinnamon, and brown sugar in a small bowl. Sprinkle this mixture evenly over the top of the cake batter in the pan.
8th Step: Bake the Cake
- Pour the batter into the prepared baking pan and spread it evenly. Bake in the preheated oven for 30-35 minutes, or until a toothpick inserted in the center comes out clean.
9th Step: Cool and Serve
- Allow the cake to cool in the pan for about 10 minutes before transferring it to a wire rack to cool completely. Once cool, slice into squares and enjoy!
How to Serve
This Pear and Pumpkin Snack Cake is delicious on its own, but you can also enhance your serving experience with these ideas:
- Slice Generously: Cut the cake into generous squares or rectangles to highlight its moist texture and flavor.
- Dust with Powdered Sugar: A light dusting of powdered sugar adds a touch of sweetness and elegance.
- Serve Warm or Room Temperature: Enjoy the cake warm or at room temperature, depending on your preference.
- Pair with Whipped Cream: Serve slices with a dollop of whipped cream or a scoop of vanilla ice cream for an indulgent treat.
- Enjoy with Tea or Coffee: This cake is perfect for an afternoon snack alongside your favorite hot beverage.
- Garnish with Fresh Pear Slices: Decorate each plate with thinly sliced fresh pears or a sprinkle of chopped nuts for added texture and flavor.
Additional Tips
Here are some helpful tips to ensure your Pear and Pumpkin Snack Cake turns out perfectly:
- Use Ripe Pears: Make sure your pears are ripe for maximum sweetness and flavor.
- Use Fresh Pumpkin: If possible, opt for fresh pumpkin puree instead of canned for a more vibrant flavor. Roast and puree your own pumpkin for the best results.
- Spice It Up: Don’t hesitate to adjust the spices according to your taste. A pinch of nutmeg or allspice can enhance the flavor profile and add warmth.
- Don’t Overmix: Overmixing can result in a dense cake, so mix just until combined.
- Test for Doneness: Since oven temperatures can vary, check your cake a few minutes early to prevent overbaking.
- Cool Completely: Allow the cake to cool completely before slicing to ensure clean cuts.
- Frosting Alternatives: For a lighter option, consider dusting the cooled cake with powdered sugar instead of frosting, or serve it with a dollop of whipped cream or crème fraîche.
- Storage: Store leftovers in an airtight container at room temperature for up to 3 days, or refrigerate for longer freshness.
- Make It Ahead: This cake keeps well, so consider making it a day in advance. The flavors often deepen overnight, making it even more delicious.
- Serve with Complementary Flavors: Pair the cake with a side of spiced chai tea or coffee to enhance the cozy flavors of the cake during fall or winter gatherings.
Recipe Variations
Feel free to customize this recipe to suit your taste! Here are some fun variations you can try:
- Spiced Apples: Substitute the pears with diced apples for a delicious twist.
- Add Chocolate: Stir in chocolate chips for a decadent addition that pairs wonderfully with pumpkin and pear.
- Nut Variations: Substitute the walnuts with pecans or almonds for a different nutty flavor and texture. You can also omit the nuts altogether for a nut-free version.
- Gluten-Free Option: Use a gluten-free flour blend to make this cake gluten-free.
- Cream Cheese Swirl: Add a creamy layer by mixing cream cheese with a bit of sugar and vanilla extract. Swirl it into the cake batter before baking for a rich, tangy flavor.
- Dairy-Free Version: Replace the butter with coconut oil and use a dairy-free yogurt or milk substitute for a dairy-free cake.
- Chocolate Chips: Fold in dark or white chocolate chips into the batter for a sweet and decadent addition that complements the pumpkin and pear flavors.
- Cranberry Addition: Mix in dried cranberries or fresh cranberries for a tart contrast to the sweetness of the cake and a pop of color.
- Pumpkin Spice Frosting: Top the cooled cake with a pumpkin spice cream cheese frosting for an extra layer of flavor and sweetness.
- Fruit Compote: Serve the cake with a warm pear or apple compote on top for added moisture and a fruity kick.
Freezing and Storage
Here’s how to store or freeze your cake for later enjoyment:
- Storage: Keep the cake in an airtight container at room temperature for up to 3 days or refrigerate for up to a week.
- Freezing: You can freeze the cake by wrapping it tightly in plastic wrap and then in aluminum foil. It will keep for up to 3 months. To enjoy, simply thaw it in the refrigerator overnight.
Special Equipment
You’ll need a few essential tools to make this cake:
- Mixing Bowls: A large mixing bowl for the batter and a smaller one for the topping.
- Electric Mixer: For creaming the butter and sugars smoothly.
- Measuring Cups and Spoons: Essential for accurately measuring ingredients, including dry and wet components.
- 9×13-inch Baking Pan: Perfect for baking this delicious snack cake.
- Parchment Paper: Optional but recommended for lining the baking pan for easy removal and cleanup.
- Cooling Rack: For allowing the cake to cool evenly after baking before slicing and serving.
- Knife or Cake Slicer: For cutting the cooled cake into even portions for serving.
FAQ Section
Here are some frequently asked questions to help you with this recipe:
- Can I use fresh pumpkin instead of canned?
Yes! Just make sure to use a well-pureed fresh pumpkin that is not too watery. - Can I make this cake ahead of time?
Absolutely! You can bake it a day in advance and store it covered at room temperature. - What if my cake is too dry?
Make sure not to overbake it! You can also add a bit of moisture with a glaze or serve it with whipped cream. - Can I make this cake in a different pan?
Yes, you can use an 8×8 or 9×9 pan, but be sure to adjust the baking time as it may take longer or shorter depending on the size.
Pear and Pumpkin Snack Cake
- Total Time: 1 hour
Ingredients
For the Cake:
- 1 cup unsalted butter, softened
- 1 cup granulated sugar
- 1 cup brown sugar, packed
- 1 cup canned pumpkin puree
- 3 large eggs
- 2 teaspoons vanilla extract
- 2 cups all-purpose flour
- 1 teaspoon baking powder
- 1 teaspoon baking soda
- 1 teaspoon cinnamon
- ½ teaspoon nutmeg
- ½ teaspoon ground ginger
- ½ teaspoon salt
- 2 ripe pears, peeled, cored, and diced
For the Topping (optional):
- ½ cup chopped pecans or walnuts
- ½ teaspoon cinnamon
- 1 tablespoon brown sugar
Instructions
Step 1: Preheat and Prepare the Pan
- Preheat your oven to 350°F (175°C). Grease and flour a 9×13-inch baking pan or line it with parchment paper for easy removal.
Step 2: Cream the Butter and Sugars
- In a large mixing bowl, beat the softened butter, granulated sugar, and brown sugar together until light and fluffy. This should take about 3-4 minutes.
Step 3: Add Pumpkin and Eggs
- Mix in the canned pumpkin puree until well combined. Add the eggs, one at a time, mixing well after each addition. Finally, stir in the vanilla extract.
Step 4: Combine Dry Ingredients
- In a separate bowl, whisk together the flour, baking powder, baking soda, cinnamon, nutmeg, ginger, and salt.
Step 5: Mix Wet and Dry Ingredients
- Gradually add the dry ingredients to the wet ingredients, mixing until just combined. Be careful not to overmix, as this can make the cake tough.
Step 6: Fold in the Pears
- Gently fold the diced pears into the batter, ensuring they’re evenly distributed throughout the mixture.
Step 7: Prepare the Topping (Optional)
- If you’re adding a topping, combine the chopped nuts, cinnamon, and brown sugar in a small bowl. Sprinkle this mixture evenly over the top of the cake batter in the pan.
Step 8: Bake the Cake
- Pour the batter into the prepared baking pan and spread it evenly. Bake in the preheated oven for 30-35 minutes, or until a toothpick inserted in the center comes out clean.
Step 9: Cool and Serve
- Allow the cake to cool in the pan for about 10 minutes before transferring it to a wire rack to cool completely. Once cool, slice into squares and enjoy!
Nutrition
- Serving Size: 12 slices
- Calories: 180 kcal
- Fat: 7g
- Carbohydrates: 25g
- Fiber: 1g
- Protein: 2g
Conclusion
I can’t wait for you to try this Pear and Pumpkin Snack Cake! It’s a deliciously moist cake that brings together the best flavors of fall in every bite. Whether you’re enjoying it as an afternoon snack, a festive dessert, or sharing it with loved ones, this cake is bound to be a hit.
If you give this recipe a try, I’d love to see how it turns out! Share your photos on social media or leave a comment to let me know your thoughts. Happy baking!

