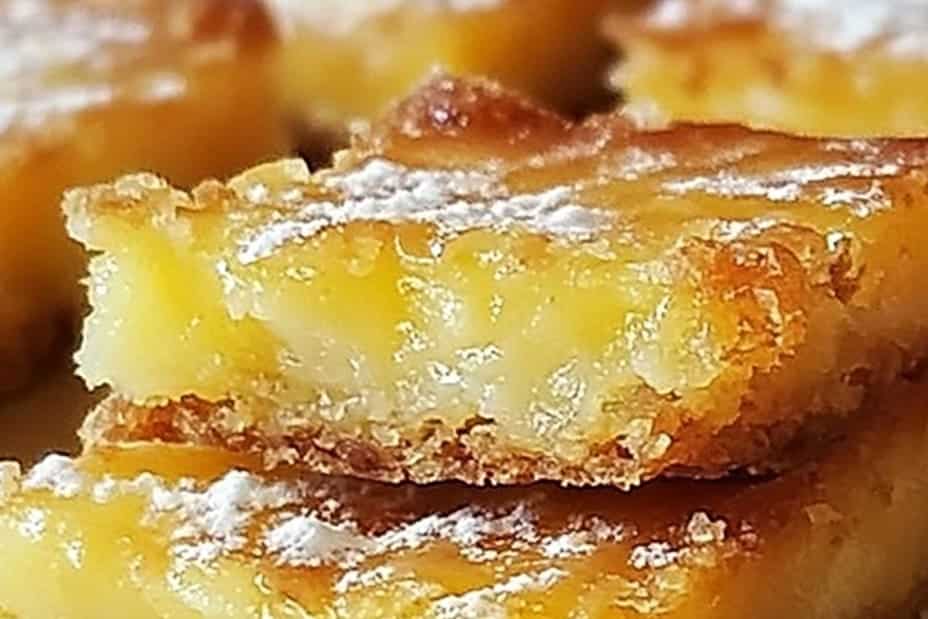

Pineapple Bliss Bars are a delightful treat that will elevate any dessert table. These bars encapsulate the essence of a tropical paradise, bringing forth a sweet, tangy flavor that is truly irresistible. With every bite, you will be transported to sun-kissed beaches with gentle waves lapping at the shore. Their vibrant color and luscious taste make them a visual and sensory delight that leaves you craving more.
The incredible combination of coconut, pineapple, and a touch of vanilla ensures that this tropical treat satisfies your sweet tooth. Picture a luscious layer of flavorful pineapple filling perfectly balanced atop a buttery crust. This recipe not only satisfies cravings but is also perfect for summer gatherings, birthday parties, or simply enjoying a piece of paradise at home. Everyone who takes a bite can’t help but smile!
You might even find yourself coming back for seconds, thirds, or even more. Whether you’re hosting a summer barbecue or looking to impress friends at a potluck, Pineapple Bliss Bars will surely be the star of the show. Get ready to learn why this recipe is a must-try, how to prepare it, and tips for serving it perfectly!
Why You’ll Love This Recipe
Pineapple Bliss Bars are more than just a dessert; they are an experience that engages the senses. Here are some reasons why you’ll love making them:
1. Easy to Make – The straightforward instructions make this an accessible recipe for all skill levels.
2. Tropical Flavors – The sweet and tangy taste of pineapple paired with creamy coconut creates an unforgettable flavor profile.
3. Versatile Desserts – These bars are perfect for any occasion, whether it’s a sunny picnic or a cozy family gathering.
4. Eye-Catching Appearance – The bright, cheerful colors are guaranteed to attract attention and savor delightful conversations.
5. Make Ahead – These bars can be prepared in advance, making entertaining easier.
6. Family-Friendly – Kids and adults alike enjoy these treats, ensuring no one is left out of the tropical bliss.
The harmony of flavors and textures creates a satisfying dessert that’s as fun to prepare as it is to enjoy. Once you make these bars, they will become a repeat request from your family and friends!
Preparation and Cooking Time
Creating these Pineapple Bliss Bars is simple and quick. Here’s a breakdown of the time you can expect to invest:
– Preparation Time: 25 minutes
– Cooking Time: 25-30 minutes
– Cooling Time: 1 hour
– Total Time: Approximately 1 hour and 55 minutes
These times may vary slightly depending on your kitchen efficiency and experience, but this framework gives a solid estimate.
Ingredients
– For the Crust:
– 1 ½ cups all-purpose flour
– ½ cup powdered sugar
– ½ teaspoon salt
– ¾ cup unsalted butter, cold and cubed
– For the Pineapple Filling:
– 2 cups crushed pineapple, drained
– ¾ cup granulated sugar
– 3 large eggs
– 1 tablespoon cornstarch
– 1 teaspoon vanilla extract
– ½ cup shredded coconut (unsweetened)
– For Garnish:
– Whipped cream (optional)
– Toasted coconut flakes (optional)
Step-by-Step Instructions

Follow these simple steps to bring your Pineapple Bliss Bars to life:
1. Preheat Oven: Preheat your oven to 350°F (175°C). Grease a 9×9-inch baking dish or line it with parchment paper for easy removal.
2. Prepare the Crust: In a mixing bowl, combine the flour, powdered sugar, and salt. Add the cold butter and mix until the mixture resembles coarse crumbs.
3. Press the Crust: Firmly press the crumb mixture into the bottom of the prepared pan. Use a fork to poke the crust gently to prevent bubbling.
4. Bake the Crust: Bake in the preheated oven for 15 minutes or until lightly golden. Remove from the oven and allow to cool slightly.
5. Prepare the Filling: In another bowl, mix the drained crushed pineapple, granulated sugar, eggs, cornstarch, vanilla extract, and shredded coconut until well combined.
6. Pour Filling: Pour the pineapple mixture over the crust, spreading it evenly.
7. Bake Again: Return the dish to the oven and bake for an additional 25-30 minutes, or until the filling is set and lightly golden on top. A toothpick inserted should come out clean.
8. Cool Completely: Remove from the oven and let it cool in the pan for at least 1 hour. Once cooled, refrigerate for an additional hour for optimal texture.
9. Cut into Bars: Once fully cooled, remove from the dish and cut into squares or bars as desired.
10. Serve and Garnish: Serve chilled, optionally topped with whipped cream and toasted coconut flakes.
These steps will yield the perfect Pineapple Bliss Bars that everyone will love!
How to Serve
To create a memorable serving experience with your Pineapple Bliss Bars, consider these tips:
1. Presentation: Arrange the bars on a colorful platter or dessert stand to attract attention.
2. Garnishes: Enhance the tropical vibe with a dollop of whipped cream and sprinkle with toasted coconut.
3. Slice Sizes: Cut the bars into bite-sized pieces for easy serving. This encourages guests to take more than one!
4. Beverage Pairing: These bars pair beautifully with tropical beverages like iced tea, fruit punches, or even a refreshing coconut water.
5. Chill Before Serving: Ensure the bars are well-chilled. Serving them cold enhances their flavor and texture, making each bite even more delightful.
Pineapple Bliss Bars are truly a tropical treat that brings sunshine to your table. Their vibrant flavors and textures will transport you and your guests to an island paradise, no matter where you are. Enjoy your culinary adventure!
Additional Tips
– Choose Ripe Pineapples: For the freshest taste, use ripe, sweet pineapples. This ensures a burst of tropical flavor in every bite.
– Adjust Texture: If you prefer a chunkier filling, you can add small pineapple chunks in addition to crushed pineapple for added texture.
– Serve with a Tropical Twist: Consider pairing the bars with a scoop of coconut or pineapple sorbet for an extra tropical experience.
– Garnish Creatively: Use colorful sprinkles, edible flowers, or mint leaves to enhance the visual appeal of your dessert.
Recipe Variation
Experiment with these variations to make your Pineapple Bliss Bars uniquely yours:
1. Add Citrus Zest: Include lime or lemon zest in the filling for a zesty burst that complements the pineapple beautifully.
2. Incorporate Nuts: Add finely chopped macadamia nuts or almonds into the crust or topping for a crunchy texture.
3. Gluten-Free Option: Substitute the all-purpose flour with gluten-free flour for a delicious gluten-free treat.
4. Chocolate Swirl: Drizzle melted dark chocolate over the filling before baking for a rich chocolatey flavor.
5. Different Fruits: Replace pineapple with mango or peach for a different fruity flavor profile.
Freezing and Storage
– Storage: Keep the Pineapple Bliss Bars in an airtight container in the refrigerator; they can stay fresh for up to one week.
– Freezing: For longer storage, you can freeze the bars. Wrap individual pieces in plastic wrap and place them in a freezer-safe container. They can be frozen for up to three months. Thaw overnight in the refrigerator before serving.
Special Equipment
To make the preparation of Pineapple Bliss Bars convenient and fun, gather the following equipment:
– 9×9-inch baking dish or a comparable size
– Mixing bowls (preferably multiple sizes)
– A whisk or electric mixer for easy mixing
– Measuring cups and spoons for accurate ingredient measurements
– Parchment paper (for easy removal)
– Rubber spatula for smoothing out the filling
Frequently Asked Questions
How can I tell if my bars are baked properly?
Insert a toothpick or knife into the center. If it comes out clean or with a few moist crumbs, the bars are done baking.
Can I use fresh pineapple instead of canned?
Yes, fresh pineapple works beautifully. Ensure you crush it well and drain excess juice during preparation.
Are there any alternatives to the eggs in this recipe?
You can use unsweetened applesauce or flaxseed meal as an egg substitute. For each egg, use ¼ cup of applesauce or 1 tablespoon of flaxseed meal mixed with 2.5 tablespoons of water.
How should I store leftovers?
Keep leftovers in an airtight container in the refrigerator. They taste delightful cold and can maintain freshness for several days.
Can I make these bars vegan?
Absolutely! Use plant-based butter and a suitable egg substitute like flax eggs to create a vegan version.
Conclusion
Pineapple Bliss Bars are a delightful dessert that brings a taste of the tropics right to your kitchen. With their refreshing flavors and easy preparation, these bars are bound to become a favorite for gatherings or a sweet treat during quiet times. Their charming appearance and scrumptious flavor make them an unforgettable addition to your dessert repertoire. Whip up a batch today, and enjoy a piece of paradise in every bite!
Pineapple Bliss Bars: An Incredible Ultimate Tropical Treat

- Prep Time: 15 minutes
- Cook Time: 25-30 minutes
- Total Time: 0 hours
Ingredients
– For the Crust:
– 1 ½ cups all-purpose flour
– ½ cup powdered sugar
– ½ teaspoon salt
– ¾ cup unsalted butter, cold and cubed
– For the Pineapple Filling:
– 2 cups crushed pineapple, drained
– ¾ cup granulated sugar
– 3 large eggs
– 1 tablespoon cornstarch
– 1 teaspoon vanilla extract
– ½ cup shredded coconut (unsweetened)
– For Garnish:
– Whipped cream (optional)
– Toasted coconut flakes (optional)
Instructions
Follow these simple steps to bring your Pineapple Bliss Bars to life:
1. Preheat Oven: Preheat your oven to 350°F (175°C). Grease a 9×9-inch baking dish or line it with parchment paper for easy removal.
2. Prepare the Crust: In a mixing bowl, combine the flour, powdered sugar, and salt. Add the cold butter and mix until the mixture resembles coarse crumbs.
3. Press the Crust: Firmly press the crumb mixture into the bottom of the prepared pan. Use a fork to poke the crust gently to prevent bubbling.
4. Bake the Crust: Bake in the preheated oven for 15 minutes or until lightly golden. Remove from the oven and allow to cool slightly.
5. Prepare the Filling: In another bowl, mix the drained crushed pineapple, granulated sugar, eggs, cornstarch, vanilla extract, and shredded coconut until well combined.
6. Pour Filling: Pour the pineapple mixture over the crust, spreading it evenly.
7. Bake Again: Return the dish to the oven and bake for an additional 25-30 minutes, or until the filling is set and lightly golden on top. A toothpick inserted should come out clean.
8. Cool Completely: Remove from the oven and let it cool in the pan for at least 1 hour. Once cooled, refrigerate for an additional hour for optimal texture.
9. Cut into Bars: Once fully cooled, remove from the dish and cut into squares or bars as desired.
10. Serve and Garnish: Serve chilled, optionally topped with whipped cream and toasted coconut flakes.
These steps will yield the perfect Pineapple Bliss Bars that everyone will love!
Nutrition
- Serving Size: 12 bars
- Calories: 250 kcal
- Fat: 12g
- Protein: 3g