Introduction
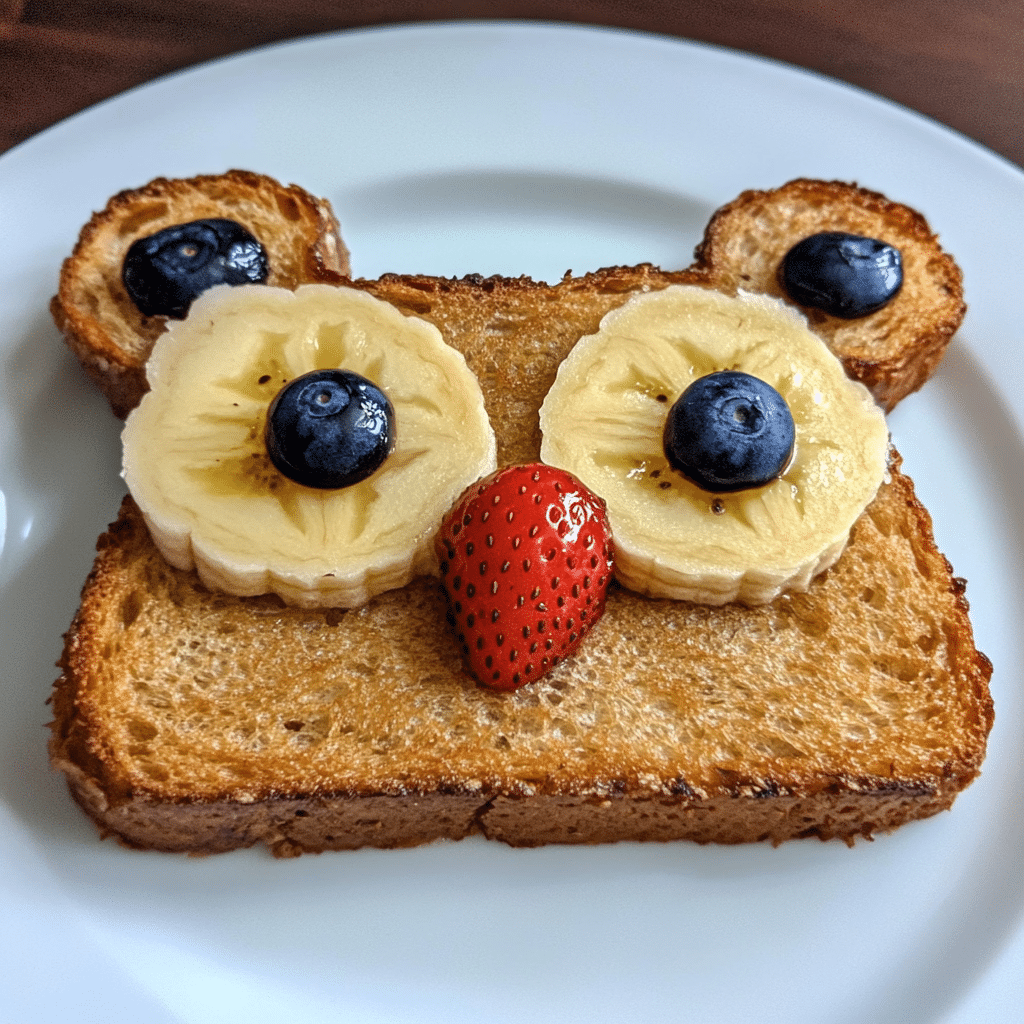
When it comes to breakfast or snack time, nothing brings a smile quite like Teddy Bear Toast! This fun and adorable dish is not only visually delightful but also incredibly easy to make. With just a few simple ingredients, you can transform ordinary toast into a whimsical bear face that will make your little ones (and even adults!) beam with joy.
What makes Teddy Bear Toast so special is its versatility. You can use your favorite bread, spreads, and toppings to create your very own teddy bear masterpiece. Whether you prefer peanut butter, cream cheese, or even Nutella, this recipe allows for endless creativity. Plus, it’s a fantastic way to sneak in some healthy ingredients, like fruits and nuts, while making snack time more enjoyable.
I first stumbled upon this charming idea while trying to think of creative ways to get my kids excited about breakfast. The moment I placed the toast on the table, their eyes lit up, and they couldn’t wait to dig in! Since then, Teddy Bear Toast has become a regular feature in our household, especially on busy mornings when we need something quick yet fun.
Why You’ll Love This Recipe
Here are a few reasons why Teddy Bear Toast should be on your breakfast menu:
- Adorable Presentation: The cute teddy bear shape makes breakfast fun and visually appealing, perfect for kids and adults alike.
- Easy to Make: With minimal ingredients and simple steps, this recipe is quick and hassle-free, making it a great choice for busy mornings.
- Customizable Toppings: You can personalize your teddy bear toast with various fruits, nut butters, and spreads, allowing for endless flavor combinations.
- Nutritious Option: Packed with whole grains, healthy fats, and vitamins from fruits, it’s a wholesome breakfast choice that’s also delicious.
- Encourages Creativity: Kids can get involved in the kitchen by helping to assemble their own teddy bears, sparking creativity and making breakfast a fun activity.
- Perfect for Special Occasions: Whether it’s a birthday, holiday, or just a fun family breakfast, teddy bear toast adds a festive touch to any meal.
- Great for Meal Prep: You can prepare the components in advance, making it easy to assemble a quick breakfast during busy mornings.
- Versatile Snack Option: Teddy bear toast isn’t just for breakfast; it makes a delightful snack or dessert, too!
- Visual Appeal: The playful design can brighten up your morning and make even the pickiest eaters excited for their meal.
- Healthy Comfort Food: It offers the comfort of a sweet treat while still being nutritious, striking a perfect balance for a satisfying meal.
Preparation Time and Servings
- Total Time: 10 minutes
- Servings: 2-4 servings, depending on the number of toast slices
- Calories per serving: Approximately 200-300 calories (varies based on toppings)
Ingredients
To create your delightful Teddy Bear Toast, gather the following ingredients:
For the Toast:
- 2 slices of whole-grain bread (or your favorite bread)
- 2 tablespoons peanut butter (or cream cheese, Nutella, etc.)
For the Bear Face:
- 1 banana, sliced (for ears and nose)
- 1-2 strawberries, sliced (for cheeks and mouth)
- 1-2 blueberries (for eyes)
- Optional: Honey or maple syrup (for drizzling)
Ingredient Highlights
- Whole-Grain Bread: Provides a nutritious base packed with fiber.
- Peanut Butter: Adds protein and healthy fats while creating a creamy texture.
- Fruits: Fresh fruits like bananas and strawberries add natural sweetness and vitamins.
Step-by-Step Instructions
Creating Teddy Bear Toast is a breeze! Here’s how to make your adorable bear faces:
1st Step: Toast the Bread
- Start by toasting your slices of bread to your desired level of crispness.
2nd Step: Spread the Base
- Once the toast is ready, spread a generous layer of peanut butter (or your chosen spread) on each slice. Make sure to cover the entire surface for the best flavor.
3rd Step: Create the Bear Face
- Ears: Place two banana slices on the top corners of the toast to create the bear’s ears.
- Eyes: Add two blueberries below the banana slices for the eyes.
- Nose: Use a slice of banana (or a strawberry slice) for the nose, placing it in the center below the eyes.
- Mouth: Cut a small slice of strawberry and place it below the nose to form the mouth. You can also use another blueberry for the mouth if preferred.
4th Step: Add Final Touches
- For extra sweetness, drizzle a bit of honey or maple syrup over the toast, if desired. You can also sprinkle some chopped nuts for added crunch.
How to Serve
Serve your Teddy Bear Toast in a fun and creative way:
- Individual Plates: Serve each Teddy Bear Toast on a separate plate for a personalized touch.
- Breakfast or Snack: Present it as a fun breakfast option or a whimsical afternoon snack for kids.
- Fruit Accompaniments: Pair with fresh fruit like strawberries, bananas, or blueberries for added color and nutrition.
- Themed Serving Tray: Use a cute serving tray with a bear theme to enhance the overall presentation.
- Creative Garnishes: Sprinkle some edible glitter or colorful sprinkles on the toast for an extra festive flair.
- Serve with Dips: Offer a side of yogurt or honey for dipping to add a delightful flavor contrast.
- Party Platter: Create a platter with various Teddy Bear Toast designs for a fun party snack.
- Mini Versions: Make mini Teddy Bear Toasts using smaller bread slices for bite-sized treats perfect for kids’ parties.
- Accompany with Beverages: Serve alongside milk, fruit juice, or smoothies for a complete meal or snack.
- Interactive Activity: Let kids decorate their own Teddy Bear Toast at the table for a fun, hands-on experience!
Additional Tips
Here are some helpful tips to ensure your Teddy Bear Toast turns out perfectly:
- Use Whole Grain Bread: Opt for whole grain or multigrain bread for added nutrition and a heartier texture.
- Choose Natural Nut Butter: Select natural almond or peanut butter without added sugars or oils for a healthier spread.
- Experiment with Spreads: Try different spreads like Greek yogurt, cream cheese, or sunflower seed butter for unique flavors.
- Customize the Face: Use various fruits, such as blueberries, strawberries, or banana slices, to create different facial expressions.
- Make it Fun: Involve kids in the decorating process to spark their creativity and make it a fun activity.
- Add a Drizzle: Consider drizzling honey, maple syrup, or chocolate sauce over the toast for added sweetness.
- Use Cookie Cutters: Use cookie cutters to create fun shapes for the toast or fruit to make it even more appealing.
- Keep It Colorful: Aim for a variety of colors with your toppings to make the toast visually appealing and nutritious.
- Serve with a Side: Pair the toast with a side of yogurt or a smoothie for a complete and satisfying breakfast or snack.
- Store Leftovers Properly: If you have leftover toppings, store them in airtight containers in the fridge to keep them fresh for future use.
These tips will help you create delightful and nutritious Teddy Bear Toast that everyone will love!
Recipe Variations
Feel free to customize your Teddy Bear Toast with these variations:
- Peanut Butter and Banana Bear: Spread peanut butter on the toast, use banana slices for ears, and a slice for the mouth, and dot with blueberries for eyes.
- Yogurt and Berry Bear: Top the toast with Greek yogurt, arrange mixed berries for ears, eyes, and a nose, and sprinkle with granola for added crunch.
- Nutella and Strawberry Bear: Use Nutella as the spread, and add sliced strawberries for ears and a mouth, with chocolate chips for the eyes.
- Avocado Toast Bear: Mash avocado on the toast, create ears with cucumber slices, a nose with cherry tomato, and eyes with radish slices.
- Cottage Cheese and Pineapple Bear: Spread cottage cheese on the toast, top with pineapple rings for ears, and use blueberries for the eyes.
- Cream Cheese and Apple Bear: Spread cream cheese on the toast, add thin apple slices for ears and a mouth, and use raisins for the eyes.
- Hummus and Veggie Bear: Spread hummus on the toast, use carrot slices for ears and cucumber for the mouth, and cherry tomatoes for the eyes.
- Maple Syrup and Pecan Bear: Drizzle maple syrup over the toast, top with pecan halves for ears, and use dried cranberries for eyes and a nose.
- Chia Seed Jam Bear: Spread chia seed jam on the toast, use almond slices for ears, and dot with small pieces of fruit for eyes.
- Chocolate Spread and Marshmallow Bear: Use a chocolate spread, place mini marshmallows for ears, and chocolate chips for eyes and a mouth for a sweet treat.
These variations add a delightful twist to the classic Teddy Bear Toast, making it fun and exciting for any meal or snack time!
Freezing and Storage
Although Teddy Bear Toast is best enjoyed fresh, you can prepare some components in advance:
- Toast: Prepare the toast in advance and store it in an airtight container for a day.
- Fruit Prep: Slice fruits ahead of time and store them in the fridge, but it’s best to assemble the toast right before serving for maximum freshness.
Special Equipment
You don’t need any special tools for this recipe, but having the following can be helpful:
- Toaster or Toaster Oven: Essential for toasting the bread to a perfect golden brown.
- Cutting Board: Provides a stable surface for cutting and assembling the toast.
- Sharp Knife: Handy for cutting the bread and any additional toppings into desired shapes.
- Cookie Cutters: Useful for creating bear shapes from fruit or bread for fun designs.
- Mixing Bowl: Ideal for preparing spreads like peanut butter or yogurt.
- Spatula: Helps in spreading toppings evenly on the toast.
- Measuring Spoons: For accurately measuring out ingredients like nut butter, honey, or yogurt.
- Small Plates: Great for presenting individual servings of Teddy Bear Toast.
- Tweezers or Tongs: Handy for placing small fruit pieces or decorations without messing up the presentation.
- Serving Platter: Perfect for showcasing multiple pieces of Teddy Bear Toast at a gathering or breakfast table.
These tools will help make the preparation of Teddy Bear Toast fun and easy!
FAQ Section
Here are some common questions you might have about making Teddy Bear Toast:
- Can I make this toast ahead of time?
While the toast is best fresh, you can prepare the ingredients in advance to save time in the morning. - What if I don’t have blueberries?
Feel free to substitute with other small fruits like raisins or mini chocolate chips for the eyes. - Can I use frozen fruit?
Frozen fruit can work, but make sure to thaw and drain it before using to avoid sogginess. - Is this recipe suitable for toddlers?
Yes! Just ensure that the fruit pieces are cut small enough to avoid choking hazards.
Teddy Bear Toast
- Total Time: 10 minutes
Ingredients
- For the Toast:
- 2 slices of whole-grain bread (or your favorite bread)
- 2 tablespoons peanut butter (or cream cheese, Nutella, etc.)
- For the Bear Face:
- 1 banana, sliced (for ears and nose)
- 1–2 strawberries, sliced (for cheeks and mouth)
- 1–2 blueberries (for eyes)
- Optional: Honey or maple syrup (for drizzling)
Instructions
Step 1: Toast the Bread
- Start by toasting your slices of bread to your desired level of crispness.
Step 2: Spread the Base
- Once the toast is ready, spread a generous layer of peanut butter (or your chosen spread) on each slice. Make sure to cover the entire surface for the best flavor.
Step 3: Create the Bear Face
- Ears: Place two banana slices on the top corners of the toast to create the bear’s ears.
- Eyes: Add two blueberries below the banana slices for the eyes.
- Nose: Use a slice of banana (or a strawberry slice) for the nose, placing it in the center below the eyes.
- Mouth: Cut a small slice of strawberry and place it below the nose to form the mouth. You can also use another blueberry for the mouth if preferred.
Step 4: Add Final Touches
- For extra sweetness, drizzle a bit of honey or maple syrup over the toast, if desired. You can also sprinkle some chopped nuts for added crunch.
Nutrition
- Serving Size: 2-4 servings
- Calories: 200-300 kcal
Conclusion
Creating Teddy Bear Toast is a delightful way to bring some joy into your breakfast or snack routine! It’s a fun, creative, and nutritious dish that the whole family will love. So gather your ingredients, get the kids involved, and start making these adorable bear faces together!
Not only is this dish visually appealing, but it also encourages creativity and imagination in the kitchen. You can customize the toppings to suit your family’s preferences, making each toast a unique masterpiece. Whether you choose fruits, spreads, or even a sprinkle of nuts, the possibilities are endless.
I can’t wait to see your wonderful Teddy Bear Toast creations! Don’t forget to snap a photo and share it—I love seeing the unique designs you come up with! Enjoy this delightful treat and happy toasting! Remember, breakfast should be fun and enjoyable, and Teddy Bear Toast is the perfect way to kick-start your day with a smile. Plus, it’s a fantastic opportunity to create lasting memories with loved ones, making every bite even more special. So, go ahead and let your creativity shine!

