

Introduction
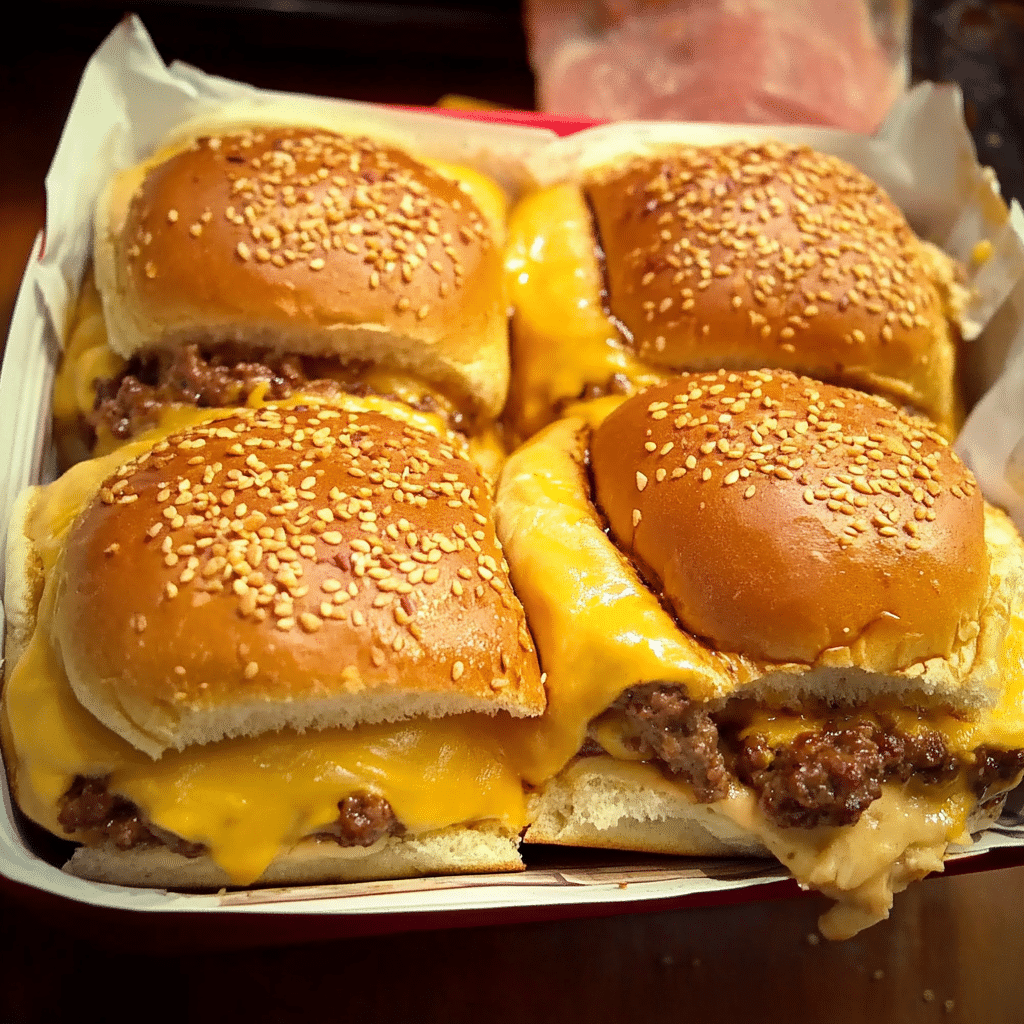
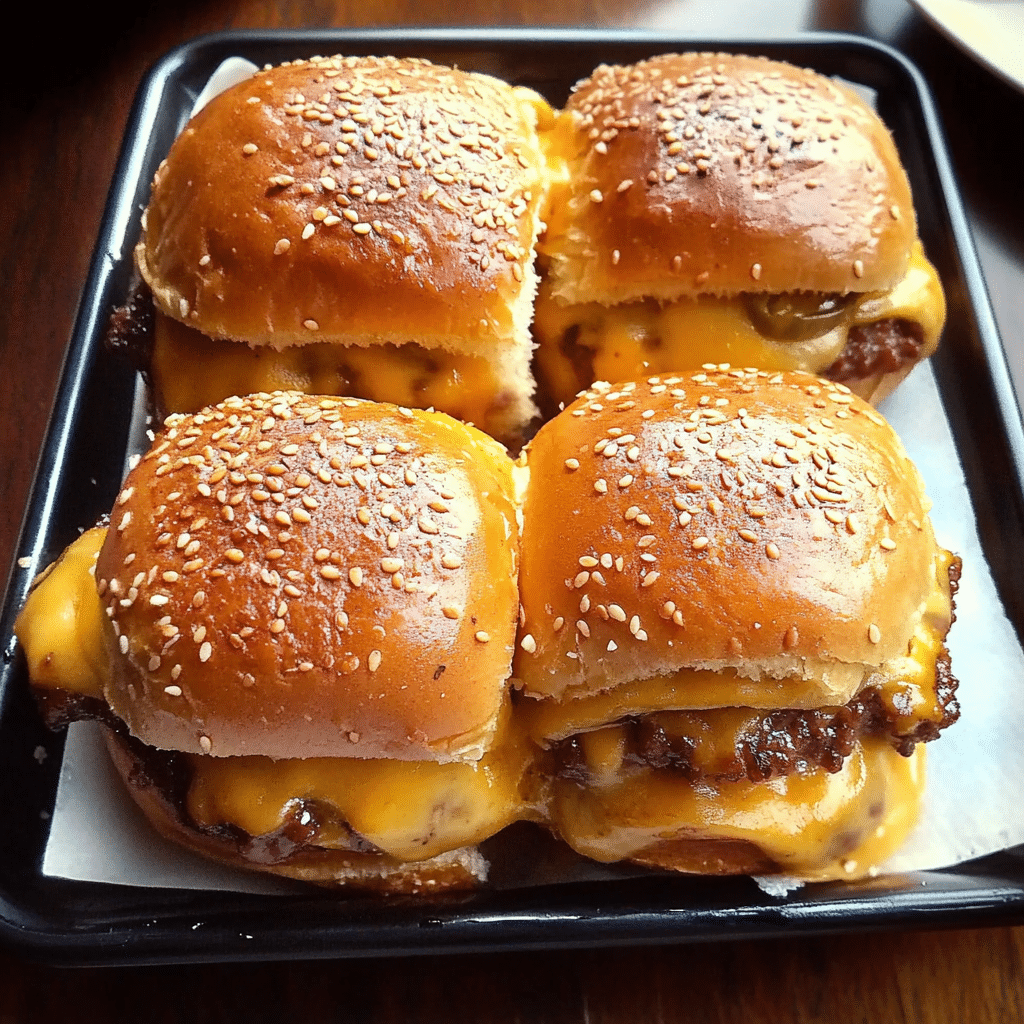
Cheeseburger Sliders are the ultimate crowd-pleasing comfort food that’s perfect for any occasion, whether it’s a casual weeknight dinner, a game day snack, or a fun party appetizer. These mini burgers pack all the flavor of a classic cheeseburger into bite-sized portions, making them perfect for snacking or serving at gatherings. The juicy beef patties are topped with melted cheese, tangy pickles, and a smear of ketchup, all nestled between soft, fluffy buns. They’re quick to make, easy to serve, and guaranteed to have everyone coming back for seconds.
I love making these sliders for family get-togethers, especially when I want to serve something that everyone will love without spending too much time in the kitchen. The best part? You can customize them however you like! Whether you’re a fan of classic cheeseburgers or want to add extra toppings like onions, lettuce, or bacon, these sliders give you all the flexibility to make them your own.
What makes Cheeseburger Sliders so great is that they’re not only delicious but also fun to eat. They’re perfect for sharing with friends or family, and because they’re so small, it’s easy to try different combinations of toppings without feeling guilty! Whether you’re hosting a big party or just enjoying a cozy meal at home, these sliders are sure to be a hit. So, grab some ingredients, fire up the grill, and get ready to enjoy some seriously tasty sliders!
Perfect for:
Turn your leftovers into tasty chef-like dishes with Duo Cover.
Turn your leftovers into tasty chef-like dishes with Duo Cover.

- Game days
- Family dinners
- Parties and gatherings
- Barbecues
- Easy weeknight meals
Why You’ll Love This Cheeseburger Sliders
Here’s why Cheeseburger Sliders are a must-try:
- Bite-Sized Deliciousness: Perfectly sized for snacking, these sliders are a fun twist on traditional cheeseburgers, making them ideal for parties and casual meals.
- Classic Cheeseburger Flavors: The combination of juicy beef patties, melted cheese, and all your favorite burger toppings will bring you the familiar, comforting taste of a classic cheeseburger in slider form.
- Easy and Quick to Make: With just a few simple ingredients and minimal prep time, these sliders can be made in under 30 minutes, making them a great choice for busy nights or impromptu gatherings.
- Customizable: You can add any toppings you like, from bacon and lettuce to onions and sauces, making these sliders as versatile as your favorite cheeseburger.
- Kid-Friendly: Kids love sliders, and the mini size makes them easy for little hands to enjoy while still satisfying their appetites.
Preparation and Cooking Time
- Total Time: 25 minutes
- Preparation Time: 10 minutes
- Cooking Time: 15 minutes
- Servings: 12 sliders
- Calories per serving: Approximately 200-250 calories
- Key Nutrients: Protein: 14g, Carbs: 18g, Fat: 12g
Ingredients
Here’s what you’ll need to make Cheeseburger Sliders:
- 1 lb ground beef (preferably 80% lean)
- 12 slider buns (hawaiian or regular)
- 12 slices of cheddar cheese
- 1 tablespoon olive oil
- 1 teaspoon garlic powder
- 1 teaspoon onion powder
- 1 tablespoon Worcestershire sauce
- Salt and pepper to taste
- 12 pickle slices
- 3 tablespoons ketchup
- 3 tablespoons mustard
- Optional toppings: lettuce, tomato, onions, bacon
Ingredient Highlights
- Ground Beef: Opt for ground beef with a bit of fat (80% lean) to keep the sliders juicy and flavorful.
- Cheddar Cheese: The rich, melty cheddar cheese adds a classic cheeseburger flavor and a creamy texture.
- Slider Buns: Soft, fluffy slider buns are essential for holding all the ingredients together while providing a soft bite.
- Worcestershire Sauce: Adds depth of flavor to the beef patties, enhancing the overall taste.
- Pickles and Ketchup: These classic burger toppings give the sliders their signature tangy and sweet notes.
Step-by-Step Instructions


Here’s how to make Cheeseburger Sliders:
Prepare the Beef Patties:
- Season the Ground Beef: In a bowl, combine the ground beef with garlic powder, onion powder, Worcestershire sauce, salt, and pepper. Mix until just combined (don’t overwork the meat to avoid tough sliders).
- Form the Patties: Divide the beef mixture into 12 equal portions and form them into small, round patties, slightly smaller than the buns, as they will shrink while cooking.
Cook the Sliders:
- Heat the Pan: Heat the olive oil in a large skillet or griddle over medium-high heat.
- Cook the Patties: Place the patties in the skillet and cook for 2-3 minutes on each side, or until they reach your desired level of doneness. In the last minute of cooking, add a slice of cheese to each patty and cover with a lid to melt the cheese.
- Toast the Buns: While the patties cook, slice the buns and toast them lightly in the same skillet until golden brown.
Assemble the Sliders:
- Build the Sliders: Place each cooked patty on the bottom half of a toasted slider bun. Top each with a pickle slice, and drizzle with ketchup and mustard.
- Serve: Add any additional toppings like lettuce, tomato, or bacon if desired, and place the top half of the bun on each slider. Serve immediately.
How to Serve Cheeseburger Sliders
Cheeseburger Sliders are perfect for a variety of occasions, and you can serve them in many creative ways:
- On a Platter: Arrange the sliders on a large platter for easy sharing at parties or gatherings.
- With French Fries or Sweet Potato Fries: Serve these sliders with crispy fries for the ultimate burger experience.
- As an Appetizer: Serve these sliders as small bites at parties, ideal for snacking and mingling.
- With Dipping Sauces: Offer a variety of dipping sauces like BBQ sauce, ranch, or a spicy aioli to take these sliders to the next level.
- For Kids: Serve them with a side of fresh veggies or fruit for a balanced, kid-friendly meal.
Additional Tips for Cheeseburger Sliders
Here are some tips to make your Cheeseburger Sliders even better:
- Don’t Overwork the Meat: When mixing the beef, be sure not to overmix it, as this can result in tough sliders.
- Use Fresh Ingredients: Fresh buns, pickles, and lettuce will elevate the overall flavor of your sliders.
- Customize the Toppings: Feel free to add your favorite burger toppings, such as caramelized onions, bacon, or sautéed mushrooms.
- Make Ahead: You can form the patties in advance and refrigerate them until you’re ready to cook. This can save time during a busy meal prep.
- For a Smokier Flavor: Add a few drops of liquid smoke or smoked paprika to the beef mixture for a smoky twist.
Recipe Variations for Cheeseburger Sliders
Here are 10 variations you can try for Cheeseburger Sliders:
- Bacon Cheeseburger Sliders: Add crispy bacon strips to the sliders for an extra savory crunch.
- BBQ Cheeseburger Sliders: Drizzle BBQ sauce on the patties and top with onion rings for a smoky, tangy flavor.
- Mushroom Swiss Sliders: Swap the cheddar cheese for Swiss cheese and top with sautéed mushrooms.
- Veggie Sliders: For a meatless option, replace the beef patties with veggie patties or portobello mushroom caps.
- Buffalo Cheeseburger Sliders: Add a spicy kick with buffalo sauce and blue cheese crumbles.
- Italian Sliders: Top with marinara sauce, mozzarella cheese, and fresh basil for an Italian-inspired twist.
- Avocado Cheeseburger Sliders: Add creamy avocado slices on top for a rich, buttery flavor.
- Hawaiian Cheeseburger Sliders: Add a slice of grilled pineapple and teriyaki sauce for a tropical, sweet touch.
- Spicy Jalapeño Cheeseburger Sliders: Add jalapeño slices and spicy mayo for a fiery kick.
- Sliders with Fried Onions: Top the sliders with crispy fried onion rings for added texture and flavor.
Freezing and Storage
- Freezing the Sliders: Assemble the sliders without the buns, and freeze the cooked patties in an airtight container. When ready to serve, reheat in the oven and assemble with fresh buns.
- Storage: Store leftover sliders in an airtight container in the refrigerator for up to 2 days. To reheat, place them in a warm oven or microwave.
Special Equipment for Cheeseburger Sliders
Here are some special equipment items to make preparing your Cheeseburger Sliders easier:
- Skillet or Griddle: A non-stick skillet or griddle is perfect for cooking the sliders evenly.
- Burger Press: Use a burger press to shape uniform patties quickly.
- Toaster or Oven: Use a toaster or oven to toast the slider buns to a perfect golden brown.
- Meat Thermometer: A meat thermometer ensures that your beef patties are cooked to perfection (160°F for well-done).
- Spatula: A wide spatula is ideal for flipping the sliders and removing them from the pan without breaking.
FAQ Section for Cheeseburger Sliders
- Can I use turkey or chicken instead of beef for the patties?
Yes, turkey or chicken can be used, but keep in mind that the texture and flavor will differ slightly. - Can I make the sliders without cheese?
Absolutely! These sliders are just as delicious without cheese, or you can substitute it with a dairy-free cheese for a different option. - How can I make these sliders spicier?
Add sliced jalapeños, hot sauce, or pepper jack cheese to increase the heat. - Can I make these sliders vegetarian?
Yes, you can replace the beef patties with veggie patties or portobello mushrooms for a vegetarian option. - Can I freeze leftover sliders?
Yes, leftover sliders can be frozen and reheated in the oven for a quick meal.
Cheeseburger Sliders

Cheeseburger Sliders are the ultimate crowd-pleasing comfort food that’s perfect for any occasion, whether it’s a casual weeknight dinner, a game day snack, or a fun party appetizer. These bite-sized burgers are loaded with all the flavors of a classic cheeseburger but in a convenient, mini form that’s perfect for snacking or serving at gatherings. The juicy beef patties are topped with melted cheese, tangy pickles, and ketchup, all sandwiched between soft, fluffy buns. These sliders are quick to make and will have everyone coming back for more.
- Prep Time: 10 minutes
- Cook Time: 15 minutes
- Total Time: 25 minutes
- Yield: 12 sliders 1x
- Category: 30 minutes meals
Ingredients
Here’s what you’ll need to make Cheeseburger Sliders:
- 1 lb ground beef (preferably 80% lean)
- 12 slider buns (hawaiian or regular)
- 12 slices of cheddar cheese
- 1 tablespoon olive oil
- 1 teaspoon garlic powder
- 1 teaspoon onion powder
- 1 tablespoon Worcestershire sauce
- Salt and pepper to taste
- 12 pickle slices
- 3 tablespoons ketchup
- 3 tablespoons mustard
- Optional toppings: lettuce, tomato, onions, bacon
Instructions
Prepare the Beef Patties:
- Season the Ground Beef: In a bowl, combine the ground beef with garlic powder, onion powder, Worcestershire sauce, salt, and pepper. Mix until just combined (don’t overwork the meat to avoid tough sliders).
- Form the Patties: Divide the beef mixture into 12 equal portions and form them into small, round patties, slightly smaller than the buns, as they will shrink while cooking.
Cook the Sliders:
- Heat the Pan: Heat the olive oil in a large skillet or griddle over medium-high heat.
- Cook the Patties: Place the patties in the skillet and cook for 2-3 minutes on each side, or until they reach your desired level of doneness. In the last minute of cooking, add a slice of cheese to each patty and cover with a lid to melt the cheese.
- Toast the Buns: While the patties cook, slice the buns and toast them lightly in the same skillet until golden brown.
Assemble the Sliders:
- Build the Sliders: Place each cooked patty on the bottom half of a toasted slider bun. Top each with a pickle slice, and drizzle with ketchup and mustard.
- Serve: Add any additional toppings like lettuce, tomato, or bacon if desired, and place the top half of the bun on each slider. Serve immediately.
Nutrition
- Calories: 200-250 kcal
- Fat: 12g
- Carbohydrates: 18g
- Protein: 14g
Conclusion
Cheeseburger Sliders are a fun, bite-sized twist on the classic cheeseburger that’s perfect for any occasion. Whether you’re hosting a party, enjoying a casual weeknight meal, or watching the big game, these sliders offer all the flavor and satisfaction of a full-sized burger in a more convenient form. The juicy beef patties, melty cheese, and customizable toppings make them a crowd-pleaser that everyone will love.
These sliders are incredibly versatile, allowing you to experiment with different cheeses, sauces, and toppings. You can go classic with lettuce, tomato, and pickles, or get creative with bacon, sautéed onions, or even a spicy jalapeño kick. Plus, they’re easy to prepare, so you can whip up a batch in no time, making them the perfect dish to serve to guests or enjoy as a family meal.
I can’t wait to see how your Cheeseburger Sliders turn out! Don’t forget to snap a photo and tag me on Instagram—I’d love to see your delicious creations! Feel free to leave a comment or share any fun variations you tried. Enjoy!


