

Introduction
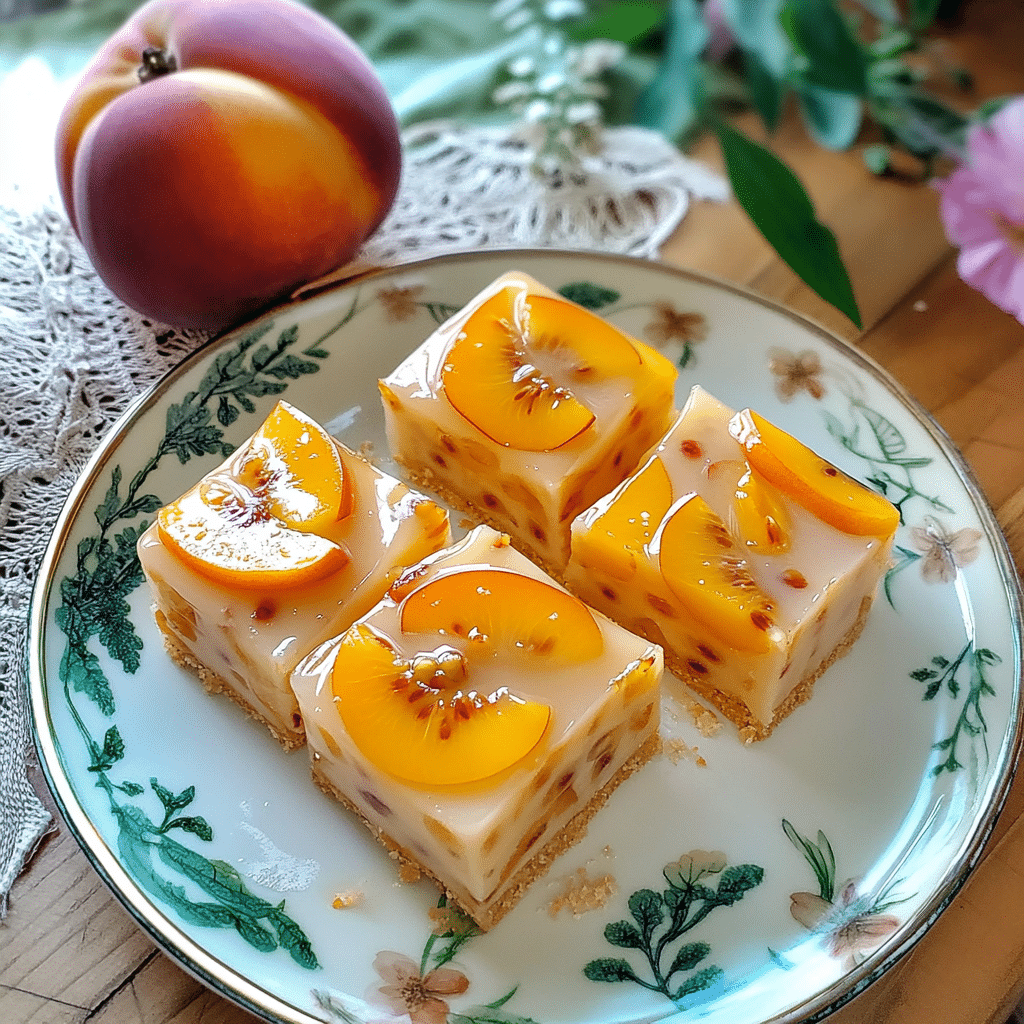
Peach Sago Jelly Cake is a delightful and refreshing dessert that’s perfect for warm weather gatherings or any time you crave a light and fruity treat. This unique cake combines layers of smooth, subtly sweet jelly, chewy sago pearls, and juicy canned or fresh peaches, creating a delightful textural contrast and a burst of summery flavors. This no-bake dessert is incredibly easy to make, making it a fantastic option for potlucks, parties, or a simple dessert for a relaxing weekend. The vibrant colors and refreshing taste make it a guaranteed crowd-pleaser.
The first time I made Peach Sago Jelly Cake, I was intrigued by the combination of textures and the sheer simplicity of the recipe. As I layered the jelly, sago, and peaches in the mold, I was already envisioning the beautiful presentation and the satisfying taste. The chilling time was the hardest part – the anticipation was intense! Once set, the unmolding process was a moment of magic, revealing a stunning cake with vibrant colors and appealing layers. The first bite was a revelation – the smooth jelly, the chewy sago, and the sweet peaches created a harmonious and refreshing experience.
What I love most about this Peach Sago Jelly Cake is its versatility and ease of customization. You can adjust the sweetness to your liking, use different types of fruit, or even add a layer of creamy custard for extra richness. It’s a perfect make-ahead dessert, allowing you to focus on other aspects of your gathering. Whether you’re serving it at a summer barbecue, a birthday party, or a simple family dinner, Peach Sago Jelly Cake is guaranteed to be a memorable and delicious addition to your dessert table.
Perfect for
- Summer gatherings
- Potlucks
- Birthday parties
- Refreshing desserts
- No-bake treats
- Easy entertaining
Why You’ll Love This Peach Sago Jelly Cake Recipe
Here’s why Peach Sago Jelly Cake will become your new favorite dessert:
- Refreshing and Fruity: The combination of peach flavor, sago pearls, and light jelly makes for a refreshing and delightful dessert, perfect for warm weather.
- Unique Texture: The cake offers a satisfying textural contrast between the smooth jelly, the chewy sago, and the soft peaches.
- Easy to Make (No-Bake): This no-bake recipe is incredibly simple and requires minimal cooking skills, making it accessible to cooks of all levels.
- Visually Appealing: The layered presentation and vibrant colors make this cake a beautiful addition to any dessert table.
- Customizable: The recipe can be easily adapted with different fruits, flavors, or layers to suit your personal preferences.
Preparation and Cooking Time
- Total Time: 5 hours (including chilling time)
- Preparation Time: 30 minutes
- Cooking Time: 30 minutes (for sago)
- Chilling Time: 4 hours
- Servings: 8-10 servings
- Calories per serving: Approximately 250-300 calories
- Key Nutrients: Protein: 2g, Carbs: 50g, Fat: 5g
Ingredients
Gather these ingredients to make your Peach Sago Jelly Cake:
- 1 cup small sago pearls
- 8 cups water, divided
- 1 (3 oz) package peach-flavored gelatin dessert mix
- 3 cups boiling water
- 1 (15 oz) can sliced peaches in heavy syrup, drained (reserve syrup)
- 1 cup reserved peach syrup
- 1/2 cup heavy cream (optional, for extra richness)
Ingredient Highlights
- Sago Pearls: These small, tapioca-like pearls provide a unique, chewy texture that is a signature element of this dessert.
- Peach-Flavored Gelatin Dessert Mix: This provides the base for the jelly, adding peach flavor and helping the cake set.
- Canned Sliced Peaches: Canned peaches provide sweetness and convenience, but you can also use fresh peaches when in season.
- Heavy Cream (Optional): Adding a layer of whipped heavy cream can add richness and creaminess to the cake.
- Reserved Peach Syrup: Adding peach syrup to the cooled jelly adds extra peach flavor.
Step-by-Step Instructions


Here’s how to make Peach Sago Jelly Cake:
Cook the Sago:
- Rinse the Sago: Rinse the sago pearls under cold water to remove any excess starch.
- Boil the Sago: Bring 4 cups of water to a boil in a medium saucepan. Add the rinsed sago pearls and cook for 20-25 minutes, or until the pearls are translucent and have a small white dot in the center. Stir occasionally to prevent sticking.
- Drain and Rinse: Drain the cooked sago pearls in a fine-mesh sieve and rinse thoroughly with cold water to remove excess starch. Set aside.
Prepare the Jelly:
- Dissolve the Gelatin: In a large bowl, dissolve the peach-flavored gelatin dessert mix in 3 cups of boiling water, stirring until completely dissolved.
- Cool and Add Syrup: Add the reserved peach syrup and 4 cups of cold water to the dissolved gelatin. Stir to combine.
Assemble the Cake:
- Layer the Ingredients: In a 9-inch round or square cake pan or a decorative mold, pour a thin layer of the peach gelatin mixture (about 1 cup) into the bottom.
- Chill First Layer: Refrigerate for about 30 minutes, or until the jelly is partially set but still slightly soft.
- Add Sago and Peaches: Gently arrange half of the cooked sago pearls evenly over the partially set jelly layer. Distribute half of the drained sliced peaches over the sago.
- Pour More Jelly: Pour another layer of the peach gelatin mixture over the sago and peaches, enough to cover them.
- Chill Second Layer: Refrigerate for another 30 minutes, or until the jelly is partially set.
- Repeat Layers: Repeat layers with the remaining sago, peaches, and gelatin mixture.
- Final Chill: Refrigerate the cake for at least 4 hours, or preferably overnight, until the jelly is completely set.
Unmold and Serve:
- Loosen the Cake: To unmold, gently loosen the edges of the cake from the pan with a thin knife or spatula.
- Dip in Warm Water: Briefly dip the bottom of the cake pan in warm water for a few seconds to help loosen the jelly.
- Invert and Serve: Place a serving plate over the top of the cake pan, invert, and gently shake to release the cake. If the cake doesn’t release easily, repeat the warm water dip.
- Slice and Serve: Slice the Peach Sago Jelly Cake and serve chilled. You can optionally garnish with whipped cream and fresh peach slices.

How to Serve Peach Sago Jelly Cake
Peach Sago Jelly Cake is a versatile dessert that can be served in various ways:
- Chilled Slices: Serve the cake in chilled slices, allowing the layers of jelly, sago, and peaches to shine.
- With Whipped Cream: Top each slice with a dollop of fresh whipped cream for added richness and a creamy texture.
- With Fresh Fruit: Garnish with fresh peach slices, raspberries, or strawberries for added color and flavor.
- Individual Portions: Serve in individual dessert cups or glasses for a more elegant presentation.
- Alongside Other Desserts: Serve alongside other summer desserts like fruit salad or ice cream for a dessert buffet.
Additional Tips for Peach Sago Jelly Cake
Here are some tips to ensure your Peach Sago Jelly Cake is perfect every time:
- Cook Sago Properly: Ensure the sago pearls are cooked until they are translucent with a small white dot in the center, and rinse them thoroughly to remove excess starch.
- Layer Carefully: When layering the ingredients, make sure the jelly is partially set before adding the sago and peaches to prevent them from sinking to the bottom.
- Chill Thoroughly: Allow the cake to chill for at least 4 hours, or preferably overnight, to ensure the jelly is completely set.
- Use a Non-Stick Pan: Use a non-stick cake pan or mold to make unmolding easier.
- Be Gentle When Unmolding: When unmolding, be gentle to avoid breaking the cake. Use a thin knife or spatula to loosen the edges, and dip the pan briefly in warm water to help release the cake.
Recipe Variations for Peach Sago Jelly Cake
Here are some variations you can try for Peach Sago Jelly Cake:
- Different Fruits: Substitute the canned peaches with other fruits like mangoes, strawberries, raspberries, or mixed berries.
- Different Jelly Flavors: Experiment with different flavors of gelatin dessert mix, such as strawberry, raspberry, or mango, to complement the fruit.
- Creamy Layer: Add a layer of creamy custard or whipped cream between the jelly layers for extra richness and texture.
- Coconut Milk: Use coconut milk instead of water to cook the sago for a tropical twist.
- Agar-Agar: Use agar-agar powder instead of gelatin for a vegetarian or vegan option. Follow the instructions on the agar-agar package for proper preparation.
- Layered Colors: Use different colors of gelatin to create a rainbow effect in the cake.
- Geometric Shapes: Use different shaped molds, such as square or rectangular, to create a different presentation.
- Floral Decorations: Decorate the top of the cake with edible flowers for an elegant and festive look.
- Fruit Syrup Variations: Replace reserved peach syrup with other fruit syrups like mango or pineapple.
- Condensed Milk Swirls: Add swirls of condensed milk to the jelly mixture before layering for a richer and sweeter cake.
Freezing and Storage
- Freezing: Freezing is not recommended, as the texture of the jelly can change and become watery when thawed.
- Storage: Store leftover Peach Sago Jelly Cake in an airtight container in the refrigerator for up to 3 days.
Special Equipment for Peach Sago Jelly Cake
Here are some special equipment items to make preparing your Peach Sago Jelly Cake easier:
- Medium Saucepan: A medium saucepan is needed for cooking the sago.
- Fine-Mesh Sieve: A fine-mesh sieve is used to drain and rinse the cooked sago.
- Large Bowl: A large bowl is used for dissolving the gelatin and mixing the jelly.
- 9-inch Cake Pan or Mold: A 9-inch round or square cake pan or a decorative mold is used for assembling the cake.
- Measuring Cups and Spoons: Accurate measuring is important for achieving the right balance of flavors and textures.
FAQ Section for Peach Sago Jelly Cake
- Can I use fresh peaches instead of canned?
Yes, you can use fresh peaches when in season. Peel, pit, and slice the peaches, and lightly cook them with a little sugar and water to soften them before adding them to the cake. - How do I prevent the sago from clumping together?
To prevent the sago from clumping, rinse it thoroughly before cooking and stir it frequently while cooking. Also, rinse the cooked sago with cold water to remove excess starch. - Can I make this cake ahead of time?
Yes, this cake is perfect for making ahead of time. It needs to chill for at least 4 hours, but you can prepare it up to 2 days in advance. - How do I make sure the jelly sets properly?
Make sure to dissolve the gelatin completely in boiling water and follow the instructions carefully. Also, allow the cake to chill for the recommended time to ensure the jelly sets properly. - Can I add a layer of whipped cream?
Yes, you can add a layer of whipped cream between the jelly layers for extra richness and texture. Chill the whipped cream layer for about 30 minutes before adding the next jelly layer.
Peach Sago Jelly Cake

Peach Sago Jelly Cake is a delightful and refreshing dessert that’s perfect for warm weather gatherings or any time you crave a light and fruity treat. This unique cake combines layers of smooth, subtly sweet jelly, chewy sago pearls, and juicy canned or fresh peaches, creating a delightful textural contrast and a burst of summery flavors. This no-bake dessert is incredibly easy to make, making it a fantastic option for potlucks, parties, or a simple dessert for a relaxing weekend. The vibrant colors and refreshing taste make it a guaranteed crowd-pleaser.
- Prep Time: 30 minutes
- Cook Time: 30 minutes
- Total Time: 5 hours
- Yield: 8–10 servings 1x
- Category: desserts
Ingredients
Gather these ingredients to make your Peach Sago Jelly Cake:
- 1 cup small sago pearls
- 8 cups water, divided
- 1 (3 oz) package peach-flavored gelatin dessert mix
- 3 cups boiling water
- 1 (15 oz) can sliced peaches in heavy syrup, drained (reserve syrup)
- 1 cup reserved peach syrup
- 1/2 cup heavy cream (optional, for extra richness)
Instructions
Cook the Sago:
-
Rinse the Sago: Rinse the sago pearls under cold water to remove any excess starch.
-
Boil the Sago: Bring 4 cups of water to a boil in a medium saucepan. Add the rinsed sago pearls and cook for 20-25 minutes, or until the pearls are translucent and have a small white dot in the center. Stir occasionally to prevent sticking.
-
Drain and Rinse: Drain the cooked sago pearls in a fine-mesh sieve and rinse thoroughly with cold water to remove excess starch. Set aside.
Prepare the Jelly:
-
Dissolve the Gelatin: In a large bowl, dissolve the peach-flavored gelatin dessert mix in 3 cups of boiling water, stirring until completely dissolved.
-
Cool and Add Syrup: Add the reserved peach syrup and 4 cups of cold water to the dissolved gelatin. Stir to combine.
Assemble the Cake:
-
Layer the Ingredients: In a 9-inch round or square cake pan or a decorative mold, pour a thin layer of the peach gelatin mixture (about 1 cup) into the bottom.
-
Chill First Layer: Refrigerate for about 30 minutes, or until the jelly is partially set but still slightly soft.
-
Add Sago and Peaches: Gently arrange half of the cooked sago pearls evenly over the partially set jelly layer. Distribute half of the drained sliced peaches over the sago.
-
Pour More Jelly: Pour another layer of the peach gelatin mixture over the sago and peaches, enough to cover them.
-
Chill Second Layer: Refrigerate for another 30 minutes, or until the jelly is partially set.
-
Repeat Layers: Repeat layers with the remaining sago, peaches, and gelatin mixture.
-
Final Chill: Refrigerate the cake for at least 4 hours, or preferably overnight, until the jelly is completely set.
Unmold and Serve:
-
Loosen the Cake: To unmold, gently loosen the edges of the cake from the pan with a thin knife or spatula.
-
Dip in Warm Water: Briefly dip the bottom of the cake pan in warm water for a few seconds to help loosen the jelly.
-
Invert and Serve: Place a serving plate over the top of the cake pan, invert, and gently shake to release the cake. If the cake doesn’t release easily, repeat the warm water dip.
-
Slice and Serve: Slice the Peach Sago Jelly Cake and serve chilled. You can optionally garnish with whipped cream and fresh peach slices.
Equipment

112-in-1 Smart Grill Combo with Original Flavors & Marks
Buy Now →
Forged Lightweight Frying Pan Set
Buy Now → Buy Now →
 Nutrition
- Calories: 250-300 kcal
- Fat: 5g
- Carbohydrates: 50g
- Protein: 2g
Conclusion
Peach Sago Jelly Cake is a refreshing, visually appealing, and easy-to-make dessert that’s perfect for any occasion. The combination of smooth jelly, chewy sago, and sweet peaches creates a delightful textural contrast and a burst of summery flavors. Whether you’re hosting a summer barbecue, celebrating a birthday, or simply craving a light and fruity treat, this recipe is guaranteed to be a hit.
I’d love to see your Peach Sago Jelly Cake creations! Be sure to tag me on Instagram with your version—I can’t wait to see how you bring this luscious dessert to life. Don’t forget to leave a comment and share your thoughts. Happy cooking!


