

Pear and Vanilla Jelly is an elegant treat that will tantalize your taste buds and impress your guests. This recipe brings together the sweet, delicate flavors of ripe pears and the warm notes of vanilla to create a jelly that is not just delicious but also visually stunning. Whether you’re serving it at a fancy dinner party or enjoying a quiet afternoon with family, this delightful dessert is sure to elevate any occasion.
Imagine a spoonful of this jelly melting in your mouth, offering a burst of fruity sweetness complemented by the subtle essence of vanilla. The unique combination of flavors makes it an unforgettable treat that is loved by many. Pair it with cheese, serve it over desserts, or simply enjoy it by the spoonful. This jelly is versatile, and once you taste it, you’ll understand why it has become a favorite for both the novice cook and the experienced chef.
In this article, we will walk you through everything you need to know about making Pear and Vanilla Jelly, why you’ll love it, and how to serve it for the best experience. Let’s dive into this amazing recipe that is more than just a sweet confection; it’s a delightful journey of flavor and elegance!
Why You’ll Love This Recipe
There are plenty of reasons why Pear and Vanilla Jelly will win you over. Here’s a list of aspects that makes this recipe exceptional:
1. Seasonal Ambiance: The natural sweetness of pears and warm vanilla evokes a sense of comfort, making it a perfect fit for any season.
2. Easy to Make: The steps are simple and straightforward, ensuring even beginner cooks can create this delectable jelly with confidence.
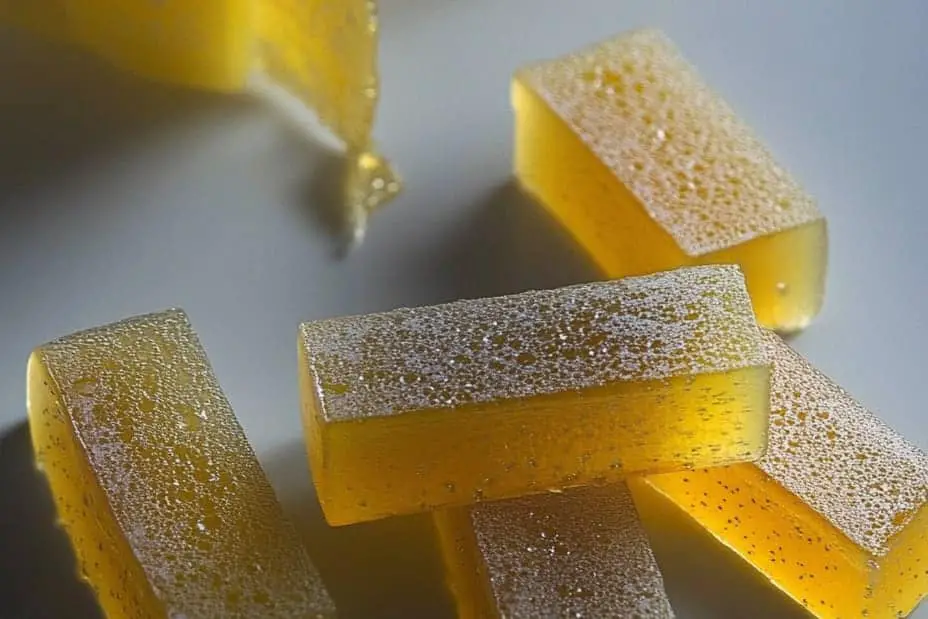
3. Elegant Presentation: The beautiful golden hue of the jelly looks stunning in jars, making it perfect for gifting or showcasing at gatherings.
4. Versatility: It pairs beautifully with a variety of dishes, from cheeses to desserts, or can simply be spread on toast.
5. Health Benefits: Pears are rich in fiber and antioxidants, making this jelly not just a treat, but a smart choice as well.
6. Memorable Flavor: The combination of fresh pears and vanilla creates a flavor profile that is truly unique and delightful, making your taste buds sing.
With these enticing factors, creating Pear and Vanilla Jelly becomes an irresistible adventure, sure to please everyone who tastes it!
Preparation and Cooking Time
Making Pear and Vanilla Jelly requires some patience, but the final product is well worth the effort. Here’s what you can expect in terms of timing:
– Preparation Time: 30 minutes
– Cooking Time: 40 minutes
– Setting Time: 4-6 hours (or overnight)
In total, aim for about 5-7 hours, including setting time, to ensure your jelly achieves the perfect texture.
Ingredients
– 4 cups fresh pears, peeled, cored, and diced
– 2 cups water
– 1 cup granulated sugar
– 1 tablespoon vanilla extract
– 1 package (1.75 oz) powdered fruit pectin
– 1 tablespoon lemon juice
Step-by-Step Instructions

Creating the delightful Pear and Vanilla Jelly is straightforward. Follow these steps to achieve perfect results:
1. Prepare the Pears: Start by peeling, coring, and dicing the pears. Set aside.
2. Cook the Pears: In a large pot, combine the diced pears and water. Bring to a boil over medium heat. Cook for about 10 minutes until the pears become soft.
3. Puree the Mixture: Remove the pot from heat. Using a strainer or food mill, extract the juice from the cooked pears. You should have about 3 cups of pear juice.
4. Combine Ingredients: Return the pear juice to the pot. Add the sugar, lemon juice, and vanilla extract. Mix well.
5. Add Pectin: Stir in the powdered fruit pectin. Bring the mixture back to a rolling boil and cook for about 1-2 minutes.
6. Check for Consistency: To test whether the jelly is ready, place a small spoonful on a chilled plate. If it holds its shape after a minute in the fridge, it’s ready. If not, continue boiling for another minute.
7. Jar the Jelly: Pour the hot jelly into sterilized jars, leaving about ¼ inch of headspace. Seal the jars with lids.
8. Process the Jars: If you are canning, process the jars in a boiling water bath for 5-10 minutes to ensure they are sealed properly.
9. Cool Down: Allow the jars to cool to room temperature. You’ll know they’re sealed if the lids are indented.
10. Set the Jelly: For best results, let the jelly set completely in the refrigerator for 4-6 hours or overnight.
How to Serve
Serving Pear and Vanilla Jelly can be as simple or sophisticated as you desire. Here are some tips to enhance your presentation:
1. Pair with Cheese: This jelly works wonderfully with a variety of cheeses, particularly sharp cheddar or creamy brie. Create a beautiful cheese platter, including crackers and fresh fruits.
2. Toast or Scones: Spread it over warm toast, fresh scones, or pancakes for an elegant breakfast or brunch option.
3. Dessert Topping: Use it as a topping for ice cream, yogurt, or cheesecake to bring a fruity twist to your favorite desserts.
4. Gifts: Jar the jelly beautifully and give it away as a gift for special occasions. Personalize them with labels and ribbons for a lovely touch.
5. Cocktail Ingredient: Get creative! Use the jelly to enhance cocktails or mocktails, adding a delightful fruity essence that will impress your guests.
By presenting Pear and Vanilla Jelly thoughtfully, you’ll not only create a wonderful culinary experience but also leave a lasting impression on everyone who is fortunate enough to enjoy it.
In summary, Pear and Vanilla Jelly is an incredible treat that’s both delicious and sophisticated. With this step-by-step guide, you can master the art of making this elegant jelly. Whether you choose to serve it at a special occasion or enjoy it during quiet moments, this recipe will offer moments of joy and indulgence. So roll up your sleeves and dive into the delightful world of homemade jelly!
Additional Tips
– Use Ripe Pears: For the best flavor, ensure your pears are perfectly ripe. This enhances the sweetness of the jelly.
– Stir Constantly: When boiling the jelly mixture, stir constantly to prevent it from sticking to the bottom of the pot.
– Test for Doneness: Always test the jelly’s consistency using the cold plate method. It helps achieve the ideal texture.
– Keep it Clean: Sanitize all equipment and jars before use to avoid contamination and ensure longer shelf life.
– Explore Sweetness Levels: Feel free to adjust the sugar based on your taste preference and the sweetness of the pears.
Recipe Variation
Get creative! Here are a few delightful variations of Pear and Vanilla Jelly to try:
1. Spiced Pear Jelly: Add a pinch of cinnamon or nutmeg for a warm spice undertone, perfect for fall.
2. Citrus Twist: Incorporate a splash of orange or lemon zest to brighten the flavor of the jelly.
3. Herbal Infusion: Consider adding fresh mint or basil during the cooking process for an exciting herbal twist.
4. Use Different Fruit: Substitute some of the pears with apples or quinces for a unique flavor combination.
Freezing and Storage
– Storage: Keep the jelly in a cool, dark place or refrigerate. It ensures optimal freshness and flavor. Once opened, consume within 3-4 weeks.
– Freezing: Pear and Vanilla Jelly can be frozen in airtight containers. It can last up to 6 months in the freezer. Make sure to leave some space at the top of the container for expansion.
Special Equipment
To prepare this jelly, you will need a few essential tools:
– Large pot for cooking the pears
– Food mill or strainer for extracting juice
– Sterilized jars for storage
– Measuring cups and spoons for accuracy
– Ladle for pouring the jelly into jars
Frequently Asked Questions
How can I tell if the jelly has set properly?
After cooling, the jelly should have a firm consistency. If it’s too runny, try reinvigorating it with a little more pectin.
Can I adjust the sweetness of the jelly?
Yes, you can modify the amount of sugar according to your taste. Remember that the natural sweetness of the pears also plays a significant role.
Is this jelly suitable for canning?
Absolutely! The recipe includes processing instructions for canning, making it safe for long-term storage.
Can I use bottled pear juice instead of fresh?
While fresh pears give the best flavor, bottled pear juice is a convenient alternative. Just ensure it’s 100% juice.
What can I pair with this jelly?
Besides cheese and toast, consider using it as a filling for pastries or as a topping for pancakes and yogurt.
Conclusion
Pear and Vanilla Jelly is not just a dessert; it’s a culinary experience that combines simplicity with elegance. Its delightful flavors and versatility make it a perfect addition to your kitchen repertoire. Whether served at gatherings or enjoyed quietly at home, every spoonful is sure to bring joy. By following this guide, you can create a delectable jelly that impresses every time. Embrace the process, and enjoy making this stunning treat!
Pear and Vanilla Jelly: An Incredible Ultimate Delight

- Prep Time: 30 minutes
- Cook Time: 40 minutes
- Total Time: 1 hour 10 minutes
Ingredients
– 4 cups fresh pears, peeled, cored, and diced
– 2 cups water
– 1 cup granulated sugar
– 1 tablespoon vanilla extract
– 1 package (1.75 oz) powdered fruit pectin
– 1 tablespoon lemon juice
Instructions
Creating the delightful Pear and Vanilla Jelly is straightforward. Follow these steps to achieve perfect results:
1. Prepare the Pears: Start by peeling, coring, and dicing the pears. Set aside.
2. Cook the Pears: In a large pot, combine the diced pears and water. Bring to a boil over medium heat. Cook for about 10 minutes until the pears become soft.
3. Puree the Mixture: Remove the pot from heat. Using a strainer or food mill, extract the juice from the cooked pears. You should have about 3 cups of pear juice.
4. Combine Ingredients: Return the pear juice to the pot. Add the sugar, lemon juice, and vanilla extract. Mix well.
5. Add Pectin: Stir in the powdered fruit pectin. Bring the mixture back to a rolling boil and cook for about 1-2 minutes.
6. Check for Consistency: To test whether the jelly is ready, place a small spoonful on a chilled plate. If it holds its shape after a minute in the fridge, it’s ready. If not, continue boiling for another minute.
7. Jar the Jelly: Pour the hot jelly into sterilized jars, leaving about ¼ inch of headspace. Seal the jars with lids.
8. Process the Jars: If you are canning, process the jars in a boiling water bath for 5-10 minutes to ensure they are sealed properly.
9. Cool Down: Allow the jars to cool to room temperature. You’ll know they’re sealed if the lids are indented.
10. Set the Jelly: For best results, let the jelly set completely in the refrigerator for 4-6 hours or overnight.
Nutrition
- Serving Size: Varies
- Calories: Approximately 70 kcal per tablespoon
- Fat: 0g
- Protein: 0g


