Introduction
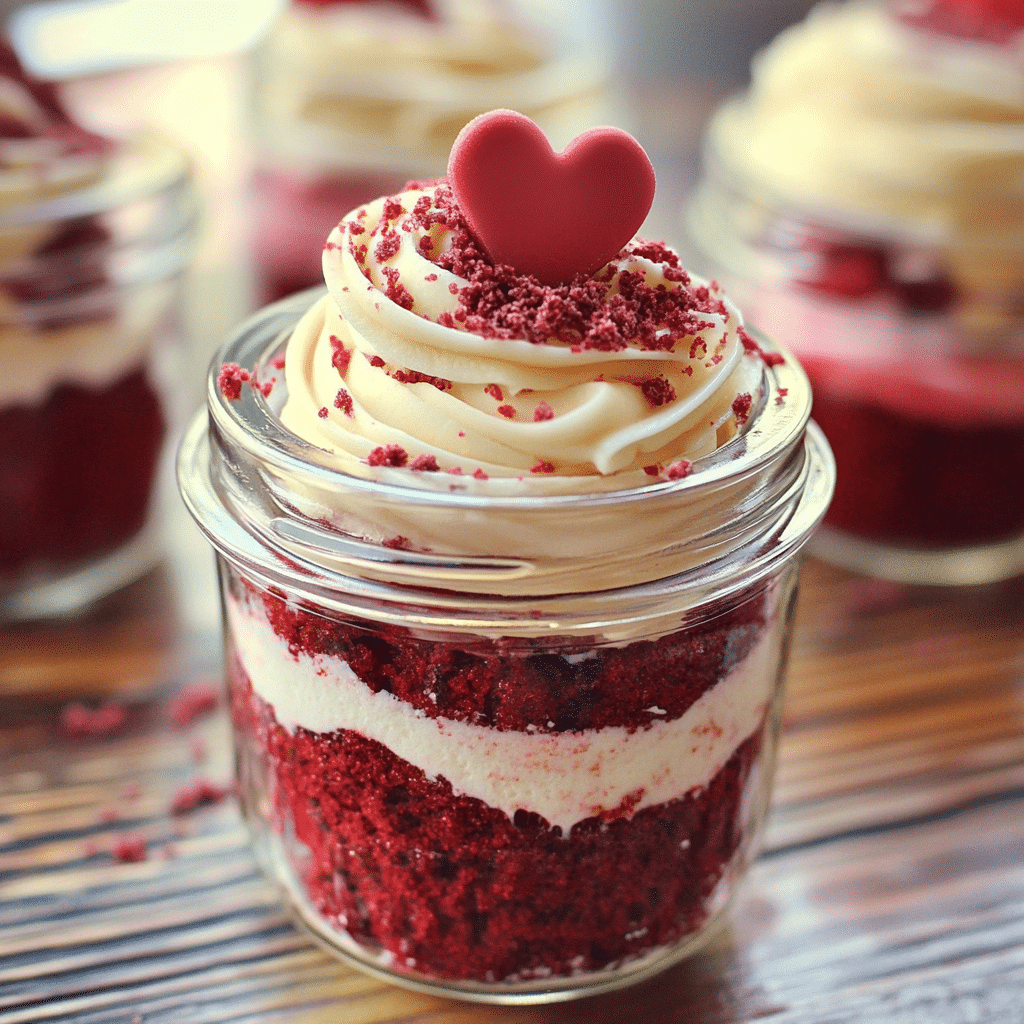
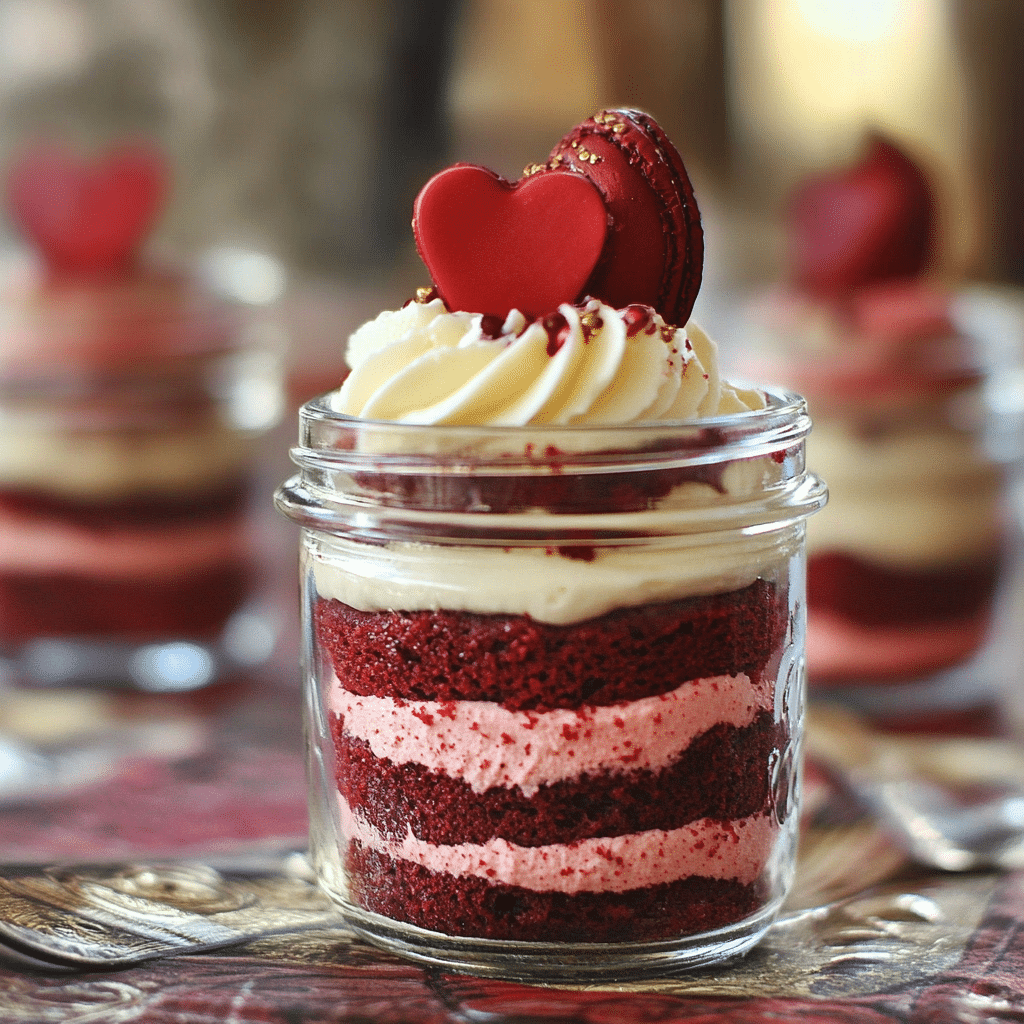
Red Velvet Cake in a Jar is a creative and adorable twist on the classic red velvet cake, offering all the rich flavors in a fun, portable form. These charming little jars are filled with layers of moist, tender red velvet cake and tangy cream cheese frosting, creating the perfect balance of sweetness and richness. The vibrant red color and creamy texture make these cakes not only delicious but visually stunning, turning each jar into a mini masterpiece. Whether served at a party, picnic, or as an everyday indulgence, these Red Velvet Cake Jars will surely steal the show.
The first time I made Red Velvet Cake in a Jar, I was delighted by how easy it was to assemble, yet how impressive it looked. Layering the cake and frosting into the jars was like creating a little edible gift, and the anticipation of seeing the vibrant red cake peeking through the glass was so much fun. The smell of freshly baked red velvet cake and cream cheese frosting wafting through my kitchen made it hard to resist, and as I served the first jar, it quickly became a hit.
What I love most about Red Velvet Cake in a Jar is how versatile and practical it is. It’s perfect for birthdays, holidays, or any occasion where you want to wow your guests with a unique treat. These jars are also great for gifting, making them a thoughtful and personalized dessert. No matter the occasion, Red Velvet Cake in a Jar is sure to be a crowd-pleaser that adds a little extra charm to any event.
Perfect for:
Turn your leftovers into tasty chef-like dishes with Duo Cover.
Turn your leftovers into tasty chef-like dishes with Duo Cover.
- Birthday parties
- Bridal showers
- Baby showers
- Picnics and potlucks
- Romantic date nights
Why You’ll Love This Red Velvet Cake In A Jar
Here’s why Red Velvet Cake in a Jar will become your new favorite dessert:
- Adorable Presentation: The cake in individual jars is both convenient and visually appealing. It’s perfect for a personal touch at any event.
- Moist and Flavorful: The red velvet cake is perfectly moist, and the cream cheese frosting adds the ideal amount of tang and sweetness to balance the flavors.
- Easy to Make and Serve: Making a cake in a jar is a fun way to serve this classic dessert. It’s easy to assemble and even easier to serve, especially at parties.
- Customizable: You can personalize the jars with sprinkles, edible glitter, or other decorations to suit the occasion.
- Make-Ahead Dessert: These cakes can be prepared in advance, making them a great option for stress-free entertaining.
Preparation and Cooking Time
- Total Time: 1 hour (plus cooling and chilling time)
- Preparation Time: 30 minutes
- Baking Time: 30 minutes
- Chilling Time: 30 minutes
- Servings: 8-10 jars
- Calories per serving: Approximately 350-400 calories
- Key Nutrients: Protein: 4g, Carbs: 50g, Fat: 18g
Ingredients
Here’s what you’ll need to make Red Velvet Cake in a Jar:
- For the Cake:
- 1 ½ cups all-purpose flour
- 1 cup granulated sugar
- 2 tablespoons unsweetened cocoa powder
- 1 teaspoon baking powder
- ½ teaspoon baking soda
- ¼ teaspoon salt
- 1 large egg
- ½ cup vegetable oil
- ½ cup buttermilk
- 1 teaspoon vanilla extract
- 1 tablespoon red food coloring
- 1 teaspoon white vinegar
- For the Cream Cheese Frosting:
- 8 oz cream cheese, softened
- ½ cup unsalted butter, softened
- 3 cups powdered sugar
- 1 teaspoon vanilla extract
- 2 tablespoons heavy cream
- For Garnish:
- Red sprinkles or edible glitter (optional)
Ingredient Highlights
- Red Food Coloring: Essential for achieving the signature red color of the cake. Opt for gel food coloring for a more vibrant hue.
- Buttermilk: Adds moisture to the cake and helps create its tender crumb.
- Cream Cheese: The creamy, tangy flavor of cream cheese is the perfect complement to the sweetness of the red velvet cake.
- Vanilla Extract: Enhances the overall flavor profile of the cake and frosting.
Step-by-Step Instructions
Here’s how to make Red Velvet Cake in a Jar:
Prepare the Cake:
- Preheat the Oven: Preheat your oven to 350°F (175°C). Grease and flour 2 8-inch round cake pans, or line them with parchment paper.
- Mix Dry Ingredients: In a medium-sized bowl, whisk together the flour, sugar, cocoa powder, baking powder, baking soda, and salt.
- Mix Wet Ingredients: In a large bowl, whisk together the egg, vegetable oil, buttermilk, vanilla extract, red food coloring, and vinegar until smooth.
- Combine Dry and Wet Ingredients: Slowly add the dry ingredients into the wet ingredients, mixing until well combined. Do not overmix.
- Bake the Cake: Pour the batter evenly into the prepared cake pans. Bake for 25-30 minutes or until a toothpick inserted into the center comes out clean.
- Cool the Cake: Allow the cakes to cool in the pans for 10 minutes, then transfer to a wire rack to cool completely.
Prepare the Cream Cheese Frosting:
- Beat the Cream Cheese and Butter: In a large mixing bowl, beat the softened cream cheese and butter together with an electric mixer until smooth and creamy.
- Add Powdered Sugar and Vanilla: Gradually add the powdered sugar, one cup at a time, until fully incorporated. Beat in the vanilla extract.
- Add Heavy Cream: Add the heavy cream one tablespoon at a time until the frosting reaches a smooth, spreadable consistency. If the frosting is too thick, add a little more cream.
Assemble the Red Velvet Cake in a Jar:
- Cut the Cake: Once the cake has cooled completely, use a round cookie cutter or the top of a jar to cut the cake into circles that will fit into your jars.
- Layer the Cake and Frosting: In each jar, place a layer of red velvet cake at the bottom, followed by a layer of cream cheese frosting. Repeat the layers until the jar is full, finishing with a dollop of frosting on top.
- Decorate: Garnish the top with red sprinkles, edible glitter, or any other decoration of your choice.
Chill and Serve:
- Chill the Cake in Jars: Refrigerate the assembled cakes for at least 30 minutes to allow the frosting to firm up.
- Serve: Once chilled, your Red Velvet Cake in a Jar is ready to serve! Enjoy it straight from the jar for a fun, individual dessert experience.
How to Serve Red Velvet Cake In A Jar
Red Velvet Cake in a Jar is perfect for serving in many different ways:
- At Parties: These individual jars make a charming dessert for birthdays, showers, and other celebrations.
- As Party Favors: Give your guests a jar to take home as a sweet, personalized treat.
- For Date Night: Serve with a romantic setting, perhaps paired with a nice glass of wine or a hot cup of coffee.
- At Picnics: Pack these jars up for a portable, no-fuss dessert that’s easy to transport and serve.
- For Kids: These jars are a fun, kid-friendly way to serve cake and make dessert feel even more special.
Additional Tips for Red Velvet Cake In A Jar
Here are some tips to ensure your Red Velvet Cake in a Jar is a success:
- Don’t Overmix the Cake Batter: Overmixing can lead to a dense cake. Mix until just combined for a lighter, fluffier texture.
- Use Room Temperature Ingredients: For the best texture and consistency, make sure your eggs, butter, and cream cheese are at room temperature.
- Chill the Frosting: If the frosting is too soft, refrigerate it for 10-15 minutes to firm it up before spreading it on the cake layers.
- Use Gel Food Coloring: Gel food coloring provides a deeper, more vibrant color without affecting the texture of the batter.
- Customize the Jars: You can personalize each jar with a cute ribbon or a small label to make it extra special for events like weddings or birthdays.
Recipe Variations for Red Velvet Cake In A Jar
Here are 10 variations you can try for Red Velvet Cake in a Jar:
- Chocolate Red Velvet: Add extra cocoa powder for a more intense chocolate flavor.
- Nutella Frosting: Swap the cream cheese frosting for Nutella frosting for a hazelnut twist.
- Carrot Red Velvet: Add grated carrots for an added texture and flavor.
- Cream Cheese and Buttercream Frosting: Mix equal parts of buttercream and cream cheese for a smoother frosting.
- Mini Cupcakes in a Jar: Bake mini red velvet cupcakes and stack them in jars for an adorable twist.
- Strawberry Red Velvet: Add finely chopped strawberries to the cake batter for a fruity variation.
- Whipped Cream Frosting: Use whipped cream frosting instead of cream cheese frosting for a lighter topping.
- Lemon Red Velvet Cake: Add a hint of lemon zest to the cake batter for a refreshing citrusy kick.
- Oreo Red Velvet: Layer crushed Oreo cookies in between the cake layers for added crunch.
- Coconut Red Velvet: Mix shredded coconut into the frosting for a tropical flavor.
Freezing and Storage
- Freezing: You can freeze the assembled cakes in jars, but it’s best to freeze the cake layers without frosting. Simply bake and cool the cake, then store it in an airtight container. When ready to serve, add frosting and chill.
- Storage: Keep the jars in the fridge for up to 3-4 days. For the best taste, serve within 1-2 days of preparation.
Special Equipment for Red Velvet Cake In A Jar
Here are some special equipment items to make preparing your Red Velvet Cake in a Jar easier:
- Mason Jars or Dessert Jars: These are perfect for layering your cake and frosting. They also create a beautiful presentation.
- Electric Mixer: An electric mixer will help you beat the frosting to a smooth and creamy texture.
- Cookie Cutter: A round cookie cutter is helpful for cutting the cake into perfect circles that fit in the jars.
- Whisk: A whisk will help you mix dry ingredients and ensure a smooth cake batter.
- Piping Bag: If you want to pipe the frosting into the jars, a piping bag with a wide tip will make the job easier.
FAQ Section for Red Velvet Cake In A Jar
- Can I make this dessert in advance?
Yes, you can prepare the cake and frosting ahead of time and assemble the jars the day of serving. - Can I use a store-bought cake mix?
Absolutely! If you’re short on time, using a red velvet cake mix will work perfectly for this recipe. - How can I make this dessert gluten-free?
Use a gluten-free flour blend to replace the all-purpose flour in the cake batter. - Can I add other frosting flavors?
Yes, you can experiment with different frostings like chocolate buttercream or even whipped cream for a lighter dessert. - How long can I store the jars?
The jars can be stored in the fridge for up to 3-4 days. Make sure they are tightly sealed.
Red Velvet Cake In A Jar
Red Velvet Cake in a Jar is a fun and charming way to serve the classic red velvet cake in individual portions. These little jars are packed with layers of moist red velvet cake, tangy cream cheese frosting, and just the right amount of sweetness. Not only does this dessert look adorable, but it’s also easy to transport and perfect for parties, picnics, or any occasion where you want to serve something a little extra special. Whether it’s for a birthday, holiday, or simply as a sweet treat, these Red Velvet Cake Jars will steal the show!
- Prep Time: 30 minutes
- Total Time: 1 hour
- Yield: 8–10 jars 1x
- Category: desserts
Ingredients
Here’s what you’ll need to make Red Velvet Cake in a Jar:
- For the Cake:
- 1 ½ cups all-purpose flour
- 1 cup granulated sugar
- 2 tablespoons unsweetened cocoa powder
- 1 teaspoon baking powder
- ½ teaspoon baking soda
- ¼ teaspoon salt
- 1 large egg
- ½ cup vegetable oil
- ½ cup buttermilk
- 1 teaspoon vanilla extract
- 1 tablespoon red food coloring
- 1 teaspoon white vinegar
- For the Cream Cheese Frosting:
- 8 oz cream cheese, softened
- ½ cup unsalted butter, softened
- 3 cups powdered sugar
- 1 teaspoon vanilla extract
- 2 tablespoons heavy cream
- For Garnish:
- Red sprinkles or edible glitter (optional)
Instructions
Prepare the Cake:
- Preheat the Oven: Preheat your oven to 350°F (175°C). Grease and flour 2 8-inch round cake pans, or line them with parchment paper.
- Mix Dry Ingredients: In a medium-sized bowl, whisk together the flour, sugar, cocoa powder, baking powder, baking soda, and salt.
- Mix Wet Ingredients: In a large bowl, whisk together the egg, vegetable oil, buttermilk, vanilla extract, red food coloring, and vinegar until smooth.
- Combine Dry and Wet Ingredients: Slowly add the dry ingredients into the wet ingredients, mixing until well combined. Do not overmix.
- Bake the Cake: Pour the batter evenly into the prepared cake pans. Bake for 25-30 minutes or until a toothpick inserted into the center comes out clean.
- Cool the Cake: Allow the cakes to cool in the pans for 10 minutes, then transfer to a wire rack to cool completely.
Prepare the Cream Cheese Frosting:
- Beat the Cream Cheese and Butter: In a large mixing bowl, beat the softened cream cheese and butter together with an electric mixer until smooth and creamy.
- Add Powdered Sugar and Vanilla: Gradually add the powdered sugar, one cup at a time, until fully incorporated. Beat in the vanilla extract.
- Add Heavy Cream: Add the heavy cream one tablespoon at a time until the frosting reaches a smooth, spreadable consistency. If the frosting is too thick, add a little more cream.
Assemble the Red Velvet Cake in a Jar:
- Cut the Cake: Once the cake has cooled completely, use a round cookie cutter or the top of a jar to cut the cake into circles that will fit into your jars.
- Layer the Cake and Frosting: In each jar, place a layer of red velvet cake at the bottom, followed by a layer of cream cheese frosting. Repeat the layers until the jar is full, finishing with a dollop of frosting on top.
- Decorate: Garnish the top with red sprinkles, edible glitter, or any other decoration of your choice.
Chill and Serve:
- Chill the Cake in Jars: Refrigerate the assembled cakes for at least 30 minutes to allow the frosting to firm up.
- Serve: Once chilled, your Red Velvet Cake in a Jar is ready to serve! Enjoy it straight from the jar for a fun, individual dessert experience.
Nutrition
- Calories: 350-400 kcal
- Fat: 18g
- Carbohydrates: 50g
- Protein: 4g
Conclusion
Red Velvet Cake in a Jar is a charming and unique twist on the classic red velvet cake. Each jar is filled with moist, flavorful layers of cake and rich, creamy frosting, creating a delightful and portable dessert that’s perfect for any occasion. Whether you’re celebrating a birthday, hosting a party, or simply indulging in a personal treat, these little jars are sure to impress your guests and satisfy your sweet tooth.
Not only is this dessert visually stunning, but it’s also incredibly versatile. You can easily customize the cake by adding different fillings, toppings, or even a personal touch like sprinkles or a flavored frosting. With endless options for personalization, Red Velvet Cake in a Jar is perfect for anyone who loves a creative spin on classic desserts.
I can’t wait to see how your Red Velvet Cake in a Jar turns out! Don’t forget to snap a photo and tag me on Instagram—I love seeing your sweet creations! Feel free to leave a comment and share your own unique twists on this fun dessert. Enjoy!

