

Introduction
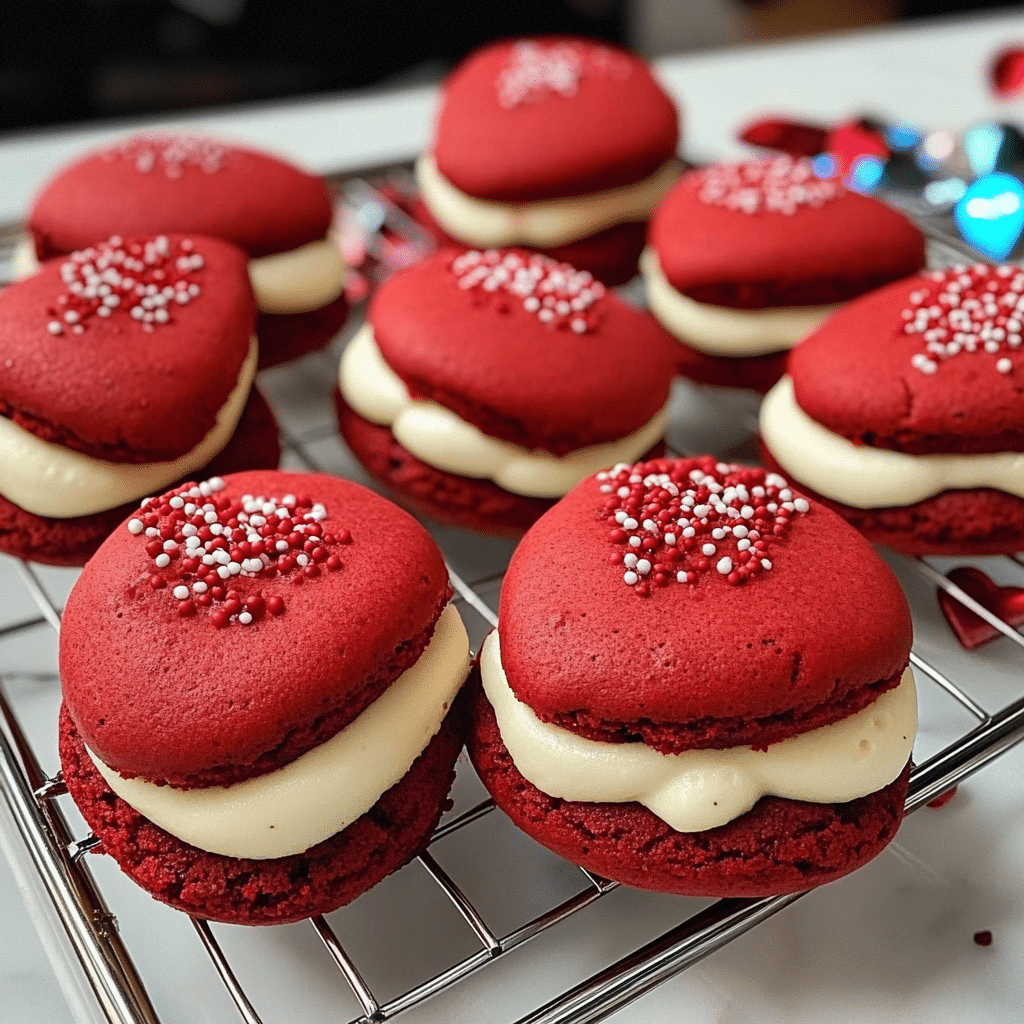
Valentine’s Red Velvet Whoopie Pies are a sweet and charming way to celebrate love and make any occasion feel extra special. These delightful treats are a twist on the classic whoopie pie, with their vibrant red hue and soft, cake-like texture that instantly brings warmth and cheer. The combination of rich red velvet flavor and creamy, velvety frosting filling creates a dessert that’s indulgent yet light, making each bite feel like a little bit of luxury. Whether gifted to a loved one or served at a celebration, these whoopie pies are sure to steal the show.
The first time I made these Valentine’s Red Velvet Whoopie Pies, I was amazed at how easily they came together and how stunning they looked. The red velvet batter baked up perfectly soft, and the creamy filling was just the right touch of sweetness. As they baked, my kitchen was filled with the irresistible scent of vanilla and cocoa, setting the perfect mood for a fun, loving treat. When I saw how the vibrant red color popped against the creamy white filling, I knew I had created something extra special.
What I love most about these whoopie pies is how they can be personalized. You can make them as big or small as you like, and you can even add little touches like sprinkles or colored sugar for a festive flair. Whether you’re treating yourself or sharing with someone special, these Valentine’s Red Velvet Whoopie Pies are guaranteed to make hearts smile and add a touch of sweetness to your celebration.
Perfect for:
Turn your leftovers into tasty chef-like dishes with Duo Cover.
Turn your leftovers into tasty chef-like dishes with Duo Cover.

- Valentine’s Day celebrations
- Special treats for loved ones
- Romantic desserts
- Dinner parties
- Bake sales or gifts
Why You’ll Love This Valentine’s Red Velvet Whoopie Pies
Here’s why you’ll fall in love with Valentine’s Red Velvet Whoopie Pies:
- Rich and Vibrant Flavor: The subtle cocoa flavor of the red velvet, paired with a hint of tangy buttermilk, creates a perfectly balanced and indulgent treat.
- Soft, Cake-Like Texture: These whoopie pies have a light, fluffy, and moist texture that melts in your mouth, providing a delightful contrast to the creamy filling.
- Perfect for Sharing: These cute, sandwich-style cookies are great for sharing with your loved ones on Valentine’s Day or any special occasion.
- Customizable: You can personalize these whoopie pies by adding festive sprinkles, coloring the filling, or shaping the pies into hearts for an extra touch of romance.
- Quick and Easy: This simple recipe requires minimal preparation and is perfect for beginner bakers or those who want a quick yet impressive dessert.
Preparation and Cooking Time
- Total Time: 1 hour 15 minutes
- Preparation Time: 30 minutes
- Baking Time: 12-15 minutes
- Cooling Time: 30 minutes
- Servings: 12 whoopie pies (24 cookies)
- Calories per serving: Approximately 350-400 calories
- Key Nutrients: Protein: 5g, Carbs: 50g, Fat: 18g
Ingredients
You’ll need the following ingredients to make your Valentine’s Red Velvet Whoopie Pies:
For the Red Velvet Cookies:
- 2 ½ cups all-purpose flour
- 1 tablespoon cocoa powder
- 1 ½ teaspoons baking powder
- ½ teaspoon baking soda
- ¼ teaspoon salt
- ½ cup unsalted butter, softened
- 1 cup granulated sugar
- 1 large egg
- 1 teaspoon vanilla extract
- 1 tablespoon red food coloring
- ½ cup buttermilk
- ½ teaspoon white vinegar
For the Cream Cheese Filling:
- 8 oz cream cheese, softened
- ½ cup unsalted butter, softened
- 2 cups powdered sugar
- 1 teaspoon vanilla extract
- Pinch of salt
Ingredient Highlights
- Red Food Coloring: Essential for achieving the vibrant red color that gives these whoopie pies their signature look.
- Buttermilk: Adds tang and moisture to the cookies, contributing to their soft and tender texture.
- Cream Cheese: Provides a rich, tangy flavor that complements the sweetness of the red velvet cookies and balances the overall taste.
- Vanilla Extract: Enhances the flavor of both the cookies and the filling, adding depth and warmth.
Step-by-Step Instructions


Follow these simple steps to make Valentine’s Red Velvet Whoopie Pies:
Prepare the Red Velvet Cookies:
- Preheat the Oven: Preheat your oven to 350°F (175°C) and line two baking sheets with parchment paper.
- Mix Dry Ingredients: In a medium bowl, whisk together the flour, cocoa powder, baking powder, baking soda, and salt. Set aside.
- Cream Butter and Sugar: In a large mixing bowl, cream together the butter and sugar using an electric mixer on medium speed until light and fluffy, about 3 minutes.
- Add the Egg and Vanilla: Add the egg and vanilla extract to the butter mixture and beat until smooth and well-combined.
- Add Food Coloring and Buttermilk: Mix in the red food coloring and buttermilk, blending well.
- Combine Wet and Dry Ingredients: Gradually add the dry ingredients to the wet mixture, mixing until just combined. Be careful not to overmix.
- Add Vinegar: Stir in the white vinegar to activate the baking soda and give the cookies their signature rise.
Shape and Bake the Cookies:
- Scoop the Dough: Use a tablespoon or cookie scoop to drop heaping spoonfuls of dough onto the prepared baking sheets. Space the dough about 2 inches apart to allow for spreading.
- Bake: Bake for 12-15 minutes, or until the cookies are set and a toothpick inserted into the center comes out clean. Rotate the pans halfway through baking for even results.
- Cool: Allow the cookies to cool on the baking sheets for 5 minutes, then transfer them to a wire rack to cool completely.
Make the Cream Cheese Filling:
- Cream the Butter and Cream Cheese: In a large bowl, beat together the softened cream cheese and butter using an electric mixer until smooth and creamy.
- Add Powdered Sugar and Vanilla: Gradually add the powdered sugar, ½ cup at a time, and continue to beat until the mixture is light and fluffy. Add the vanilla extract and a pinch of salt, then beat until fully incorporated.
Assemble the Whoopie Pies:
- Pair the Cookies: Once the cookies are completely cool, pair them up by size.
- Fill with Cream Cheese: Spread a generous amount of cream cheese filling onto the flat side of one cookie in each pair, then top with the other cookie to form a sandwich.
- Serve and Enjoy: Gently press the cookies together to spread the filling evenly, and enjoy your Valentine’s Red Velvet Whoopie Pies!

How to Serve Valentine’s Red Velvet Whoopie Pies
Valentine’s Red Velvet Whoopie Pies can be served in a variety of fun and festive ways:
- On a Dessert Platter: Arrange the whoopie pies on a beautiful dessert platter for a stunning presentation.
- In Gift Boxes: These make excellent gifts when placed in cute gift boxes or bags. Add some tissue paper for an extra touch of elegance.
- With Ice Cream: Serve the whoopie pies with a scoop of vanilla or strawberry ice cream for a delightful treat.
- With a Cup of Coffee or Tea: Pair these soft, sweet pies with a hot beverage like coffee or tea to balance their richness.
- For Special Occasions: Serve at Valentine’s Day parties, anniversaries, or romantic dinners for a sweet and thoughtful touch.
Additional Tips for Valentine’s Red Velvet Whoopie Pies
Here are some tips to ensure your Valentine’s Red Velvet Whoopie Pies turn out perfect every time:
- Don’t Overmix the Dough: Overmixing can lead to dense cookies. Mix until the ingredients are just combined for a light texture.
- Cool the Cookies Completely: Ensure the cookies are completely cool before assembling to prevent the cream cheese filling from melting.
- Customize the Filling: You can add food coloring to the filling to match the red velvet color, or even add a few chocolate chips for extra texture.
- Storage: Store the assembled whoopie pies in an airtight container at room temperature for up to 3 days, or refrigerate for longer freshness.
- Chill the Filling: If the cream cheese filling is too soft to spread, chill it in the refrigerator for 10-15 minutes to firm up.
Recipe Variations for Valentine’s Red Velvet Whoopie Pies
Here are 10 variations you can try for Valentine’s Red Velvet Whoopie Pies:
- Chocolate Red Velvet Whoopie Pies: Add a handful of mini chocolate chips to the cookie dough for extra chocolate flavor.
- Coconut Red Velvet Whoopie Pies: Add shredded coconut to the cream cheese filling for a tropical twist.
- Strawberry Filling: Swap the cream cheese filling for a strawberry buttercream or whipped cream for a fruity variation.
- Mini Whoopie Pies: Make mini-sized whoopie pies by using a smaller scoop of dough and adjusting the baking time.
- Nutty Red Velvet Whoopie Pies: Add chopped pecans or walnuts to the cookie dough for added crunch and flavor.
- Caramel Drizzle: Drizzle caramel sauce over the cream cheese filling for a rich, sweet addition.
- Red Velvet Whoopie Pie Cake: Assemble the cookies into a large whoopie pie cake by stacking the cookies and filling in layers.
- Peppermint Red Velvet Whoopie Pies: Add peppermint extract to the cream cheese filling for a refreshing twist.
- Orange Zest Filling: Add a bit of orange zest to the cream cheese filling for a citrusy punch.
- Nutella Filling: Swap the cream cheese filling with Nutella for a chocolate-hazelnut twist.
Freezing and Storage
- Freezing the Whoopie Pies: You can freeze the unfilled cookies for up to 3 months. Just ensure they are completely cooled before wrapping them tightly in plastic wrap and storing in a freezer bag.
- Storing Leftovers: Store any leftover whoopie pies in an airtight container at room temperature for up to 3 days, or refrigerate for up to a week.
Special Equipment for Valentine’s Red Velvet Whoopie Pies
Here are some special equipment items to make preparing your Valentine’s Red Velvet Whoopie Pies easier:
- Electric Mixer: An electric mixer helps you cream the butter, sugar, and filling ingredients quickly and evenly.
- Cookie Scoop: A cookie scoop ensures you get even-sized cookies for a uniform look when assembling the whoopie pies.
- Parchment Paper: Lining your baking sheets with parchment paper prevents the cookies from sticking and makes cleanup easier.
- Cooling Rack: A cooling rack allows air to circulate around the cookies, preventing them from becoming soggy and helping them cool faster.
- Sifter: Sifting the dry ingredients will help prevent clumping and ensure a smooth cookie batter.
FAQ Section for Valentine’s Red Velvet Whoopie Pies
- Can I make these whoopie pies ahead of time?
Yes, you can make the cookies and filling ahead of time, then assemble and serve them the next day for optimal freshness. - Can I use regular food coloring instead of gel?
Yes, but gel food coloring tends to produce a brighter and more vibrant color. Regular liquid food coloring might slightly alter the texture. - Can I freeze the whoopie pies?
Yes, you can freeze the cookies (without filling) and cream cheese filling separately, then assemble when ready to serve. - What can I substitute for buttermilk?
If you don’t have buttermilk, you can use ½ cup of regular milk mixed with 1 teaspoon of lemon juice or vinegar. - Can I make these without cream cheese?
Yes, you can replace the cream cheese filling with buttercream frosting for a different flavor and texture.
Valentine’s Red Velvet Whoopie Pies

Valentine’s Red Velvet Whoopie Pies are a fun and festive twist on the classic whoopie pie, perfect for celebrating love and special occasions. With their vibrant red color, soft and cakey texture, and creamy filling, these indulgent treats make a wonderful gift for loved ones or a delightful addition to any Valentine’s Day celebration. The combination of rich red velvet flavor, paired with a creamy frosting filling, creates a truly irresistible dessert that will have everyone asking for seconds.
- Prep Time: 30 minutes
- Cook Time: 30 minutes
- Total Time: 1 hour 15 minutes
- Yield: 12 whoopie pies 1x
- Category: baking
Ingredients
For the Red Velvet Cookies:
- 2 ½ cups all-purpose flour
- 1 tablespoon cocoa powder
- 1 ½ teaspoons baking powder
- ½ teaspoon baking soda
- ¼ teaspoon salt
- ½ cup unsalted butter, softened
- 1 cup granulated sugar
- 1 large egg
- 1 teaspoon vanilla extract
- 1 tablespoon red food coloring
- ½ cup buttermilk
- ½ teaspoon white vinegar
For the Cream Cheese Filling:
- 8 oz cream cheese, softened
- ½ cup unsalted butter, softened
- 2 cups powdered sugar
- 1 teaspoon vanilla extract
- Pinch of salt
Instructions
Prepare the Red Velvet Cookies:
- Preheat the Oven: Preheat your oven to 350°F (175°C) and line two baking sheets with parchment paper.
- Mix Dry Ingredients: In a medium bowl, whisk together the flour, cocoa powder, baking powder, baking soda, and salt. Set aside.
- Cream Butter and Sugar: In a large mixing bowl, cream together the butter and sugar using an electric mixer on medium speed until light and fluffy, about 3 minutes.
- Add the Egg and Vanilla: Add the egg and vanilla extract to the butter mixture and beat until smooth and well-combined.
- Add Food Coloring and Buttermilk: Mix in the red food coloring and buttermilk, blending well.
- Combine Wet and Dry Ingredients: Gradually add the dry ingredients to the wet mixture, mixing until just combined. Be careful not to overmix.
- Add Vinegar: Stir in the white vinegar to activate the baking soda and give the cookies their signature rise.
Shape and Bake the Cookies:
- Scoop the Dough: Use a tablespoon or cookie scoop to drop heaping spoonfuls of dough onto the prepared baking sheets. Space the dough about 2 inches apart to allow for spreading.
- Bake: Bake for 12-15 minutes, or until the cookies are set and a toothpick inserted into the center comes out clean. Rotate the pans halfway through baking for even results.
- Cool: Allow the cookies to cool on the baking sheets for 5 minutes, then transfer them to a wire rack to cool completely.
Make the Cream Cheese Filling:
- Cream the Butter and Cream Cheese: In a large bowl, beat together the softened cream cheese and butter using an electric mixer until smooth and creamy.
- Add Powdered Sugar and Vanilla: Gradually add the powdered sugar, ½ cup at a time, and continue to beat until the mixture is light and fluffy. Add the vanilla extract and a pinch of salt, then beat until fully incorporated.
Assemble the Whoopie Pies:
- Pair the Cookies: Once the cookies are completely cool, pair them up by size.
- Fill with Cream Cheese: Spread a generous amount of cream cheese filling onto the flat side of one cookie in each pair, then top with the other cookie to form a sandwich.
- Serve and Enjoy: Gently press the cookies together to spread the filling evenly, and enjoy your Valentine’s Red Velvet Whoopie Pies!
Nutrition
- Serving Size: 24 cookies
- Calories: 350-400 kcal
- Fat: 18g
- Carbohydrates: 50g
- Protein: 5g
Conclusion
Valentine’s Red Velvet Whoopie Pies are a charming and delicious way to celebrate love. With their soft, cake-like texture and rich red velvet flavor, these treats are perfect for any occasion, but they really shine on Valentine’s Day. The creamy, tangy cream cheese filling sandwiched between two tender red velvet cakes makes each bite a little piece of heaven.
Whether you’re baking them for a special someone or sharing them with friends and family, these whoopie pies are sure to impress. Their festive color and decadent flavor make them a perfect gift or a sweet treat to enjoy together. Plus, they’re easy to make and customizable—so get creative with your decorations and make them truly unique!
I can’t wait to see your beautiful Valentine’s Red Velvet Whoopie Pies! Don’t forget to snap a photo and tag me on Instagram—I love seeing your delicious creations. Share your love and spread some sweetness this Valentine’s Day!


