

Introduction
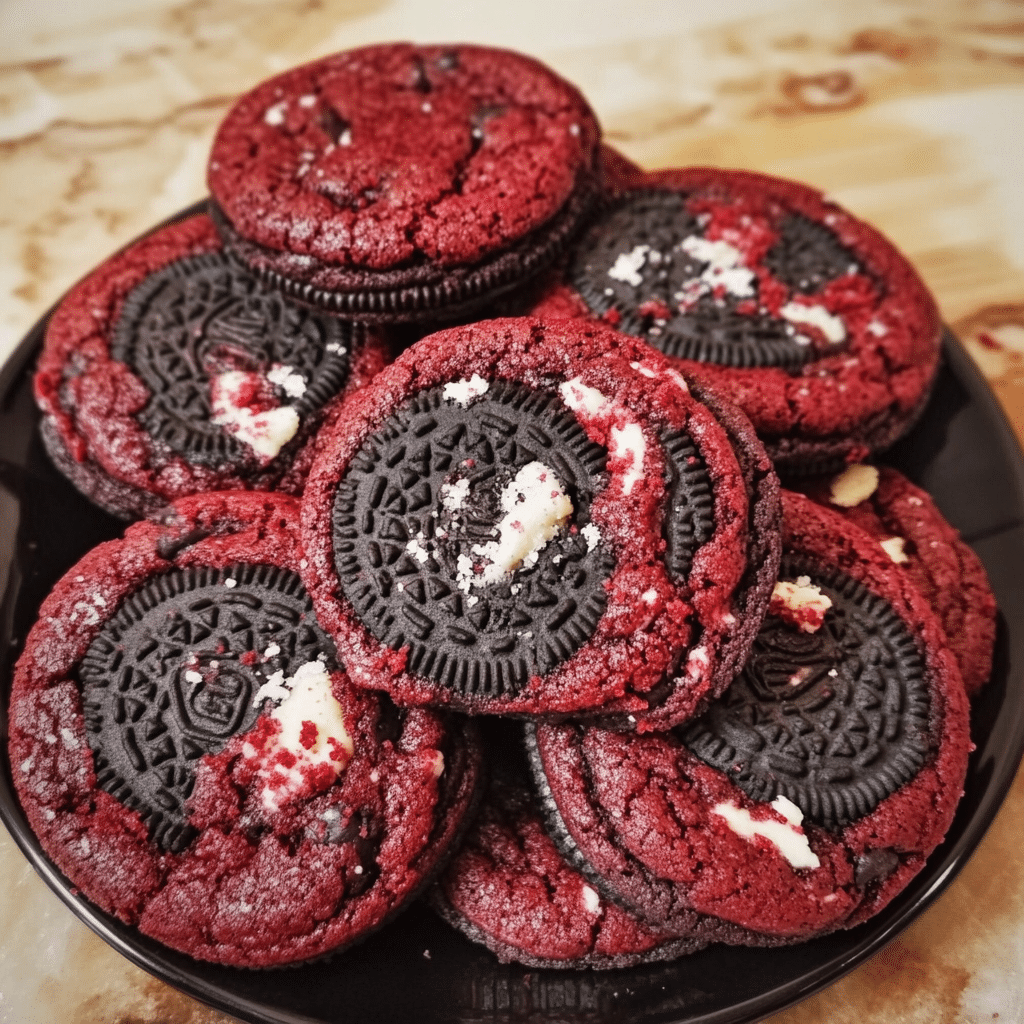
Crushed Oreo Red Velvet Cookies are a delightful twist on two classic treats, combining the rich, velvety flavor of red velvet cake with the nostalgic crunch of Oreo cookies. These cookies have a striking, vibrant color that immediately catches the eye, and their soft, chewy texture makes each bite a comforting indulgence. The sweet, tangy notes of red velvet perfectly complement the crunch of the Oreo pieces, creating a treat that’s as fun as it is flavorful. With their unique taste and stunning look, these cookies are perfect for any occasion, from birthday parties to cozy afternoons at home.
The first time I baked Crushed Oreo Red Velvet Cookies, I was blown away by how easily they came together. The dough mixed beautifully, and as I added the crushed Oreo pieces, I couldn’t wait to taste the blend of red velvet and creamy filling. As the cookies baked, the kitchen was filled with the irresistible aroma of chocolate and vanilla, which only added to the excitement. When I pulled them out of the oven, I was thrilled to see the cookies had spread perfectly, creating soft, chewy treats with the perfect amount of crunch from the Oreos.
What I love most about these Crushed Oreo Red Velvet Cookies is their versatility. They’re great for special events like holiday gatherings or bake sales, but they’re just as wonderful for a simple dessert when you’re craving something sweet. You can even experiment by adding a little white chocolate or a sprinkle of sea salt for extra flavor. No matter how you enjoy them, these cookies are sure to be a hit and leave everyone asking for the recipe!
Perfect for:
Turn your leftovers into tasty chef-like dishes with Duo Cover.
Turn your leftovers into tasty chef-like dishes with Duo Cover.

- Holiday gatherings
- Birthday parties
- Cookie exchanges
- Sweet snack cravings
- Red velvet lovers
Why You’ll Love This Crushed Oreo Red Velvet Cookies Recipe
Here’s why Crushed Oreo Red Velvet Cookies will quickly become your new go-to cookie:
- Vibrant and Festive: The bright red color makes these cookies an eye-catching treat, perfect for holiday parties or special occasions.
- Delicious Flavor Combination: The rich, slightly tangy red velvet flavor paired with the creamy, crunchy bits of Oreo creates a uniquely delicious and satisfying taste.
- Chewy Texture: These cookies are soft and chewy on the inside, with the right balance of tenderness and slight crunch from the Oreo pieces.
- Simple to Make: You don’t need a lot of ingredients, and the process is straightforward, making these cookies easy enough for both beginners and experienced bakers.
- Great for Gifting: These cookies make a thoughtful and fun gift for friends and family during the holidays or for any special occasion.
Preparation and Cooking Time
- Total Time: 1 hour 15 minutes
- Preparation Time: 15 minutes
- Cooking Time: 10-12 minutes
- Servings: 24 cookies
- Calories per serving: Approximately 180-200 calories per cookie
- Key Nutrients: Protein: 2g, Carbs: 24g, Fat: 9g
Ingredients
Gather these ingredients to make your Crushed Oreo Red Velvet Cookies:
- 1 ¾ cups all-purpose flour
- 2 tablespoons cocoa powder
- 1 teaspoon baking soda
- ¼ teaspoon salt
- ½ cup unsalted butter, softened
- 1 cup granulated sugar
- 1 large egg
- 1 teaspoon vanilla extract
- 2 tablespoons red food coloring
- 1 cup crushed Oreo cookies (about 10-12 Oreos)
- ½ cup white chocolate chips (optional)
Ingredient Highlights
- Red Food Coloring: Gives these cookies their signature vibrant red color, making them stand out as a fun, festive treat.
- Oreo Cookies: The crushed Oreos add crunch and sweetness, giving these cookies a satisfying texture and flavor contrast.
- Cocoa Powder: Enhances the chocolate flavor of the red velvet base, creating a deeper, richer taste.
- White Chocolate Chips: Optional but recommended for an extra creamy and sweet addition to the cookie dough.
Step-by-Step Instructions


Here’s how to make Crushed Oreo Red Velvet Cookies:
Prepare the Dry Ingredients:
- Mix Dry Ingredients: In a medium bowl, whisk together the all-purpose flour, cocoa powder, baking soda, and salt. Set aside.
Cream the Butter and Sugar:
- Cream the Butter and Sugar: In a large mixing bowl, cream together the softened butter and granulated sugar using an electric mixer on medium speed until light and fluffy (about 2-3 minutes).
- Add the Egg and Vanilla: Add the egg and vanilla extract, mixing until combined.
- Add the Red Food Coloring: Stir in the red food coloring until the dough reaches the desired hue of red.
Combine the Wet and Dry Ingredients:
- Add Dry Ingredients to Wet Ingredients: Gradually add the dry ingredients to the wet ingredients, mixing until the dough is just combined.
- Fold in the Oreos and White Chocolate Chips: Gently fold in the crushed Oreo cookies and white chocolate chips (if using) using a spatula, ensuring they’re evenly distributed throughout the dough.
Shape and Bake the Cookies:
- Preheat the Oven: Preheat your oven to 350°F (175°C) and line a baking sheet with parchment paper.
- Form the Cookie Dough: Scoop out tablespoon-sized portions of dough and roll them into balls. Place them on the prepared baking sheet, spacing them about 2 inches apart.
- Flatten the Dough: Gently flatten each cookie dough ball with your hand or the back of a spoon to help them spread evenly while baking.
- Bake: Bake in the preheated oven for 10-12 minutes, or until the edges are set and the centers are slightly soft.
- Cool: Allow the cookies to cool on the baking sheet for 5 minutes before transferring them to a wire rack to cool completely.

How to Serve Crushed Oreo Red Velvet Cookies
Crushed Oreo Red Velvet Cookies can be served in various ways:
- With a Glass of Milk: These cookies are perfect with a cold glass of milk, which helps balance the sweetness and adds a comforting touch.
- As a Dessert Platter: Serve them on a dessert platter alongside other cookies or cakes for a festive treat during the holidays or at a party.
- Packaged as Gifts: Individually wrap each cookie in cellophane or place them in a decorative box to give as a fun and delicious gift.
- With Ice Cream: Pair these cookies with vanilla or chocolate ice cream for a perfect dessert combination.
- On Their Own: Serve them on their own as a delightful snack to satisfy your sweet tooth any time of day.
Additional Tips for Crushed Oreo Red Velvet Cookies
Here are some tips to make your Crushed Oreo Red Velvet Cookies even better:
- Don’t Overmix the Dough: To keep your cookies soft and chewy, mix the dough just until the dry ingredients are incorporated.
- Use a Cookie Scoop: A cookie scoop ensures uniform-sized cookies, making them bake evenly.
- Chill the Dough: If you want thicker cookies, chill the dough for 30 minutes before baking to prevent excessive spreading.
- Store Properly: Store these cookies in an airtight container at room temperature for up to 1 week, or freeze them for up to 3 months.
- Customize with Add-ins: You can substitute white chocolate chips with dark or milk chocolate chips, or add sprinkles for a festive touch.
Recipe Variations for Crushed Oreo Red Velvet Cookies
Here are 10 variations for Crushed Oreo Red Velvet Cookies:
- Red Velvet Oreo Cheesecake Cookies: Add a cream cheese center to your cookies for a decadent cheesecake twist.
- Double Chocolate Red Velvet Cookies: Use semi-sweet chocolate chips along with the white chocolate chips for a richer chocolate flavor.
- Mint Oreo Red Velvet Cookies: Use mint Oreos instead of regular Oreos to add a refreshing minty flavor.
- Red Velvet Oreo Brownie Cookies: Mix in a bit of brownie batter mix to the dough for a fudgy, brownie-like texture.
- Red Velvet Oreo Cupcakes: Use the dough to create mini cupcakes, topped with a swirl of cream cheese frosting.
- Coconut Red Velvet Oreo Cookies: Add shredded coconut to the dough for a tropical twist.
- Peanut Butter Oreo Red Velvet Cookies: Include peanut butter chips or a peanut butter swirl for a savory-sweet combination.
- Caramel Red Velvet Oreo Cookies: Add caramel chunks or swirl caramel sauce into the dough for a sweet contrast.
- Red Velvet Oreo Sandwich Cookies: Spread a layer of cream cheese frosting between two cookies to create a sandwich.
- Spiced Red Velvet Oreo Cookies: Add a pinch of cinnamon or nutmeg to the dough for a spiced version of these cookies.
Freezing and Storage
- Freezing the Dough: If you want to make the cookies later, you can freeze the dough. Shape the dough into balls, place them on a baking sheet, and freeze until firm. Then, transfer the dough balls to a zip-top bag or airtight container and store them in the freezer for up to 3 months. Bake from frozen for 12-14 minutes.
- Storing Leftovers: Store baked cookies in an airtight container at room temperature for up to 1 week. For longer storage, keep them in the freezer for up to 3 months.
Special Equipment for Crushed Oreo Red Velvet Cookies
Here are some special equipment items to make preparing your Crushed Oreo Red Velvet Cookies easier:
- Electric Mixer: Use an electric mixer to cream the butter and sugar quickly and effectively.
- Cookie Scoop: A cookie scoop ensures even-sized cookies that bake uniformly.
- Baking Sheet: A sturdy baking sheet lined with parchment paper helps prevent sticking and ensures even baking.
- Wire Rack: A wire rack is essential for cooling the cookies evenly and preventing them from getting soggy.
- Measuring Cups and Spoons: Accurate measurements are key to perfect cookies, so make sure you have the right tools.
FAQ Section for Crushed Oreo Red Velvet Cookies
- Can I use a different type of cookie instead of Oreos?
Yes, you can experiment with different cookie brands or types, but Oreos provide the best crunch and flavor for this recipe. - Can I make these cookies without food coloring?
Yes, you can leave out the food coloring if you prefer a more subtle look, but the red color is a key element of these cookies’ visual appeal. - Can I add frosting to these cookies?
Absolutely! You can add a swirl of cream cheese frosting or even sandwich two cookies together with frosting in the middle. - How can I make the cookies thicker?
If you prefer thicker cookies, chill the dough before baking or use a bit less baking soda to prevent excessive spreading. - Can I use gluten-free flour for this recipe?
Yes, you can substitute gluten-free all-purpose flour for the regular flour, though the texture may vary slightly.
Crushed Oreo Red Velvet Cookies
Crushed Oreo Red Velvet Cookies are a perfect fusion of two beloved treats: the rich, smooth flavor of red velvet cake and the satisfying crunch of crushed Oreo cookies. These cookies are beautifully vibrant, soft, and bursting with flavor, making them ideal for any occasion. Whether you’re baking for a special event or just want to indulge in a sweet treat, these cookies will add a fun and flavorful twist to your cookie repertoire. With the combination of cocoa, creamy filling, and bits of Oreo, every bite is sure to leave you craving more.
- Prep Time: 15 minutes
- Cook Time: 10-12 minutes
- Total Time: 1 hour 15 minutes
- Yield: 24 cookies 1x
- Category: desserts
Ingredients
Gather these ingredients to make your Crushed Oreo Red Velvet Cookies:
- 1 ¾ cups all-purpose flour
- 2 tablespoons cocoa powder
- 1 teaspoon baking soda
- ¼ teaspoon salt
- ½ cup unsalted butter, softened
- 1 cup granulated sugar
- 1 large egg
- 1 teaspoon vanilla extract
- 2 tablespoons red food coloring
- 1 cup crushed Oreo cookies (about 10–12 Oreos)
- ½ cup white chocolate chips (optional)
Instructions
Prepare the Dry Ingredients:
- Mix Dry Ingredients: In a medium bowl, whisk together the all-purpose flour, cocoa powder, baking soda, and salt. Set aside.
Cream the Butter and Sugar:
- Cream the Butter and Sugar: In a large mixing bowl, cream together the softened butter and granulated sugar using an electric mixer on medium speed until light and fluffy (about 2-3 minutes).
- Add the Egg and Vanilla: Add the egg and vanilla extract, mixing until combined.
- Add the Red Food Coloring: Stir in the red food coloring until the dough reaches the desired hue of red.
Combine the Wet and Dry Ingredients:
- Add Dry Ingredients to Wet Ingredients: Gradually add the dry ingredients to the wet ingredients, mixing until the dough is just combined.
- Fold in the Oreos and White Chocolate Chips: Gently fold in the crushed Oreo cookies and white chocolate chips (if using) using a spatula, ensuring they’re evenly distributed throughout the dough.
Shape and Bake the Cookies:
- Preheat the Oven: Preheat your oven to 350°F (175°C) and line a baking sheet with parchment paper.
- Form the Cookie Dough: Scoop out tablespoon-sized portions of dough and roll them into balls. Place them on the prepared baking sheet, spacing them about 2 inches apart.
- Flatten the Dough: Gently flatten each cookie dough ball with your hand or the back of a spoon to help them spread evenly while baking.
- Bake: Bake in the preheated oven for 10-12 minutes, or until the edges are set and the centers are slightly soft.
- Cool: Allow the cookies to cool on the baking sheet for 5 minutes before transferring them to a wire rack to cool completely.
Nutrition
- Calories: 180-200 kcal
- Fat: 9g
- Carbohydrates: 24g
- Protein: 2g
Conclusion
Crushed Oreo Red Velvet Cookies are a delightful combination of rich flavor, vibrant color, and a fun texture that will wow anyone who tries them. Whether you’re preparing them for a festive gathering or indulging in a sweet treat at home, these cookies will bring joy with every bite. Their perfect balance of chewy, crunchy, and creamy elements makes them irresistible, and with endless variations, they’ll never get boring. So go ahead and bake a batch of these delicious cookies—they’re sure to be a hit wherever they’re served!
The blend of crumbled Oreos and red velvet cake mix gives these cookies their signature flavor, while the creamy filling adds an extra layer of indulgence. Whether served at a celebration, as a gift, or just because, these cookies are bound to impress with their unique taste and stunning color.
I can’t wait to see your cookie creations! Be sure to snap a photo and tag me on Instagram—I’d love to see how you bring this festive treat to life! Don’t forget to leave a comment and share how you made it your own. Happy baking!


