

Introduction
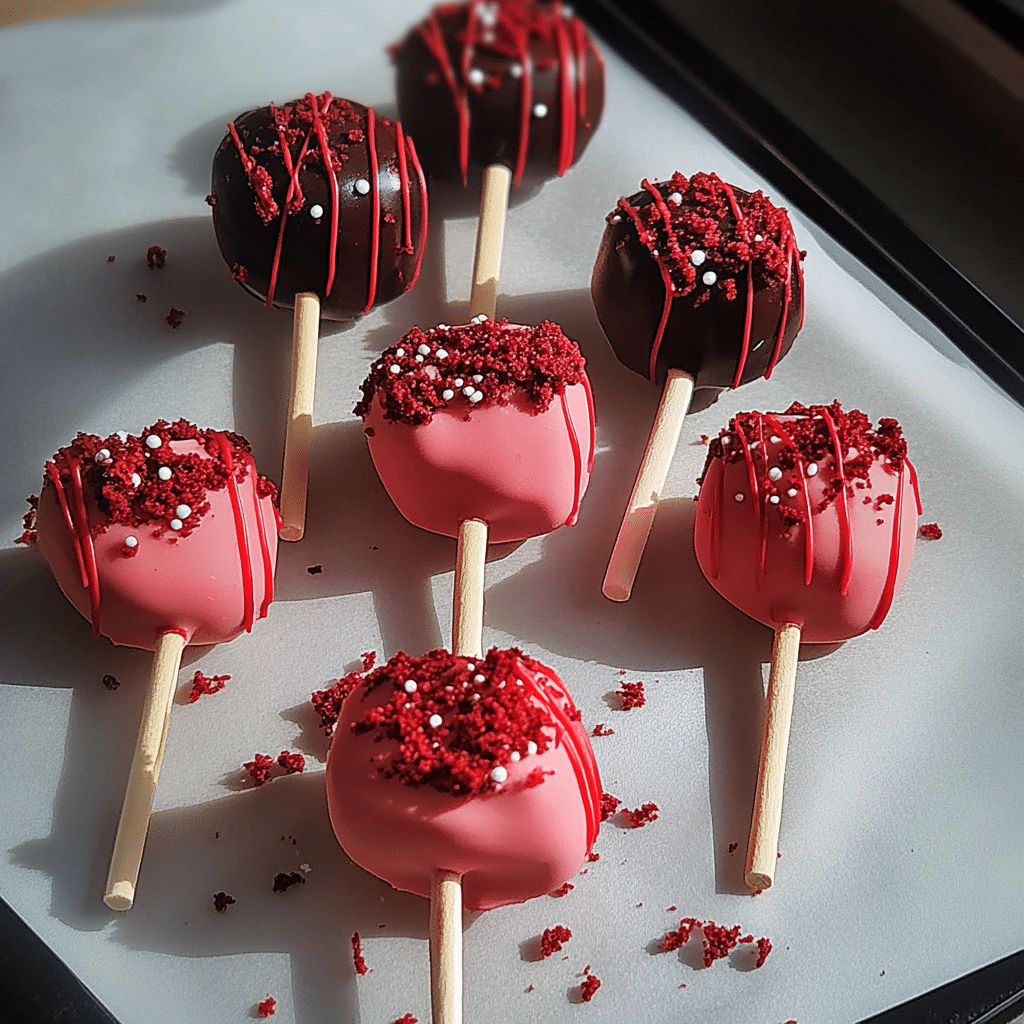
Red Velvet Cake Pops are a delightful treat that’s both visually stunning and decadently delicious. These bite-sized beauties combine the rich, velvety flavor of classic red velvet cake with a creamy, dreamy frosting filling, all covered in a smooth chocolate shell. Whether you’re looking for a unique dessert for a special occasion or a fun baking project, these cake pops are the perfect choice. Their vibrant red color and irresistible chocolate or white chocolate coating make them not just a treat for the taste buds but also a feast for the eyes.
The first time I made Red Velvet Cake Pops, I was surprised at how simple they were to put together, despite their elegant appearance. The cake itself was moist and flavorful, and the frosting added just the right amount of sweetness. Rolling the cake mixture into balls, dipping them in melted chocolate, and adding a little sparkle with sprinkles made them feel like an art project, but in the best possible way. As they set, the anticipation of taking that first bite was almost unbearable!
What I love most about Red Velvet Cake Pops is how versatile they are. They’re perfect for a birthday party, a Valentine’s Day treat, or even just a sweet snack for yourself. You can customize them with different coatings, from chocolate to vanilla or even a mix of both. Add some colorful sprinkles, or dip them in crushed nuts for extra texture. No matter how you make them, Red Velvet Cake Pops are guaranteed to bring joy to any occasion.
Perfect for:
Turn your leftovers into tasty chef-like dishes with Duo Cover.
Turn your leftovers into tasty chef-like dishes with Duo Cover.

- Valentine’s Day
- Birthday parties
- Baby showers
- Holiday gatherings
- Dessert tables
Why You’ll Love This Red Velvet Cake Pops Recipe
Here’s why Red Velvet Cake Pops will be a favorite in your kitchen:
- Perfectly Portable: These mini desserts are easy to serve and transport, making them great for parties and events.
- Rich, Velvety Flavor: The classic red velvet cake flavor combined with a creamy frosting center gives a delightful balance of chocolate and tangy sweetness.
- Kid-Friendly Fun: Decorating the cake pops can be a fun activity for kids, letting them get creative with sprinkles and toppings.
- Beautiful Presentation: Their vibrant red color with a smooth chocolate coating makes them a standout dessert for special occasions.
- Customizable: You can easily switch up the coating and decorations to match any theme or celebration.
Preparation and Cooking Time
- Total Time: 3 hours
- Preparation Time: 1 hour
- Chilling Time: 2 hours
- Servings: 24 cake pops
- Calories per serving: Approximately 150-180 calories
- Key Nutrients: Protein: 2g, Carbs: 20g, Fat: 8g
Ingredients
Gather these ingredients to make your Red Velvet Cake Pops:
For the Cake:
- 1 ½ cups all-purpose flour
- 1 cup granulated sugar
- 2 tablespoons unsweetened cocoa powder
- 1 teaspoon baking powder
- ½ teaspoon baking soda
- ½ teaspoon salt
- ½ cup unsalted butter, softened
- 2 large eggs
- ¾ cup buttermilk
- 2 teaspoons red food coloring
- 1 teaspoon vanilla extract
- 1 teaspoon white vinegar
Frosting:
- 4 oz cream cheese, softened
- ¼ cup unsalted butter, softened
- 1 ½ cups powdered sugar
- 1 teaspoon vanilla extract
Coating:
- 16 oz white or dark chocolate melting wafers
- Sprinkles for decoration (optional)
- Lollipop sticks
Ingredient Highlights
- Buttermilk: Adds a slight tang and moisture to the cake.
- Cocoa Powder: Provides a subtle chocolate flavor, essential for red velvet cake.
- Red Food Coloring: Gives the cake its signature vibrant red color.
- Cream Cheese: Creates a rich, tangy frosting that balances the sweetness of the cake.
- Melting Wafers: Ensure a smooth, glossy finish for the cake pops.
Step-by-Step Instructions


Prepare the Cake:
- Preheat the Oven: Preheat your oven to 350°F (175°C). Grease and line an 8-inch round cake pan.
- Mix Dry Ingredients: In a medium bowl, whisk together the flour, cocoa powder, baking powder, baking soda, and salt.
- Cream Butter and Sugar: In a large bowl, beat the butter and sugar together until light and fluffy.
- Add Eggs and Coloring: Add the eggs, vanilla extract, and red food coloring, mixing until fully incorporated.
- Combine Wet and Dry: Gradually alternate adding the dry ingredients and buttermilk to the butter mixture, starting and ending with dry ingredients.
- Add Vinegar: Stir in the white vinegar to enhance the cake’s tangy flavor.
- Bake the Cake: Pour the batter into the prepared cake pan and bake for 30-35 minutes or until a toothpick inserted in the center comes out clean.
- Cool Completely: Let the cake cool completely before proceeding.
Prepare the Frosting:
- Cream Butter and Cream Cheese: In a bowl, beat together the cream cheese and butter until smooth.
- Add Sugar and Vanilla: Gradually mix in the powdered sugar and vanilla extract until creamy and smooth.
Make the Cake Pops:
- Crumble the Cake: Crumble the cooled red velvet cake into fine crumbs using your hands or a fork.
- Mix with Frosting: Add the frosting to the crumbled cake and mix until the mixture holds together like dough.
- Form Cake Balls: Roll the mixture into 1-inch balls and place them on a parchment-lined baking sheet.
- Chill: Refrigerate the cake balls for at least 2 hours to firm up.
Coat the Cake Pops:
- Melt the Chocolate: Melt the chocolate wafers in a microwave-safe bowl in 30-second intervals until smooth.
- Insert Sticks: Dip the tip of each lollipop stick into the melted chocolate and insert it halfway into each cake ball.
- Dip the Cake Pops: Dip each cake pop into the melted chocolate, ensuring even coverage.
- Decorate: If desired, add sprinkles immediately after dipping while the chocolate is still wet.
- Set the Pops: Place the cake pops upright in a foam block or cake pop stand to allow the coating to harden completely.

How to Serve Red Velvet Cake Pops
Red Velvet Cake Pops can be served in various fun and creative ways:
- On a Dessert Table: Arrange them in a decorative stand for a stunning centerpiece at parties.
- Individually Wrapped: Wrap each cake pop in a clear treat bag and tie with a ribbon for party favors.
- In a Bouquet: Create a cake pop bouquet by arranging them in a vase filled with decorative beads.
- As Gifts: Perfect for holidays, birthdays, or thank-you gifts when beautifully packaged.
- With Coffee: Serve alongside a cup of coffee or hot cocoa for a cozy treat.
Additional Tips for Red Velvet Cake Pops
- Chill Time is Essential: Ensure the cake balls are well-chilled before dipping to prevent them from falling off the sticks.
- Thin the Chocolate: If the coating is too thick, add a teaspoon of coconut oil to thin it out.
- Avoid Overmixing: When combining the cake and frosting, mix just until the mixture holds together.
- Room Temperature Ingredients: Use room temperature butter and cream cheese for a smooth frosting texture.
- Decorating Ideas: Use themed sprinkles, drizzle with contrasting chocolate, or color the white chocolate with food coloring for extra flair.
Recipe Variations for Red Velvet Cake Pops
- Red Velvet Cheesecake Pops: Add a small piece of cheesecake in the center of each cake ball for a surprise filling.
- White Chocolate Red Velvet Pops: Coat the cake pops in white chocolate instead of dark for a sweeter twist.
- Heart-Shaped Cake Pops: Shape the cake balls into hearts for Valentine’s Day.
- Red Velvet Oreo Cake Pops: Mix crushed Oreos into the cake crumbs for extra crunch.
- Mini Cupcake Pops: Flatten the cake balls and mold them into mini cupcake shapes.
- Nutty Red Velvet Pops: Roll the finished cake pops in crushed pecans for added texture.
- Sprinkle Explosion: Mix rainbow sprinkles directly into the cake crumbs for a colorful surprise inside.
- Marbled Pops: Swirl white and dark chocolate together for a marbled effect.
- Vegan Version: Use dairy-free cream cheese and butter alternatives with a vegan cake mix.
- Gluten-Free Version: Swap all-purpose flour with a gluten-free blend for a celiac-friendly option.
Freezing and Storage for Red Velvet Cake Pops
- Freezing: Store uncoated cake balls in an airtight container and freeze for up to 2 months. Thaw slightly before coating.
- Refrigeration: Store finished cake pops in the fridge for up to 5 days.
- Room Temperature: Cake pops can be kept at room temperature for up to 2 days in a cool, dry place.
Special Equipment for Red Velvet Cake Pops
- Electric Hand Mixer
- 8-inch Round Cake Pan
- Cooling Rack
- Mixing Bowls
- Lollipop Sticks
- Cake Pop Stand or Foam Block
- Parchment Paper
- Microwave-Safe Bowl
- Sifter
FAQ Section for Red Velvet Cake Pops
- Can I use boxed cake mix?
Yes, a red velvet boxed cake mix works well for convenience. - What can I use instead of cream cheese frosting?
Buttercream frosting or marshmallow fluff can be substituted. - How do I prevent cake pops from cracking?
Ensure the cake balls are fully chilled before dipping and avoid extreme temperature changes. - Can I make these ahead of time?
Yes, you can prepare them up to 3 days in advance. - Can I make them without sticks?
Yes, you can serve them as cake truffles instead.
Red Velvet Cake Pops

Red Velvet Cake Pops are the ultimate bite-sized treat, combining the rich, velvety flavor of classic red velvet cake with a creamy frosting filling, all coated in a smooth chocolate shell. These charming cake pops are perfect for holidays, birthday parties, Valentine’s Day, or just a fun baking project. The vibrant red color paired with a decadent chocolate or white chocolate coating makes them visually stunning and deliciously irresistible.
- Prep Time: 1 hour
- Total Time: 3 hours
- Yield: 24 cake pops 1x
- Category: desserts
Ingredients
For the Cake:
- 1 ½ cups all-purpose flour
- 1 cup granulated sugar
- 2 tablespoons unsweetened cocoa powder
- 1 teaspoon baking powder
- ½ teaspoon baking soda
- ½ teaspoon salt
- ½ cup unsalted butter, softened
- 2 large eggs
- ¾ cup buttermilk
- 2 teaspoons red food coloring
- 1 teaspoon vanilla extract
- 1 teaspoon white vinegar
For the Frosting:
- 4 oz cream cheese, softened
- ¼ cup unsalted butter, softened
- 1 ½ cups powdered sugar
- 1 teaspoon vanilla extract
For the Coating:
- 16 oz white or dark chocolate melting wafers
- Sprinkles for decoration (optional)
- Lollipop sticks
Instructions
Prepare the Cake:
- Preheat the Oven: Preheat your oven to 350°F (175°C). Grease and line an 8-inch round cake pan.
- Mix Dry Ingredients: In a medium bowl, whisk together the flour, cocoa powder, baking powder, baking soda, and salt.
- Cream Butter and Sugar: In a large bowl, beat the butter and sugar together until light and fluffy.
- Add Eggs and Coloring: Add the eggs, vanilla extract, and red food coloring, mixing until fully incorporated.
- Combine Wet and Dry: Gradually alternate adding the dry ingredients and buttermilk to the butter mixture, starting and ending with dry ingredients.
- Add Vinegar: Stir in the white vinegar to enhance the cake’s tangy flavor.
- Bake the Cake: Pour the batter into the prepared cake pan and bake for 30-35 minutes or until a toothpick inserted in the center comes out clean.
- Cool Completely: Let the cake cool completely before proceeding.
Prepare the Frosting:
- Cream Butter and Cream Cheese: In a bowl, beat together the cream cheese and butter until smooth.
- Add Sugar and Vanilla: Gradually mix in the powdered sugar and vanilla extract until creamy and smooth.
Make the Cake Pops:
- Crumble the Cake: Crumble the cooled red velvet cake into fine crumbs using your hands or a fork.
- Mix with Frosting: Add the frosting to the crumbled cake and mix until the mixture holds together like dough.
- Form Cake Balls: Roll the mixture into 1-inch balls and place them on a parchment-lined baking sheet.
- Chill: Refrigerate the cake balls for at least 2 hours to firm up.
Coat the Cake Pops:
- Melt the Chocolate: Melt the chocolate wafers in a microwave-safe bowl in 30-second intervals until smooth.
- Insert Sticks: Dip the tip of each lollipop stick into the melted chocolate and insert it halfway into each cake ball.
- Dip the Cake Pops: Dip each cake pop into the melted chocolate, ensuring even coverage.
- Decorate: If desired, add sprinkles immediately after dipping while the chocolate is still wet.
- Set the Pops: Place the cake pops upright in a foam block or cake pop stand to allow the coating to harden completely.
Nutrition
- Calories: 150-180 kcal
- Fat: 8g
- Carbohydrates: 20g
- Protein: 2g
Conclusion
Red Velvet Cake Pops are the perfect blend of elegance and fun, making any occasion extra special. Their rich, velvety cake center paired with a smooth chocolate shell offers a bite-sized indulgence that’s impossible to resist. With endless decorating possibilities and the ease of serving, these cake pops are sure to be a hit every time! Whether you’re celebrating Valentine’s Day, a birthday, or simply treating yourself to something sweet, these cake pops bring both beauty and flavor in a single, irresistible bite.
Easy to make yet visually stunning, these Red Velvet Cake Pops are ideal for any gathering. The cake’s rich red color and creamy texture come together perfectly, while the chocolate coating adds a satisfying crunch. Decorate them with sprinkles, glitter, or your favorite toppings for a personalized touch that matches your event’s theme.
I can’t wait to see your Red Velvet Cake Pop creations! Be sure to snap a photo and tag me on Instagram—I’d love to see how you bring these fun treats to life! Don’t forget to leave a comment and share how you made it your own. Happy baking!


